App Provisioning
Introduction
App provisioning provides several critical functionalities for usage of the Corva platform. Amongst these, provisioning gives clients the ability to restrict access to apps within their organization, as well as the ability to promote and sell their applications within the Corva app store.
What is Provisioning?
Provisioning provides three main functionalities within the Corva platform
- App provisioning: give any client the ability to manage internal subscriptions to apps. The client has the ability to allow or restrict access to applications at a company, program, or rig/frac fleet level.
- App purchases: give clients the ability to offer their application in the app store, as well as purchase applications from other clients. To offer any application within the app store, it must be approved through the provisioning app review process which will be described below.
- App dependencies: allow clients to have back-end applications added automatically to newly created streams.
Where is Provisioning Located?
App provisioning can be found at the top of Dev Center as its own tab, as may be seen in the image below.
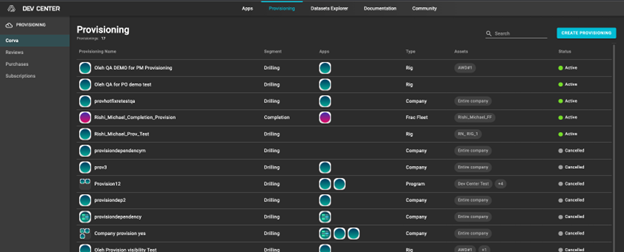
This however is not a default option to all users and it must be requested. In order to request access to the Provisioning tab, please follow the steps on the next section.
Who Can Use Provisioning?
Provisioning is Available to all Corva users upon request. If you do not see the ‘Provisioning’ tab in Dev Center that means that you do not have corresponding access permission.
Request Permission to “Provisioning” Flow
Only Company Admin has access to manage permissions. For a Company Admin the following steps must be followed:
- Open your User Profile page
- Click “Manage Permissions” button [Must have Permissions management access]
- Open “Dev Center” tab
- Click “Add Permission” button
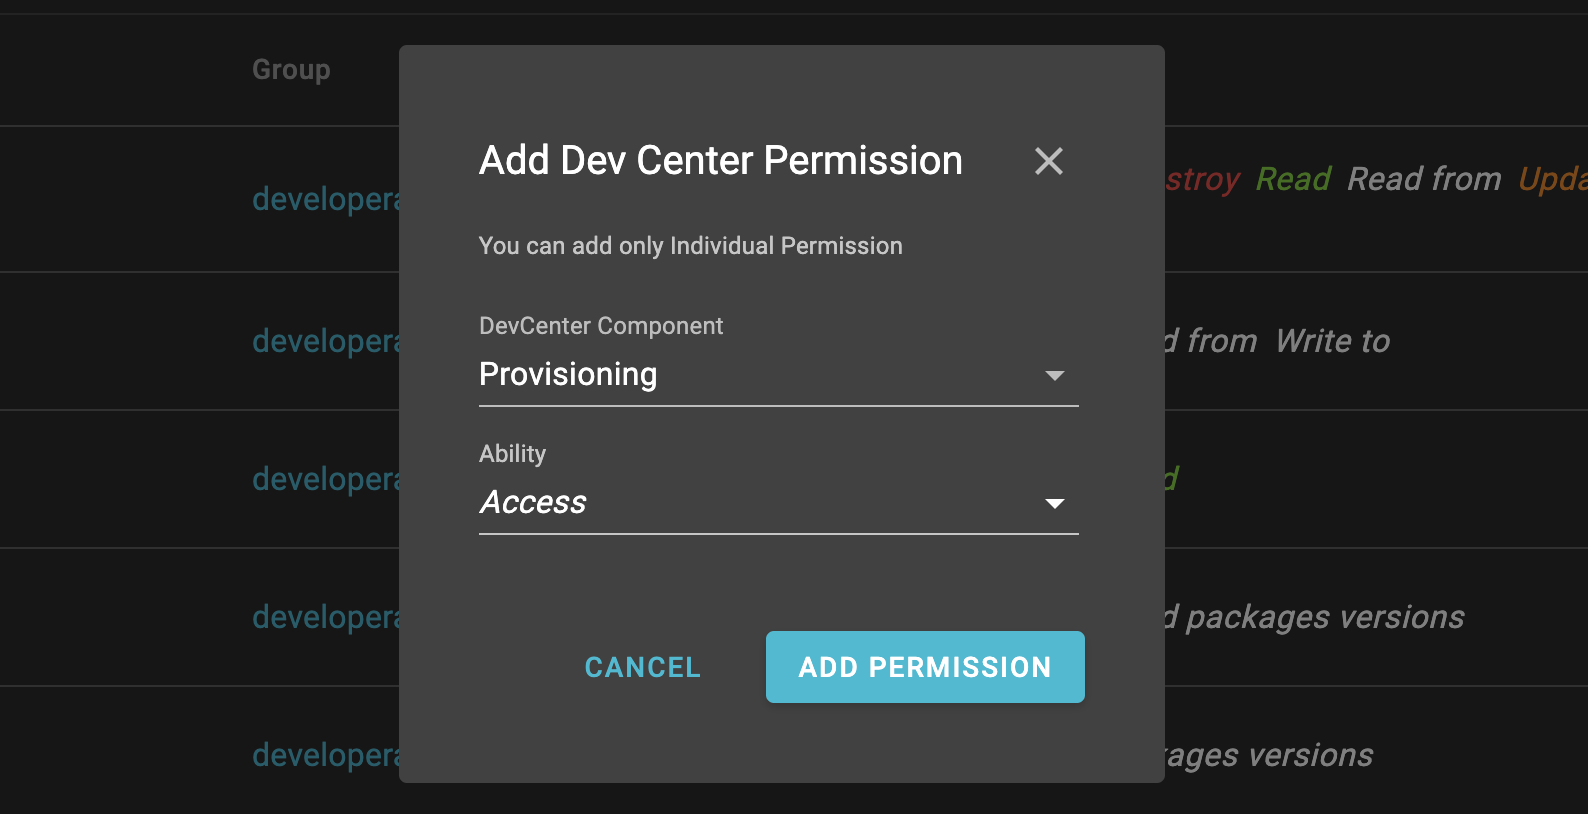
- Choose ‘Dev Center Component’ = ‘Provisioning’ & ‘Ability’ = ‘Access’
- Click “Add Permission” button on modal
How do I use Provisioning?
This section will describe how to use the main three functions of App provisioning.
In this section we describe how you may create internal permissions to applications through the provisioning process. To start the provisioning process you need to have access to “Provisioning” tab in the Dev Center.
NOTE : App Provisioning works on newly created wells and rerun wells only if the apps have been provisioned in the App Provisioning tool before the new well is created or a rerun occurs. If the app is not provisioned before a new well is created or a rerun occurs, then you will need to add the backend app manually to the asset's stream.
NOTE : When creating Program or rig level App Provisioning, they are exclusive. If a provisioning is created for a program and then another for a rig under that program, the rig will be removed from the program provisioning. The only provisioning that is inclusive is a company level provisioning.
Creating App Provisioning
- Go to the provisioning tab in Dev Center (step 1 in image)
- Open Provisioning section (it has the same name as your company) in the provisioning tab (step 2 in image)
- Click the “Create Provisioning” button (step 3 in image)

Input provision name, choose a segment, choose assets and add those apps that should be available in the App Store. Notice, only those assets that you added to the provision will be available while adding App to dashboard.
Save changes
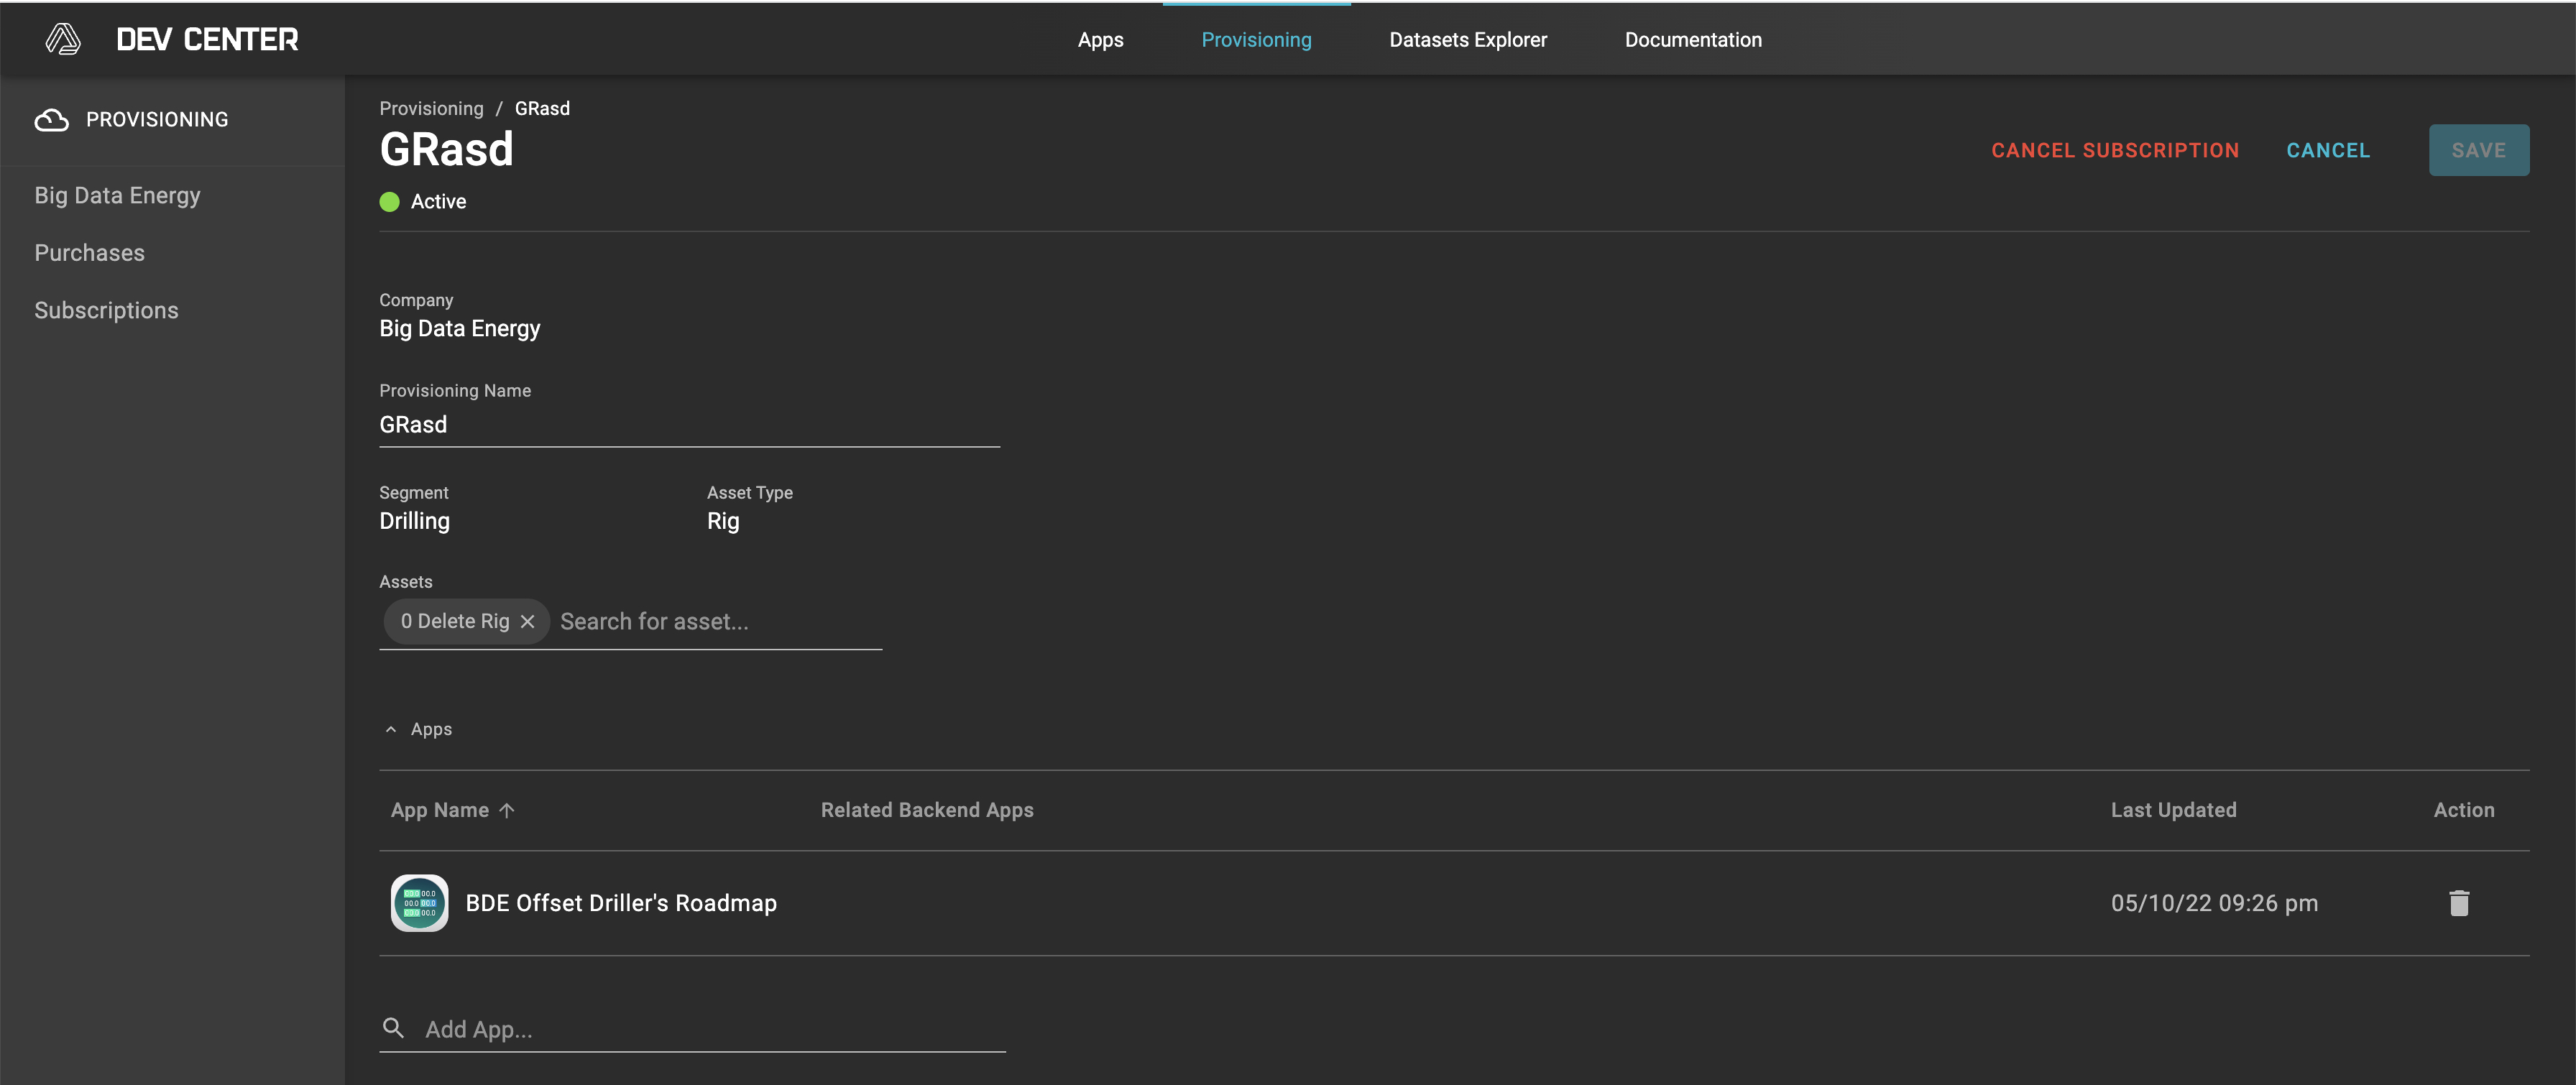
After these steps, all apps that were added to the provision will be available in the App Store for other users of the same company. When a user adds an App, the user is able to choose only those assets that were set in provision.
Provisioning Use Cases
The following set of use cases provide examples of how provisioning can be used to segment application accessibility by company, program, and rig. These examples reflect the updated Subscriptions 2.0 hierarchy.
Pre-conditions
Assets:
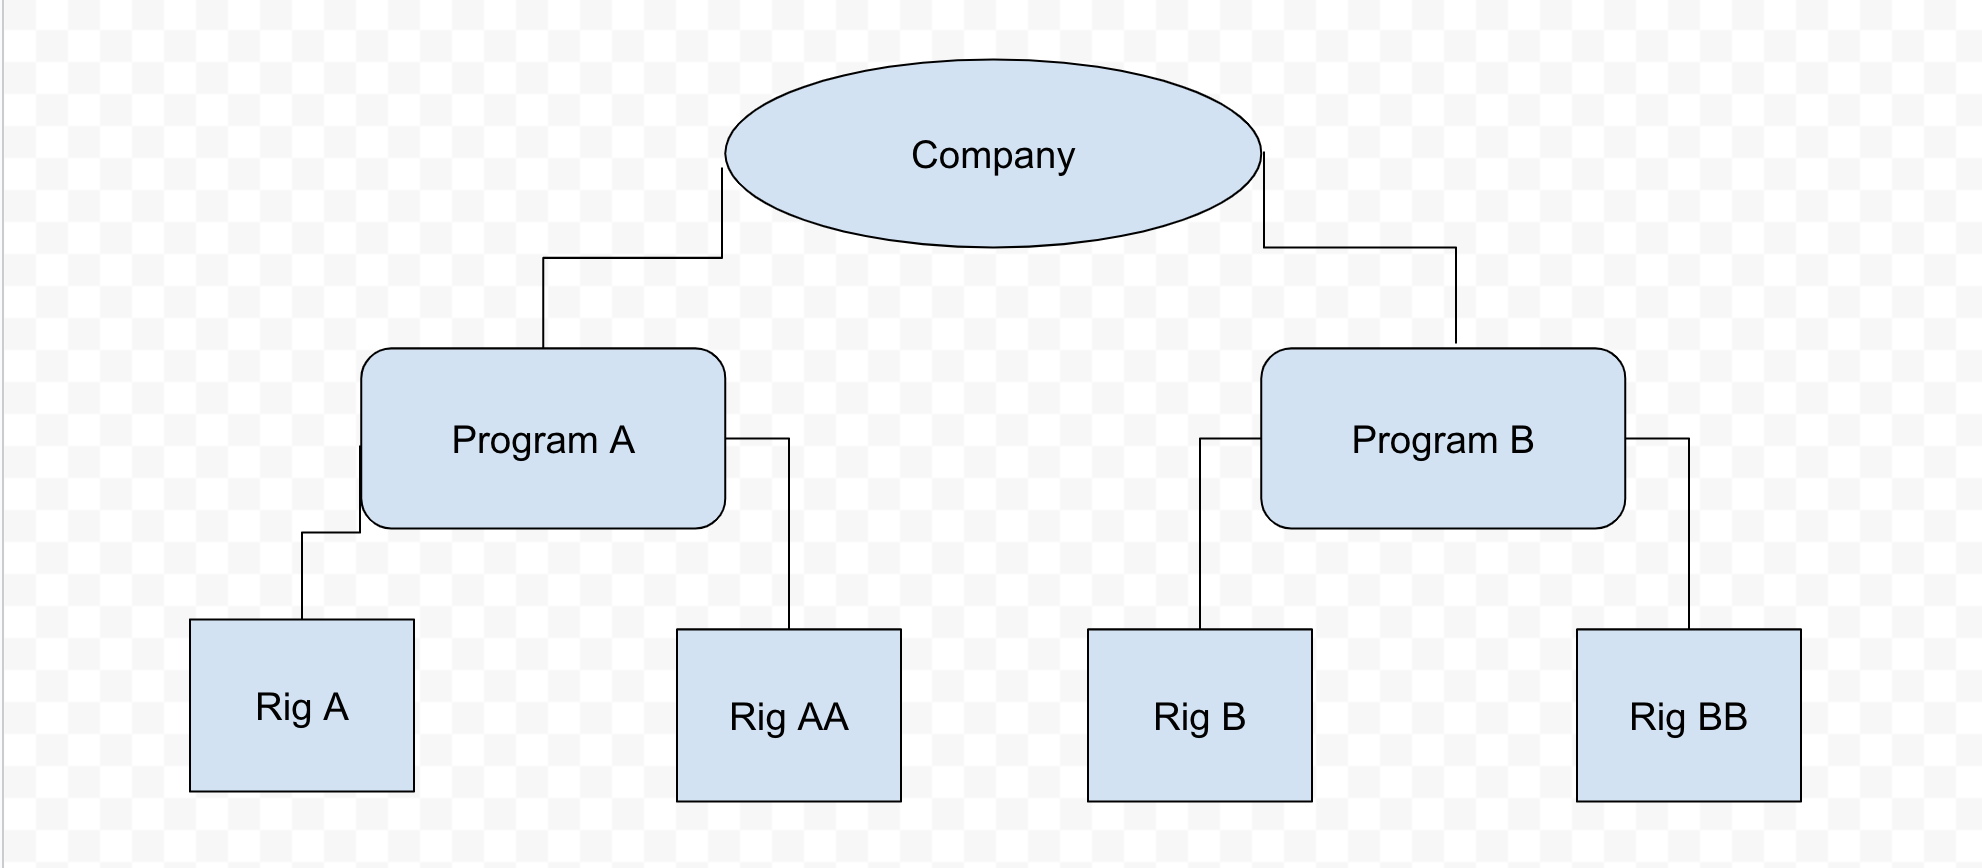
- 1 company
- 2 programs/BU: Program A, Program B
- 4 rigs: Rig A and Rig AA belong to Program A; Rig B and Rig BB belong to Program B
Apps:
- 3 FE apps: FE App X, FE App Y, FE App Z
- 3 BE apps: BE App XX, BE App YY, BE App ZZ → BE App XX is added as a dependency of FE App X; BE App YY is added as a dependency of FE App Y; BE App ZZ is added as a dependency of FE App Z
Comment
All use cases are provided for segment = drilling, log_type = time.
Additional materials (charts)
https://docs.google.com/drawings/d/1g7VsPx7O8UM68D_lUv6j3scjeP4sal5AiT5rUjf2C4s/edit
Use Case #1
Problem: The company wants FE App X and FE App Y to have access to all company rigs.
Solution:
- Create one company-level subscription that includes both FE apps [FE App X, FE App Y]
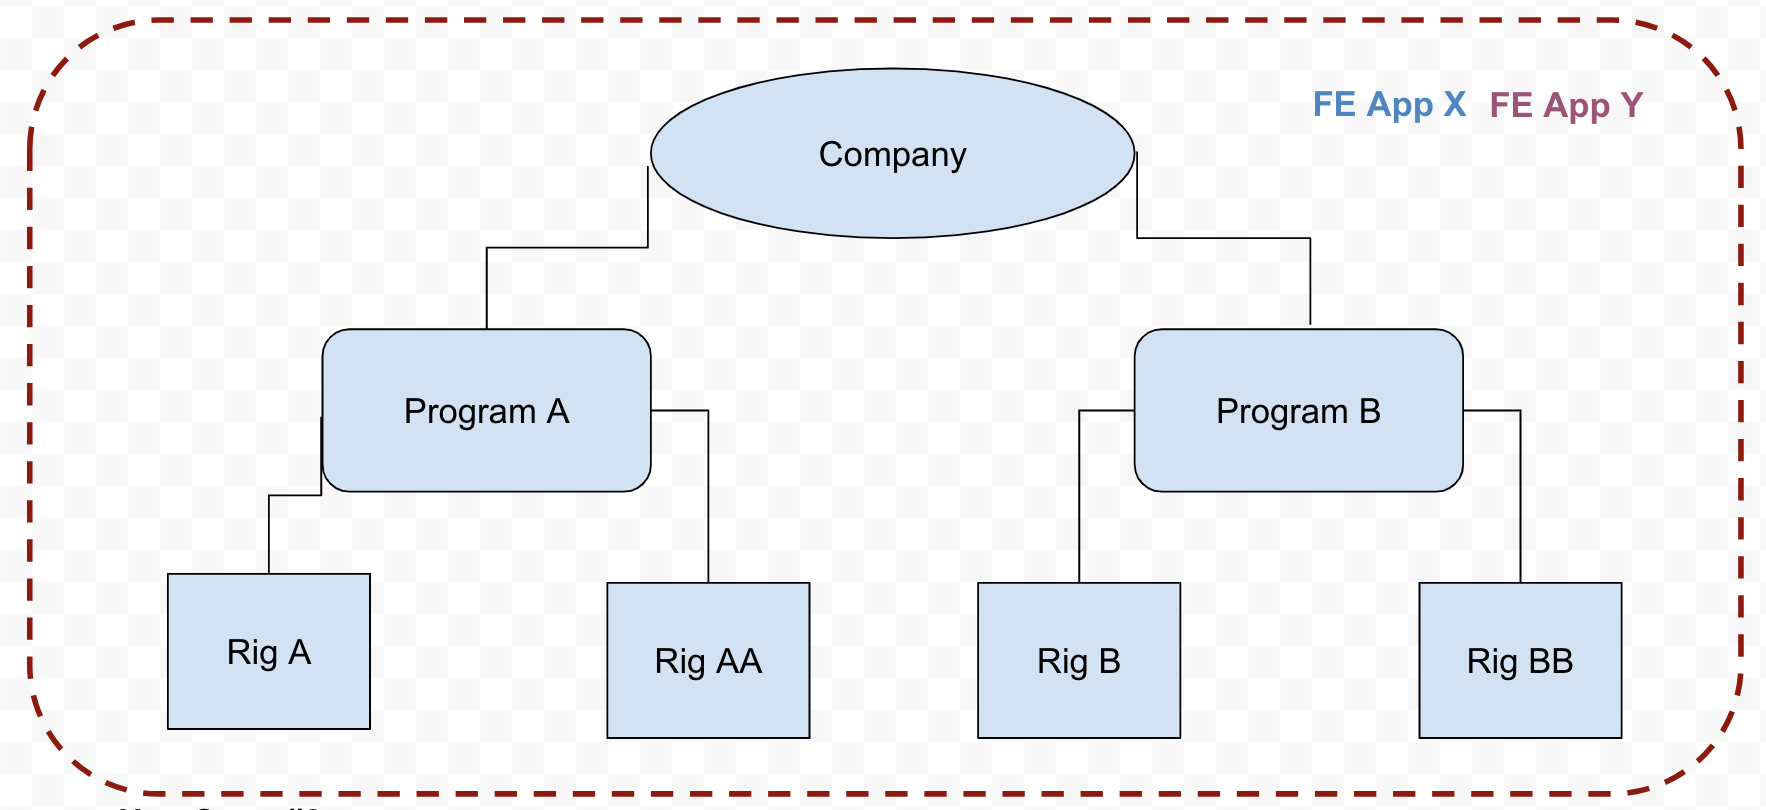
Subscription details:
- Segment = Drilling
- Asset Type = Company
- Apps = [FE App X, FE App Y]
Result:
- All company rigs will be available in the asset selector for both FE App X and FE App Y.
- BE App XX and BE App YY will be added to all existing drilling time streams with
well status ≠ completeand to every newly created drilling time stream.
Use Case #2
Problem: The company wants:
- FE App X has access to all company assets
- FE App Y has access to Rig A only
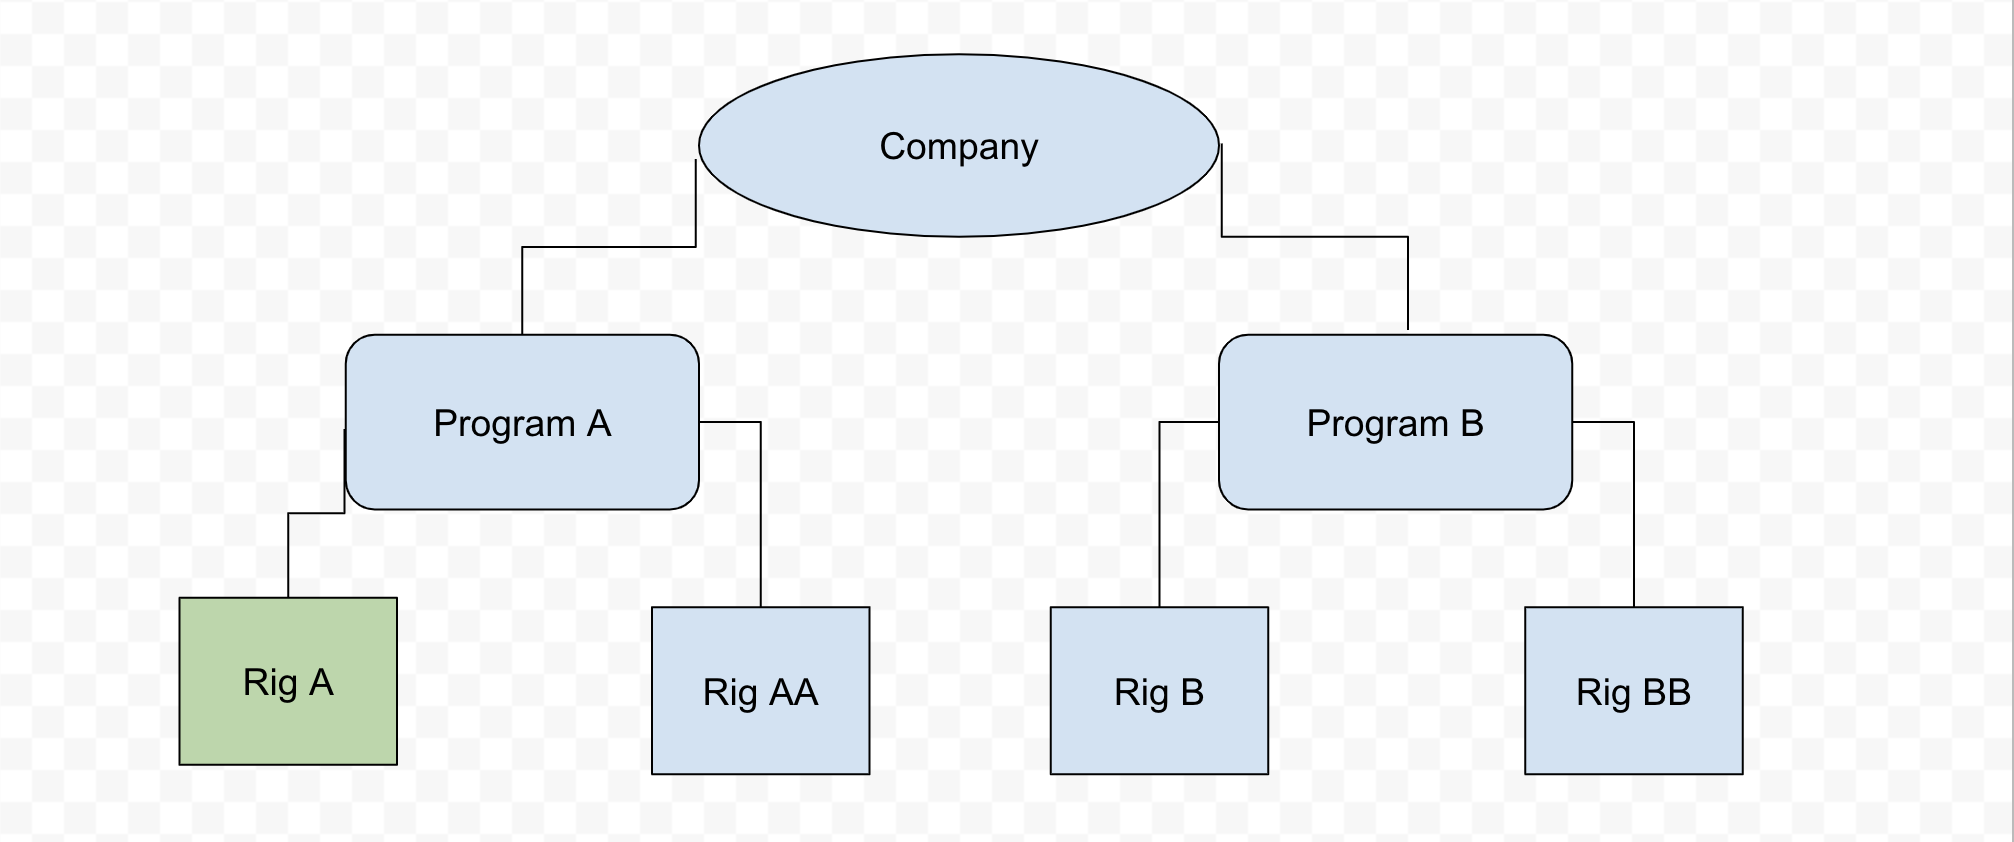
Solution:
- Create one company-level subscription for FE App X
- Create one rig-level subscription for FE App Y
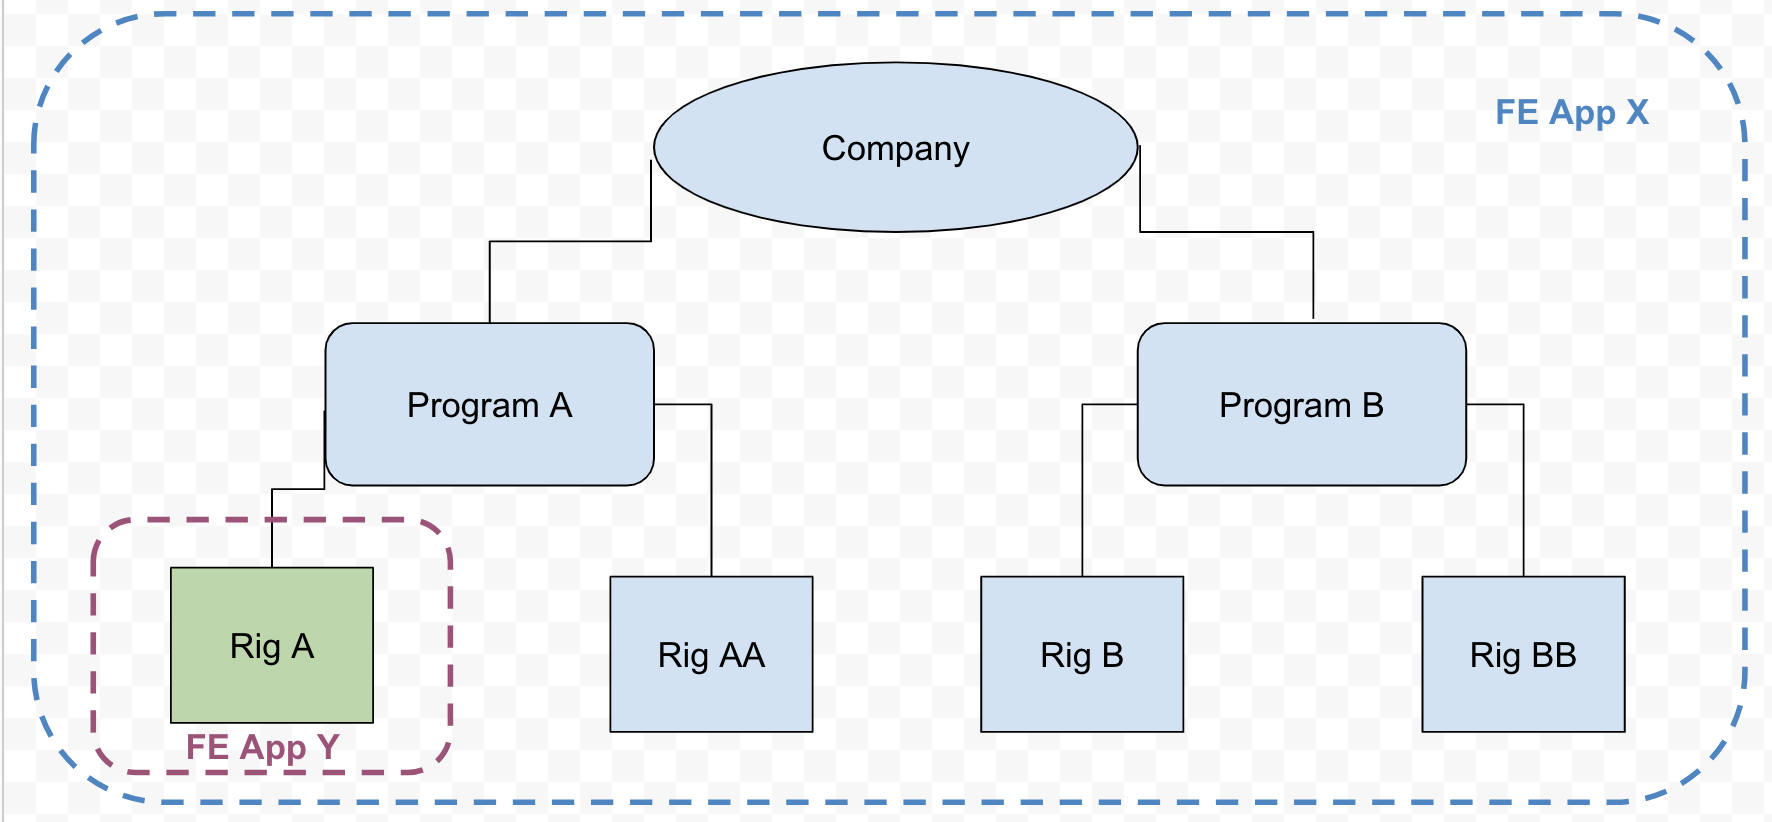
Subscription details: Subscription #1
- Segment = Drilling
- Asset Type = Company
- Apps = [FE App X]
Subscription #2
- Segment = Drilling
- Asset Type = Rig
- Assets = Rig A
- Apps = [FE App Y]
Result:
- All company rigs will be available in the asset selector for FE App X only.
- For FE App Y, only Rig A will be available in the asset selector.
- BE App XX will be added to all existing company drilling time streams with
well status ≠ completeand to every newly created drilling time stream. - BE App YY will be added to all existing drilling time streams with
well status ≠ completeand to every newly created drilling time stream related to Rig A only.
Use Case #3
Problem: The company wants:
- FE App X has access to all company assets
- FE App Y has access to all rigs from Program A
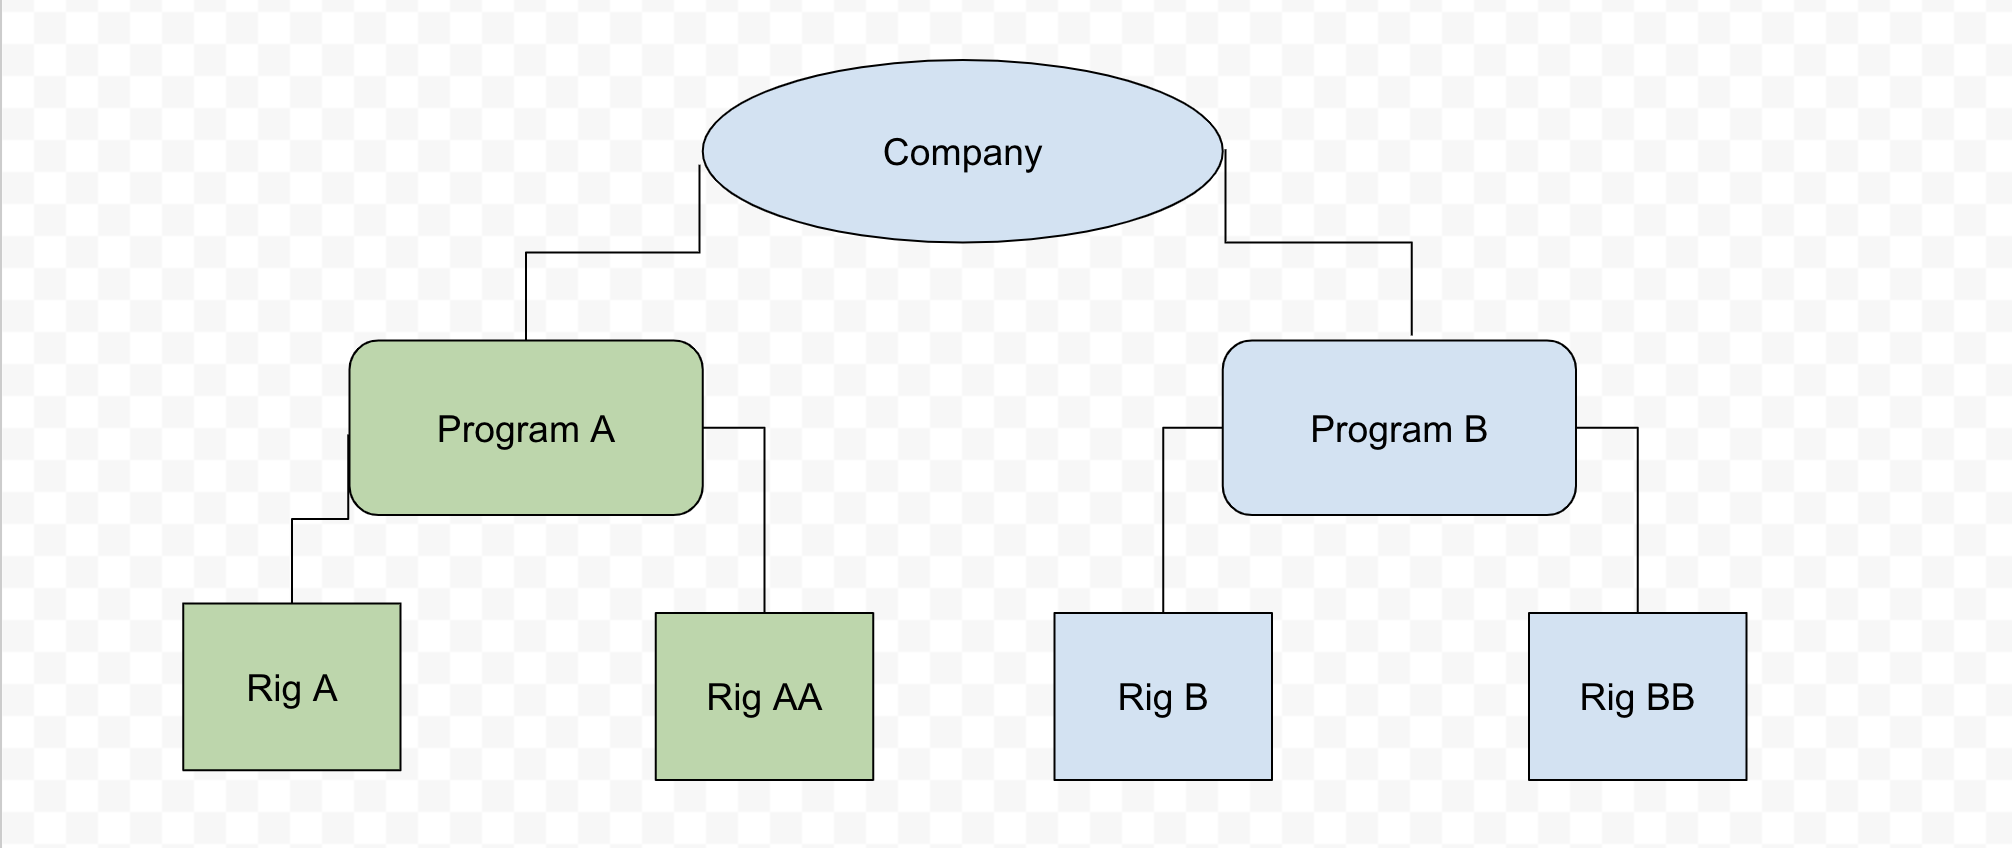
Solution:
- Create one company-level subscription for FE App X
- Create one program-level subscription for FE App Y
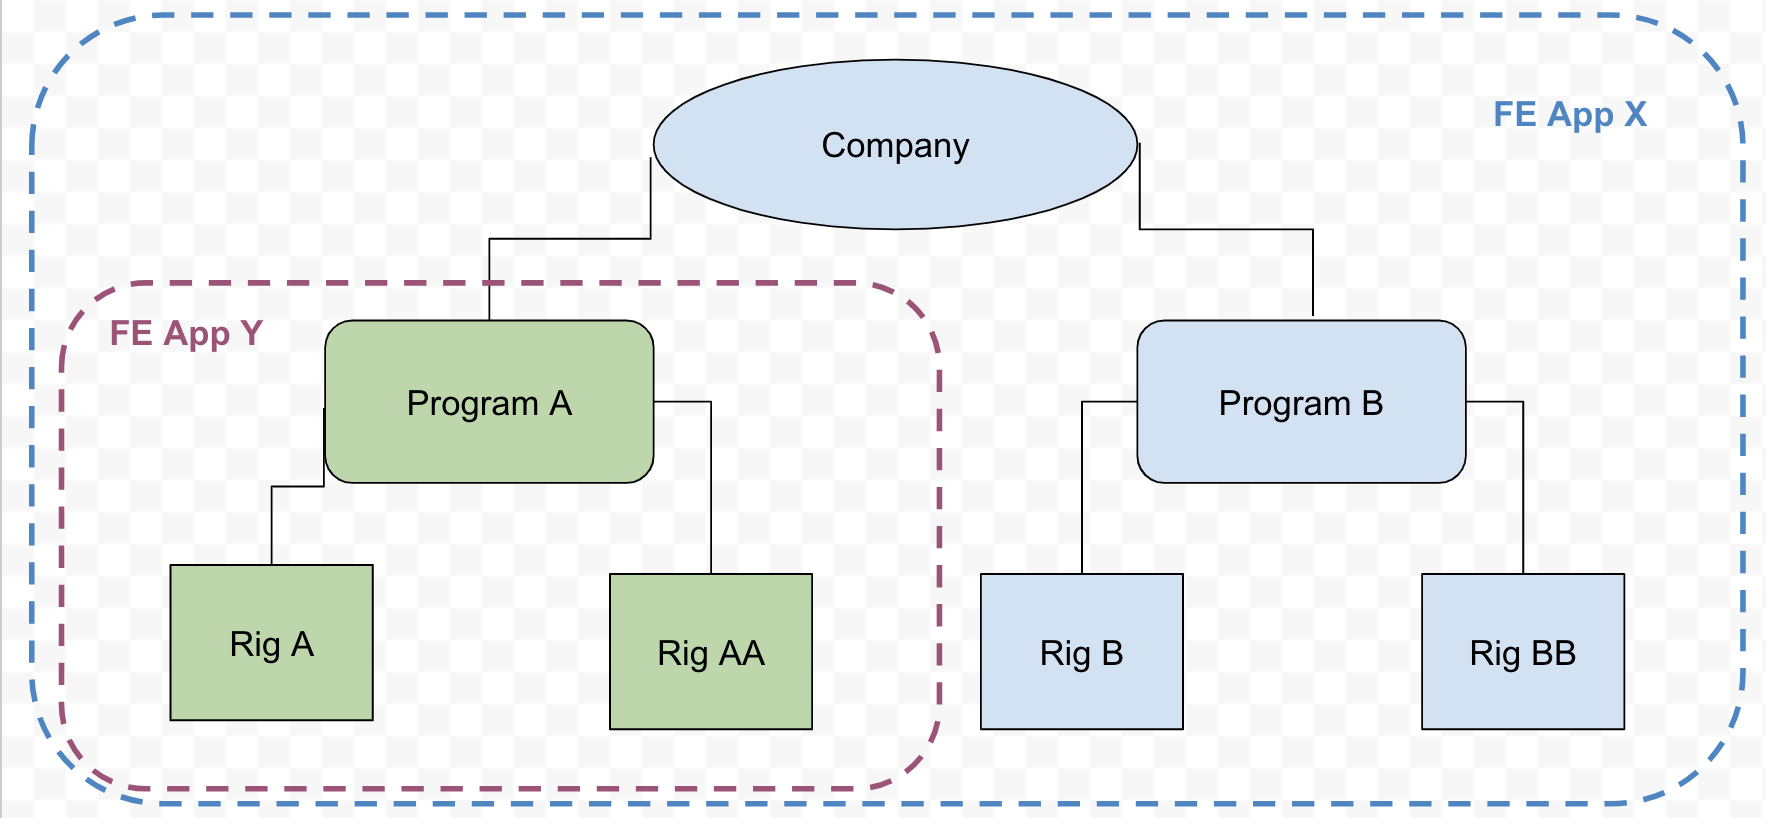
Subscription details: Subscription #1
- Segment = Drilling
- Asset Type = Company
- Apps = [FE App X]
Subscription #2
- Segment = Drilling
- Asset Type = Program
- Assets = Program A
- Apps = [FE App Y]
Result:
- All company rigs will be available in the asset selector for FE App X only.
- For FE App Y, only Rig A and Rig AA will be available in the asset selector.
- BE App XX will be added to all existing company drilling time streams with
well status ≠ completeand to every newly created drilling time stream. - BE App YY will be added to all existing drilling time streams with
well status ≠ completeand to every newly created drilling time stream related to Rig A and Rig AA.
Use Case #4
Problem: The company wants:
- FE App X has access to all company assets
- FE App Y has access to all rigs from Program A
- FE App Z has access to Rig A only
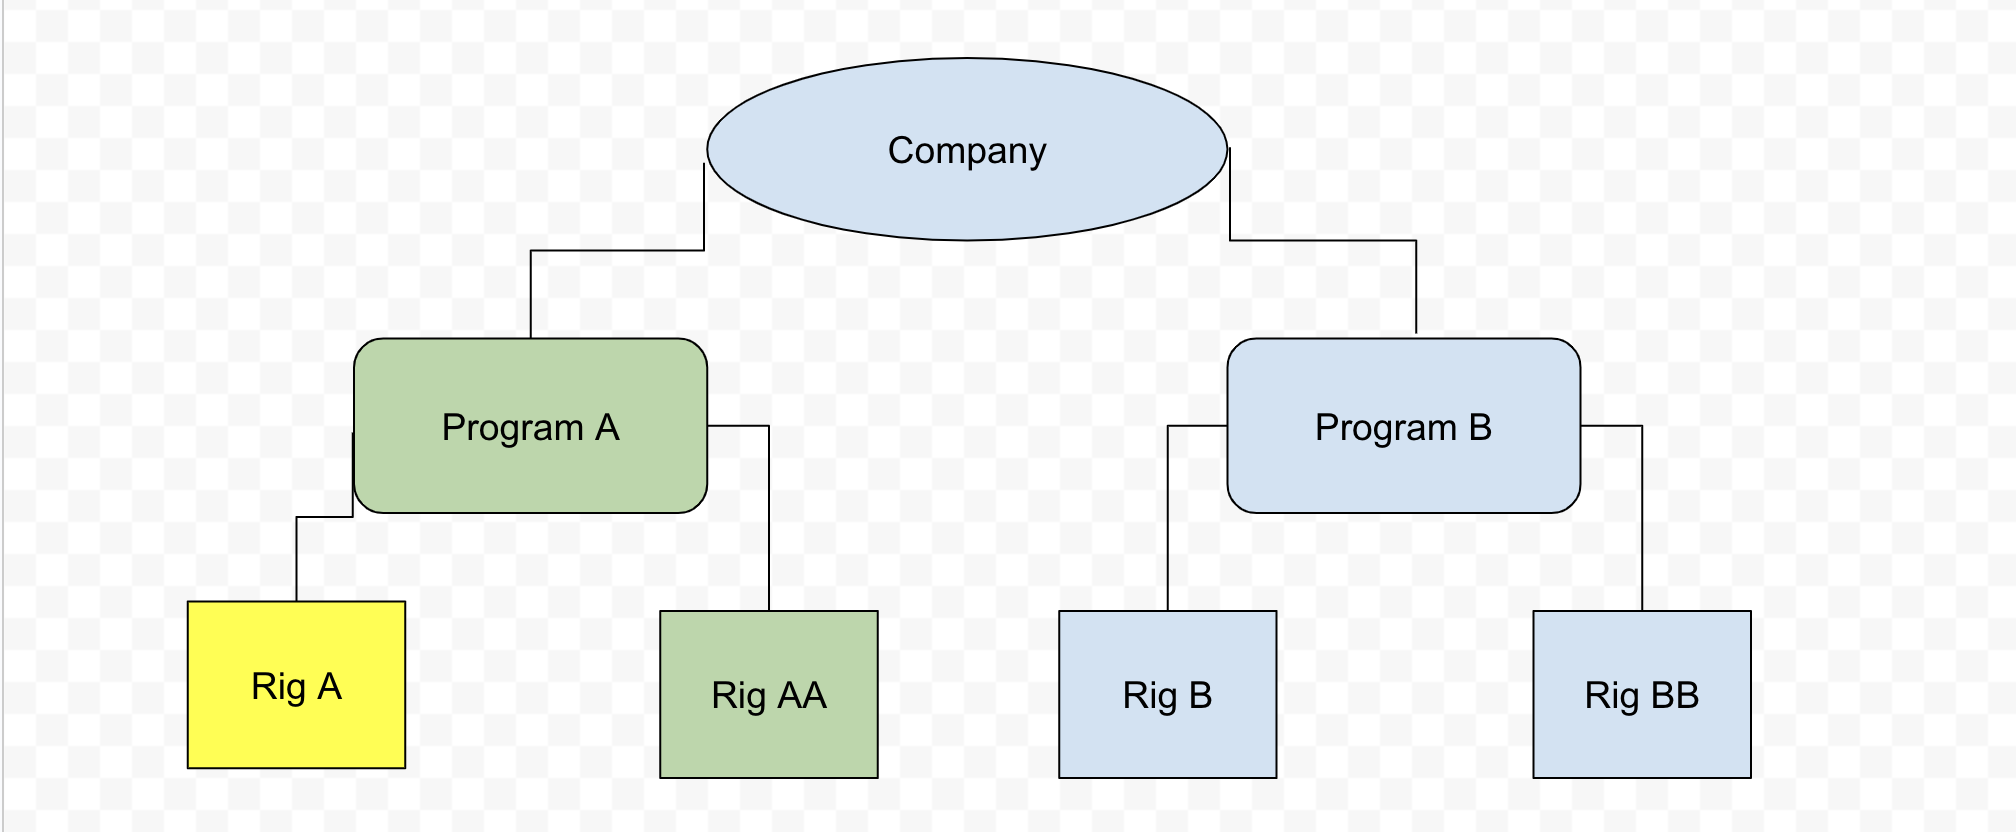
Solution:
- Create one company-level subscription for FE App X
- Create one program-level subscription for FE App Y
- Create one rig-level subscription for FE App Z
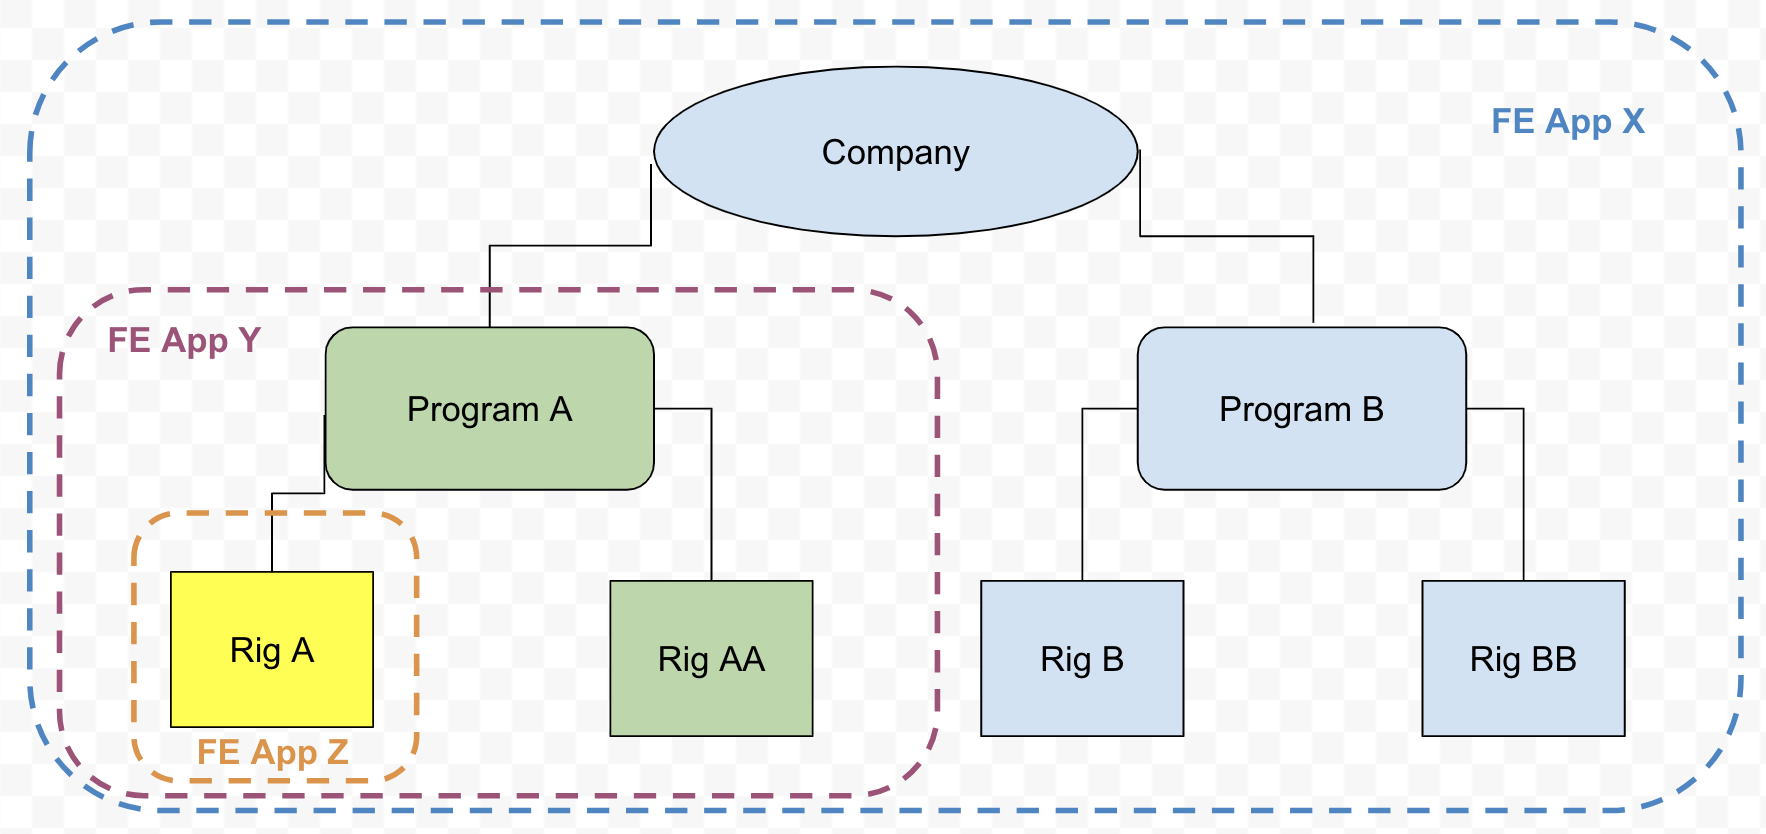
Subscription details: Subscription #1
- Segment = Drilling
- Asset Type = Company
- Apps = [FE App X]
Subscription #2
- Segment = Drilling
- Asset Type = Program
- Assets = Program A
- Apps = [FE App Y]
Subscription #3
- Segment = Drilling
- Asset Type = Rig
- Assets = Rig A
- Apps = [FE App Z]
Result:
- All company rigs will be available in the asset selector for FE App X only.
- For FE App Y, only Rig A and Rig AA will be available in the asset selector.
- For FE App Z, only Rig A will be available in the asset selector.
- BE App XX will be added to all existing company drilling time streams with
well status ≠ completeand to every newly created drilling time stream. - BE App YY will be added to all existing drilling time streams with
well status ≠ completeand to every newly created drilling time stream related to Rig A and Rig AA. - BE App ZZ will be added to all existing drilling time streams with
well status ≠ completeand to every newly created drilling time stream related to Rig A.
Use Case #5
Problem: The company wants:
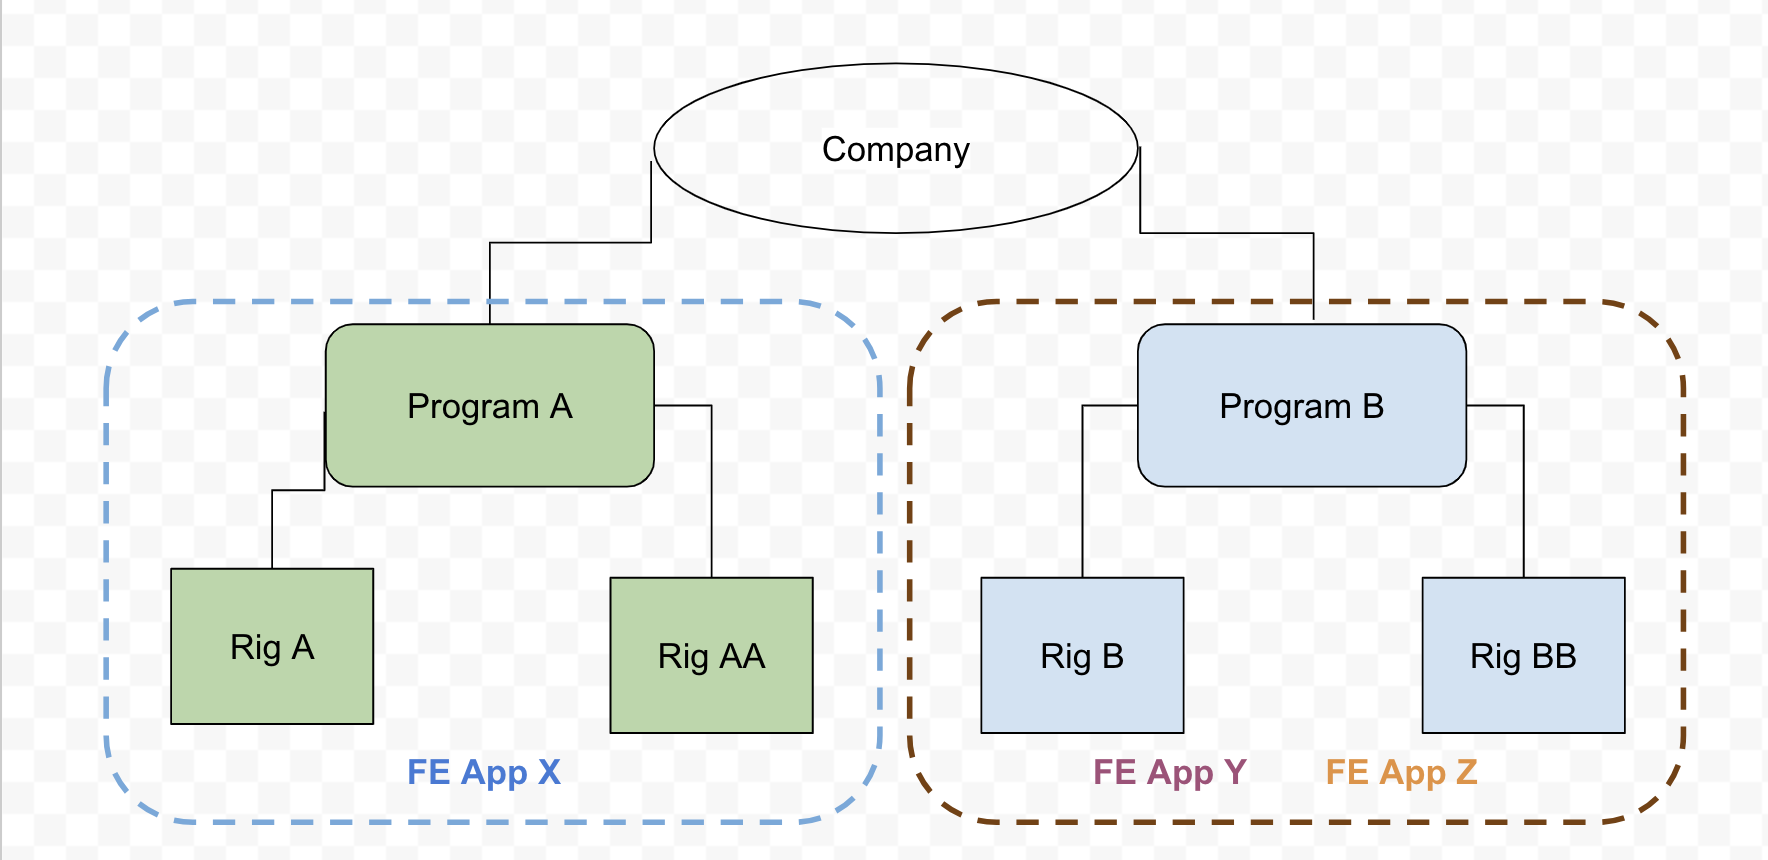
- FE App X has access to all rigs from Program A
- FE App Y and FE App Z have access to all rigs from Program B
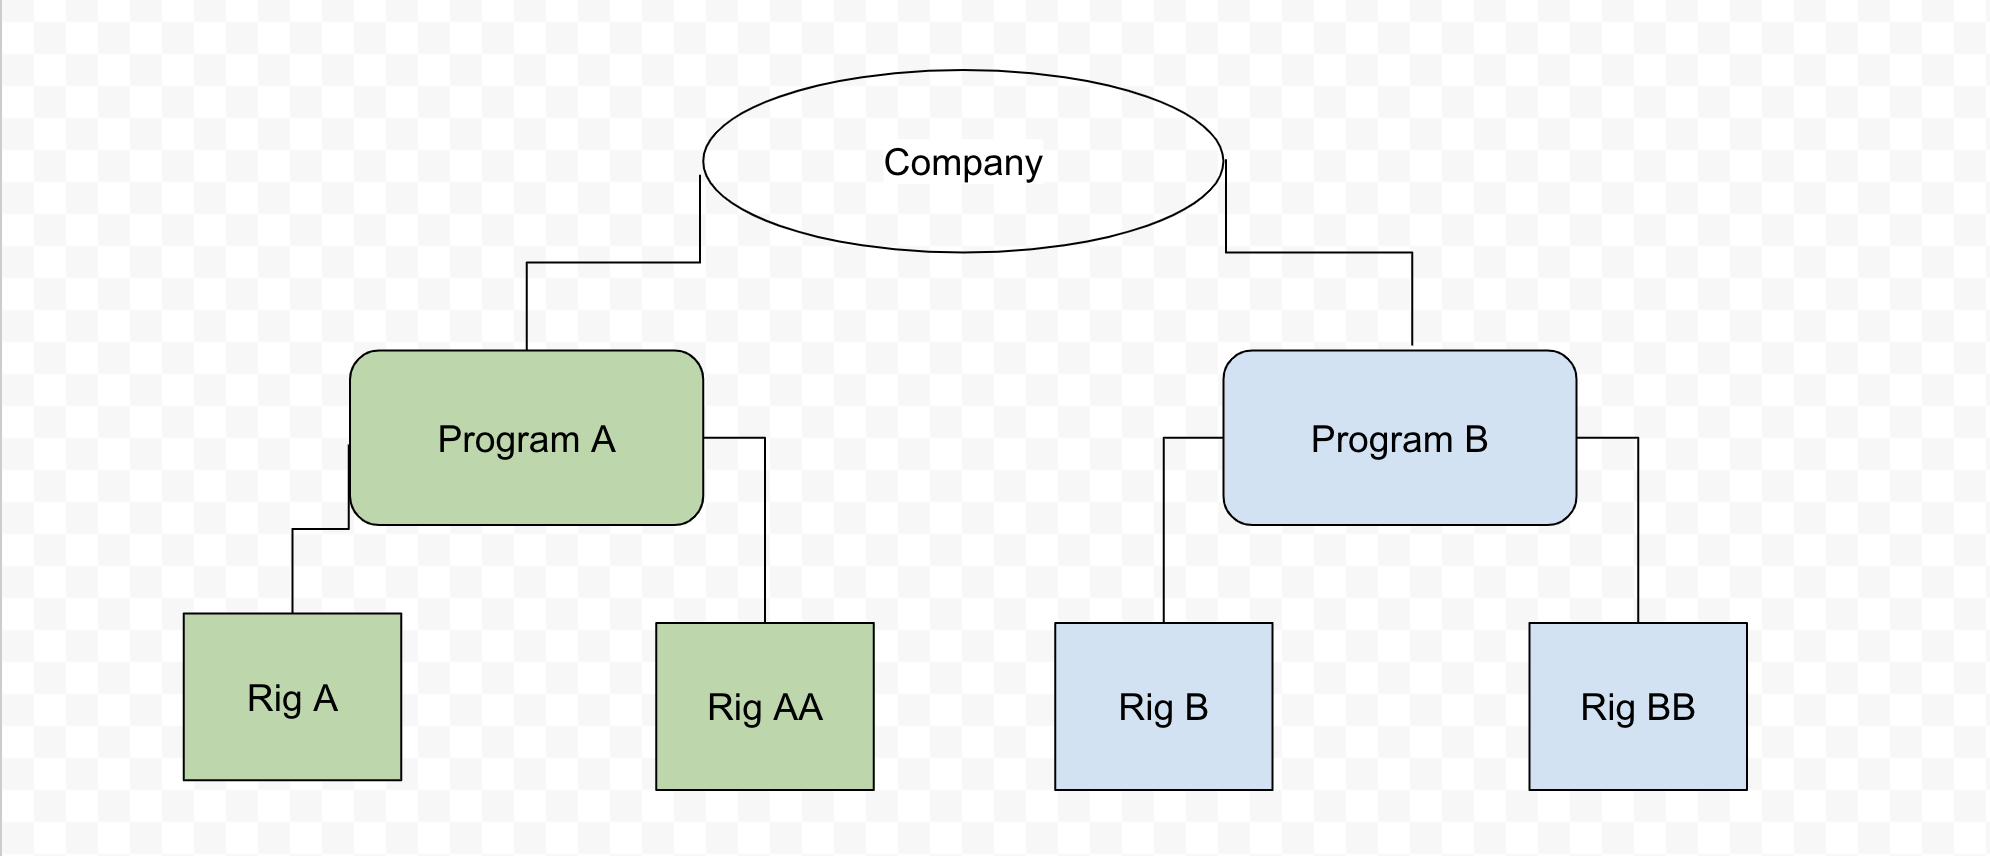
Solution:
- Create two program-level subscriptions: one for FE App X, another for FE App Y and FE App Z
Subscription details: Subscription #1
- Segment = Drilling
- Asset Type = Program
- Asset = Program A
- Apps = [FE App X]
Subscription #2
- Segment = Drilling
- Asset Type = Program
- Assets = Program B
- Apps = [FE App Y, FE App Z]
Result:
- For FE App X, only Rig A and Rig AA will be available in the asset selector.
- For FE App Y and FE App Z, only Rig B and Rig BB will be available in the asset selector.
- BE App XX will be added to all existing drilling time streams with
well status ≠ completeand to every newly created drilling time stream related to Rig A and Rig AA. - BE App YY and BE App ZZ will be added to all existing drilling time streams with
well status ≠ completeand to every newly created drilling time stream related to Rig B and Rig BB.
Use Case #6
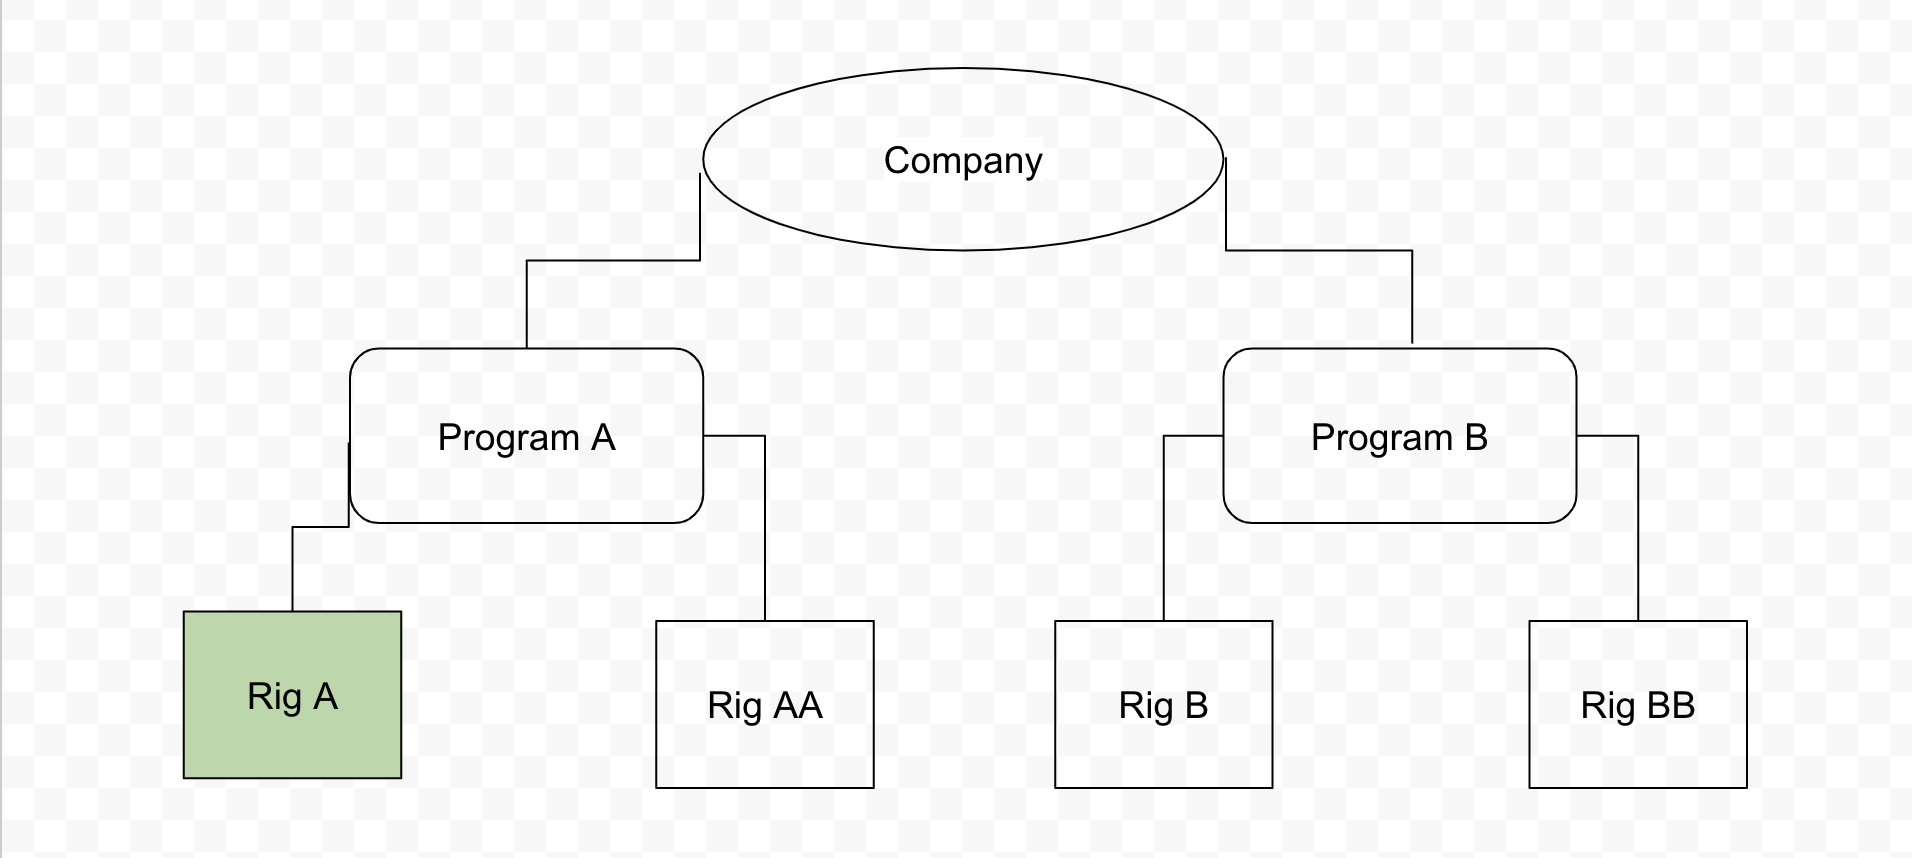
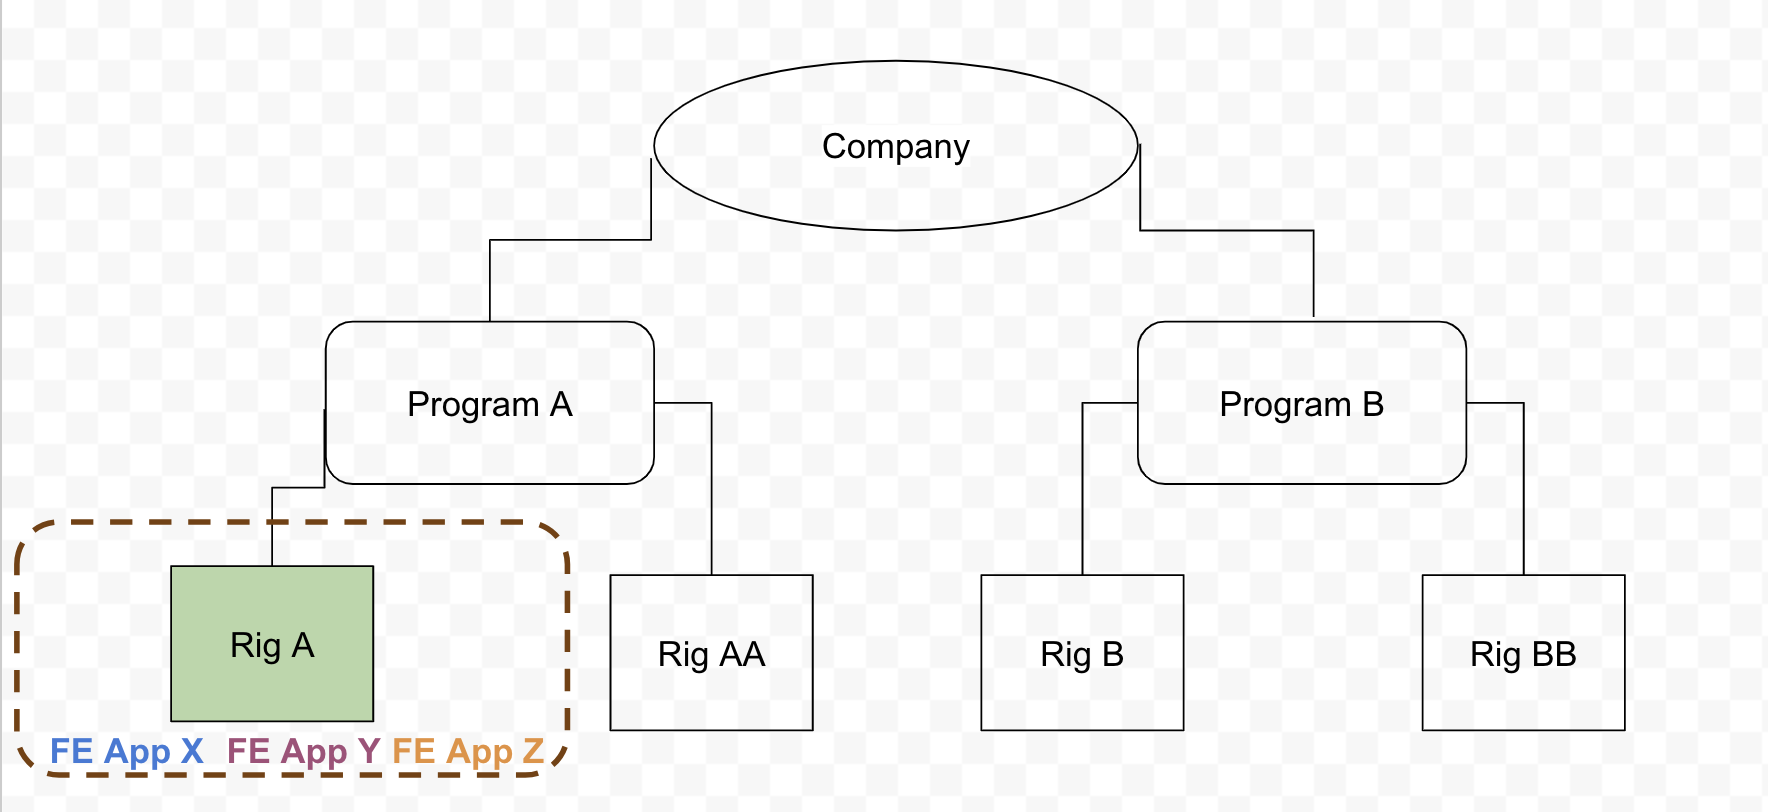
Problem: The company wants all apps to be available only for Rig A.
Solution:
- Create one rig-level subscription
Subscription details: Subscription #1
- Segment = Drilling
- Asset Type = Rig
- Assets = Rig A
- Apps = [FE App X, FE App Y, FE App Z]
Result:
- For FE App X, FE App Y, and FE App Z, only Rig A will be available in the asset selector.
- BE App XX, BE App YY, and BE App ZZ will be added to all existing drilling time streams with
well status ≠ completeand to every newly created drilling time stream related to Rig A.
Use Case #7
Problem: The company wants:
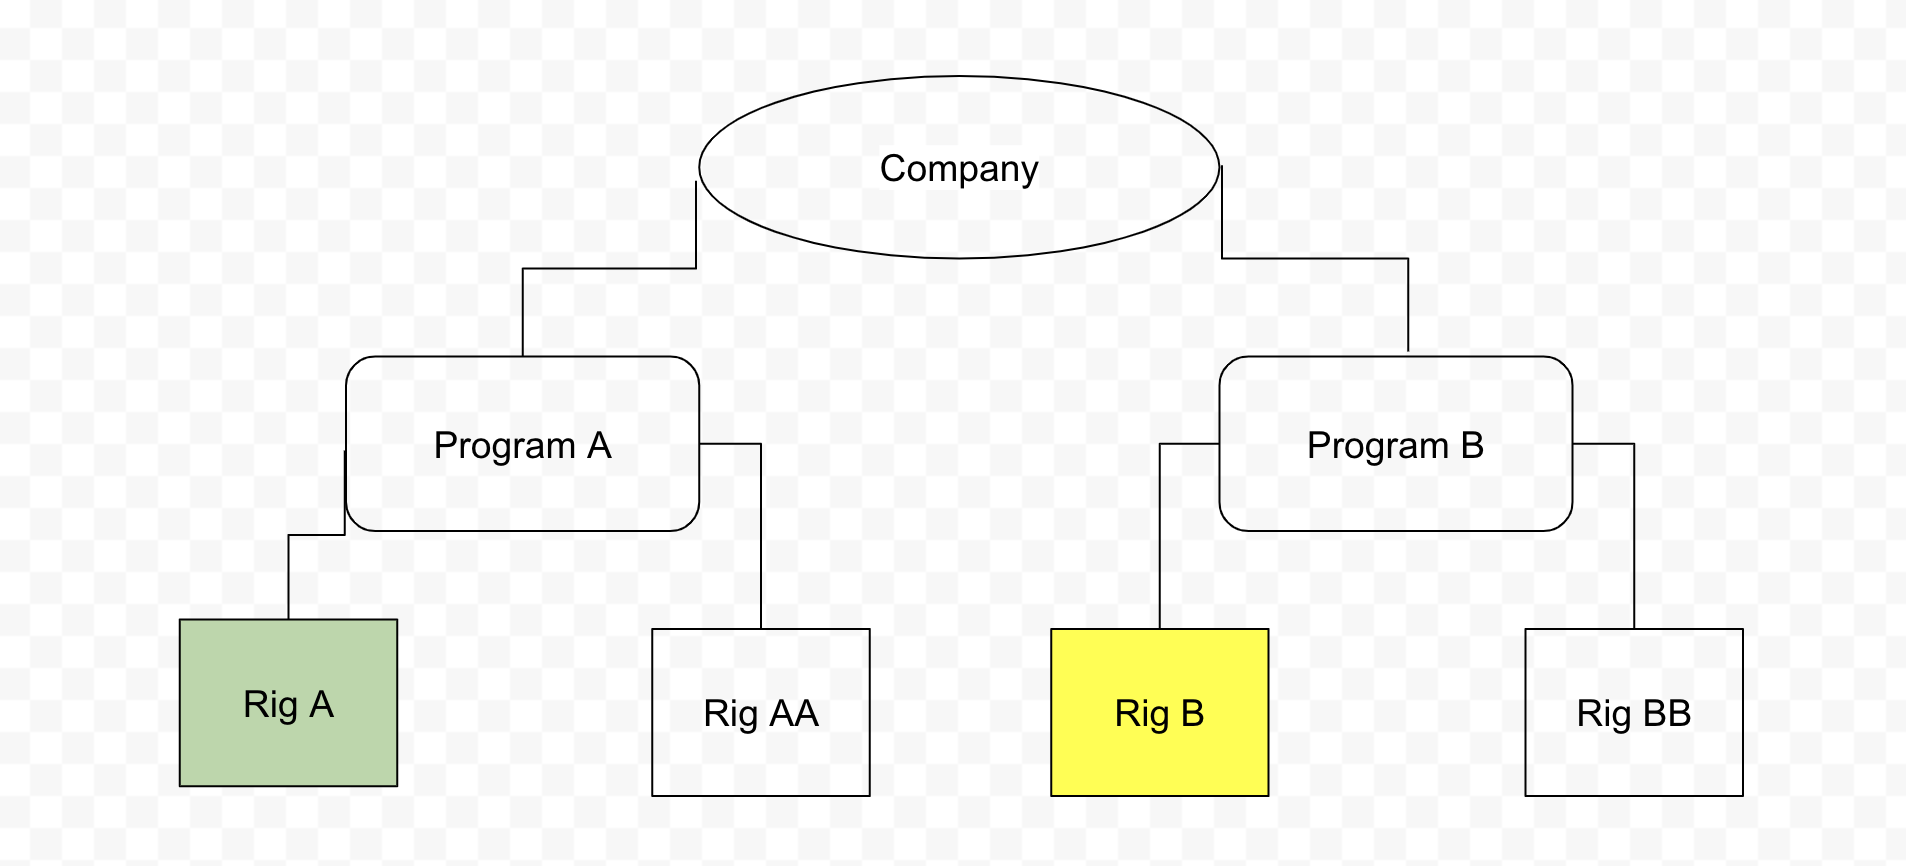
- FE App X has access to Rig A
- FE App Y has access to Rig B
Solution:
- Create two rig-level subscriptions
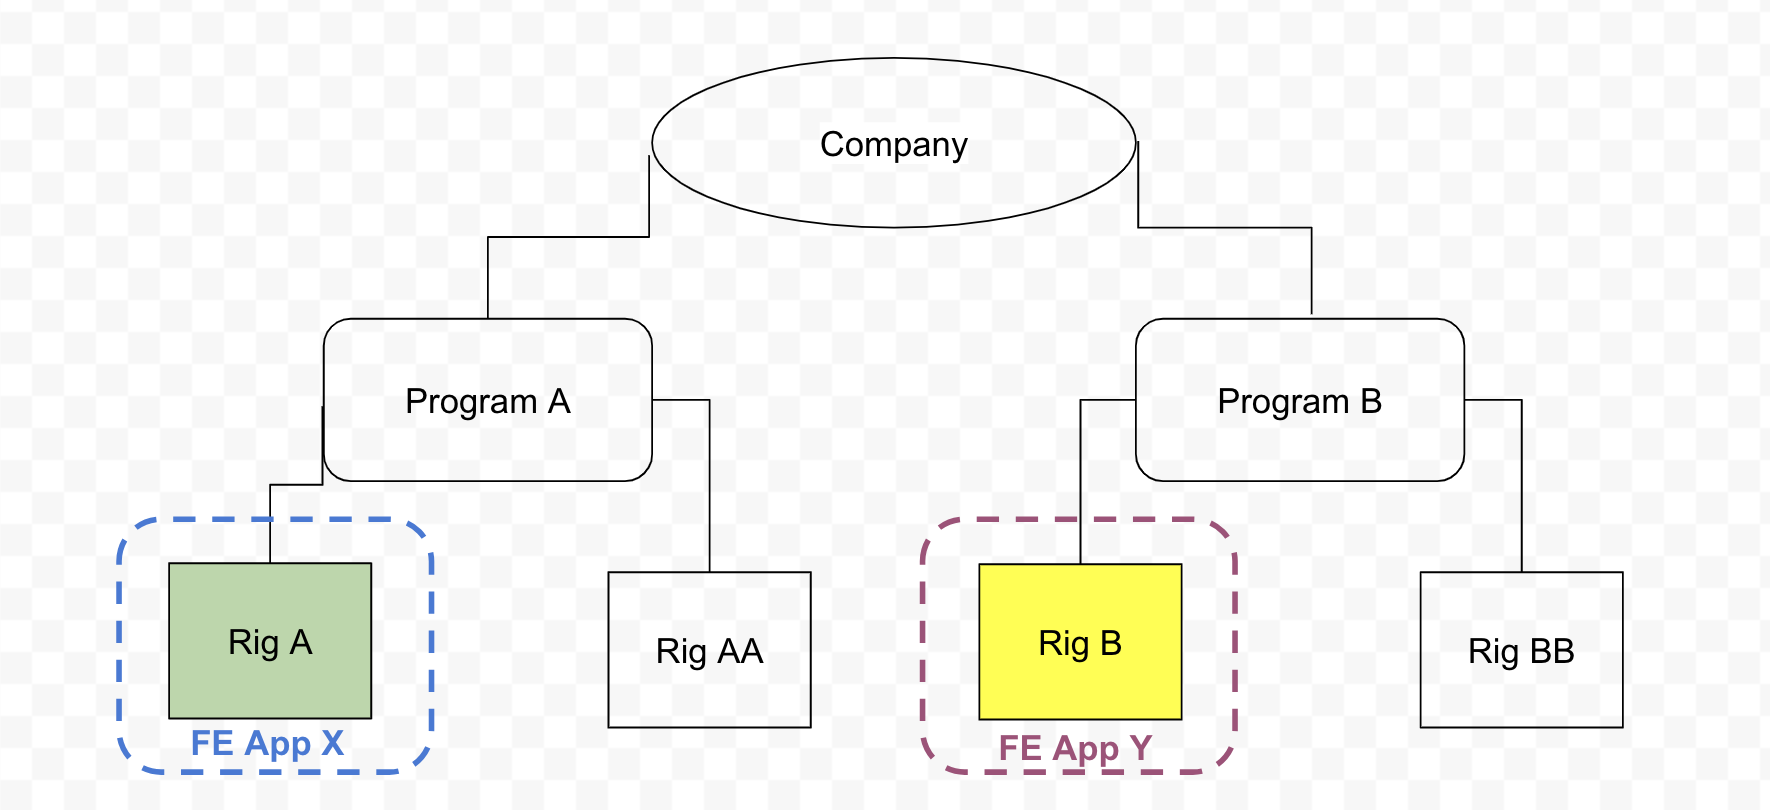
Subscription details: Subscription #1
- Segment = Drilling
- Asset Type = Rig
- Assets = Rig A
- Apps = [FE App X]
Subscription #2
- Segment = Drilling
- Asset Type = Rig
- Assets = Rig B
- Apps = [FE App Y]
Result:
- For FE App X, only Rig A will be available in the asset selector.
- For FE App Y, only Rig B will be available in the asset selector.
- BE App XX will be added to all existing drilling time streams with
well status ≠ completeand to every newly created drilling time stream related to Rig A. - BE App YY will be added to all existing drilling time streams with
well status ≠ completeand to every newly created drilling time stream related to Rig B.
Use Case #8
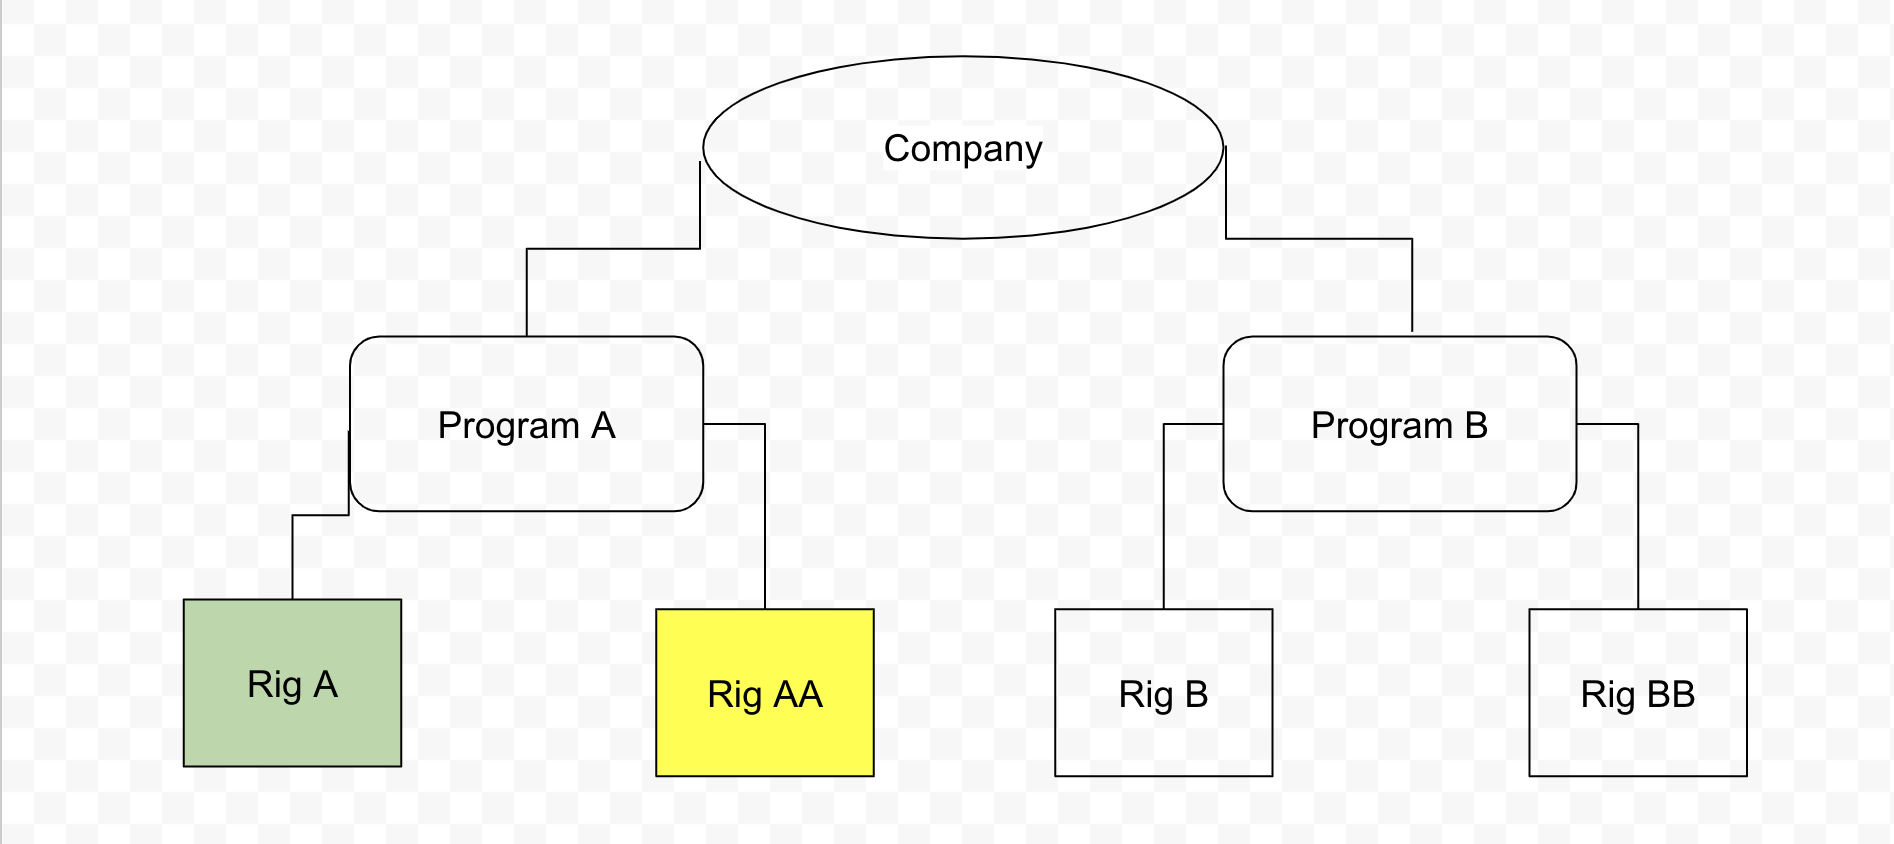
Problem: The company wants:
- FE App X has access to Rig A
- FE App Y has access to Rig AA
Solution:
- Create two rig-level subscriptions
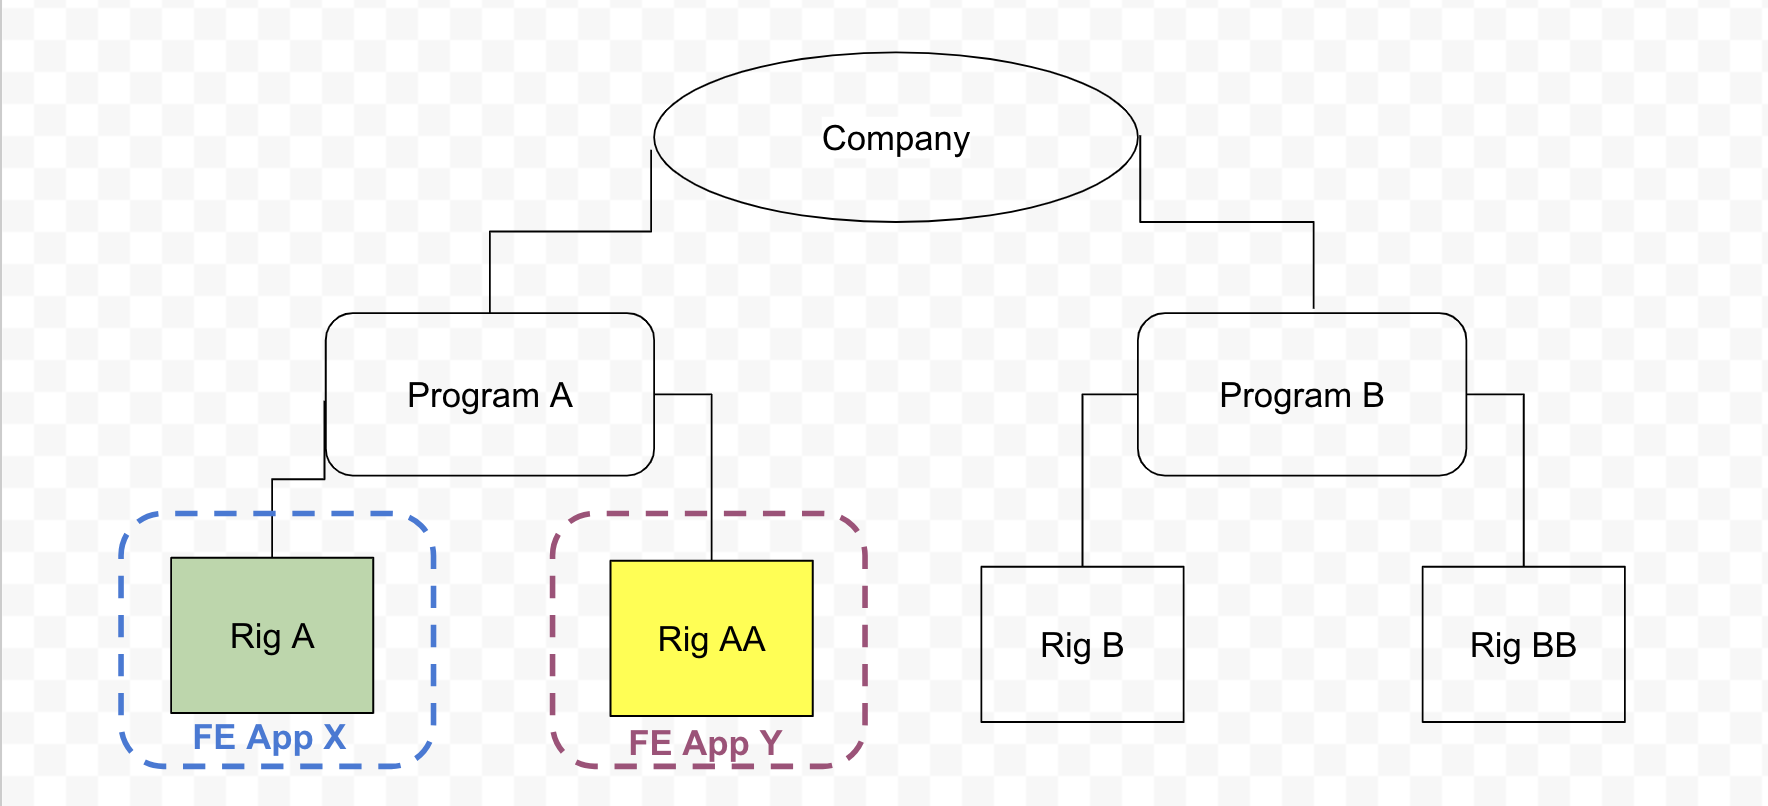
Subscription details: Subscription #1
- Segment = Drilling
- Asset Type = Rig
- Assets = Rig A
- Apps = [FE App X]
Subscription #2
- Segment = Drilling
- Asset Type = Rig
- Assets = Rig AA
- Apps = [FE App Y]
Result:
- For FE App X, only Rig A will be available in the asset selector.
- For FE App Y, only Rig AA will be available in the asset selector.
- BE App XX will be added to all existing drilling time streams with
well status ≠ completeand to every newly created drilling time stream related to Rig A. - BE App YY will be added to all existing drilling time streams with
well status ≠ completeand to every newly created drilling time stream related to Rig AA.
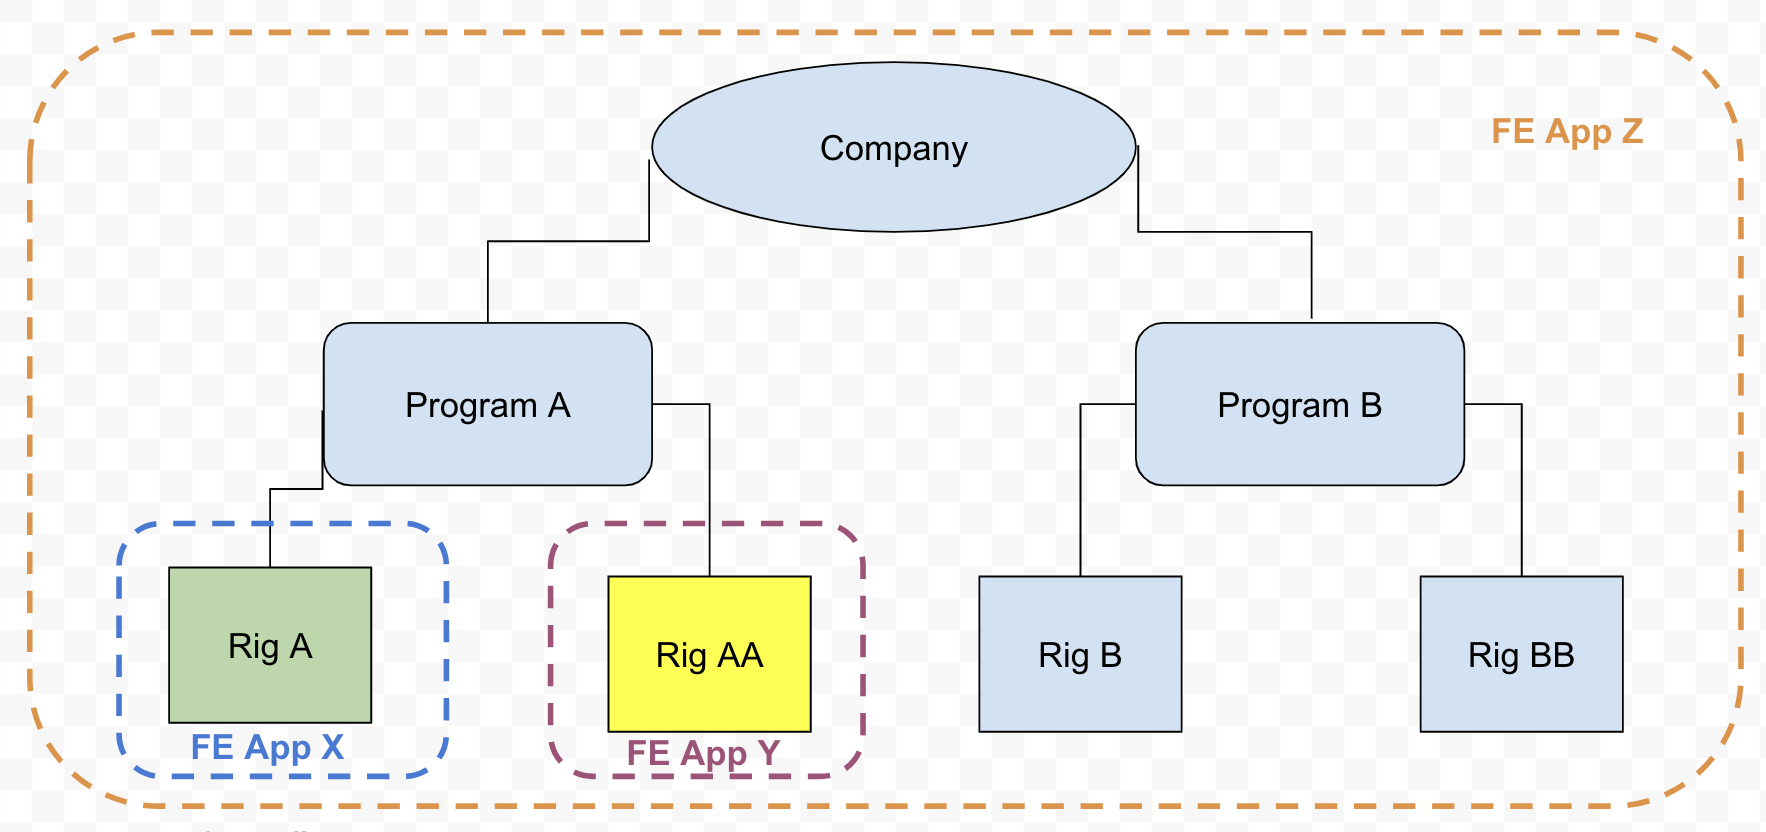
Use Case #9
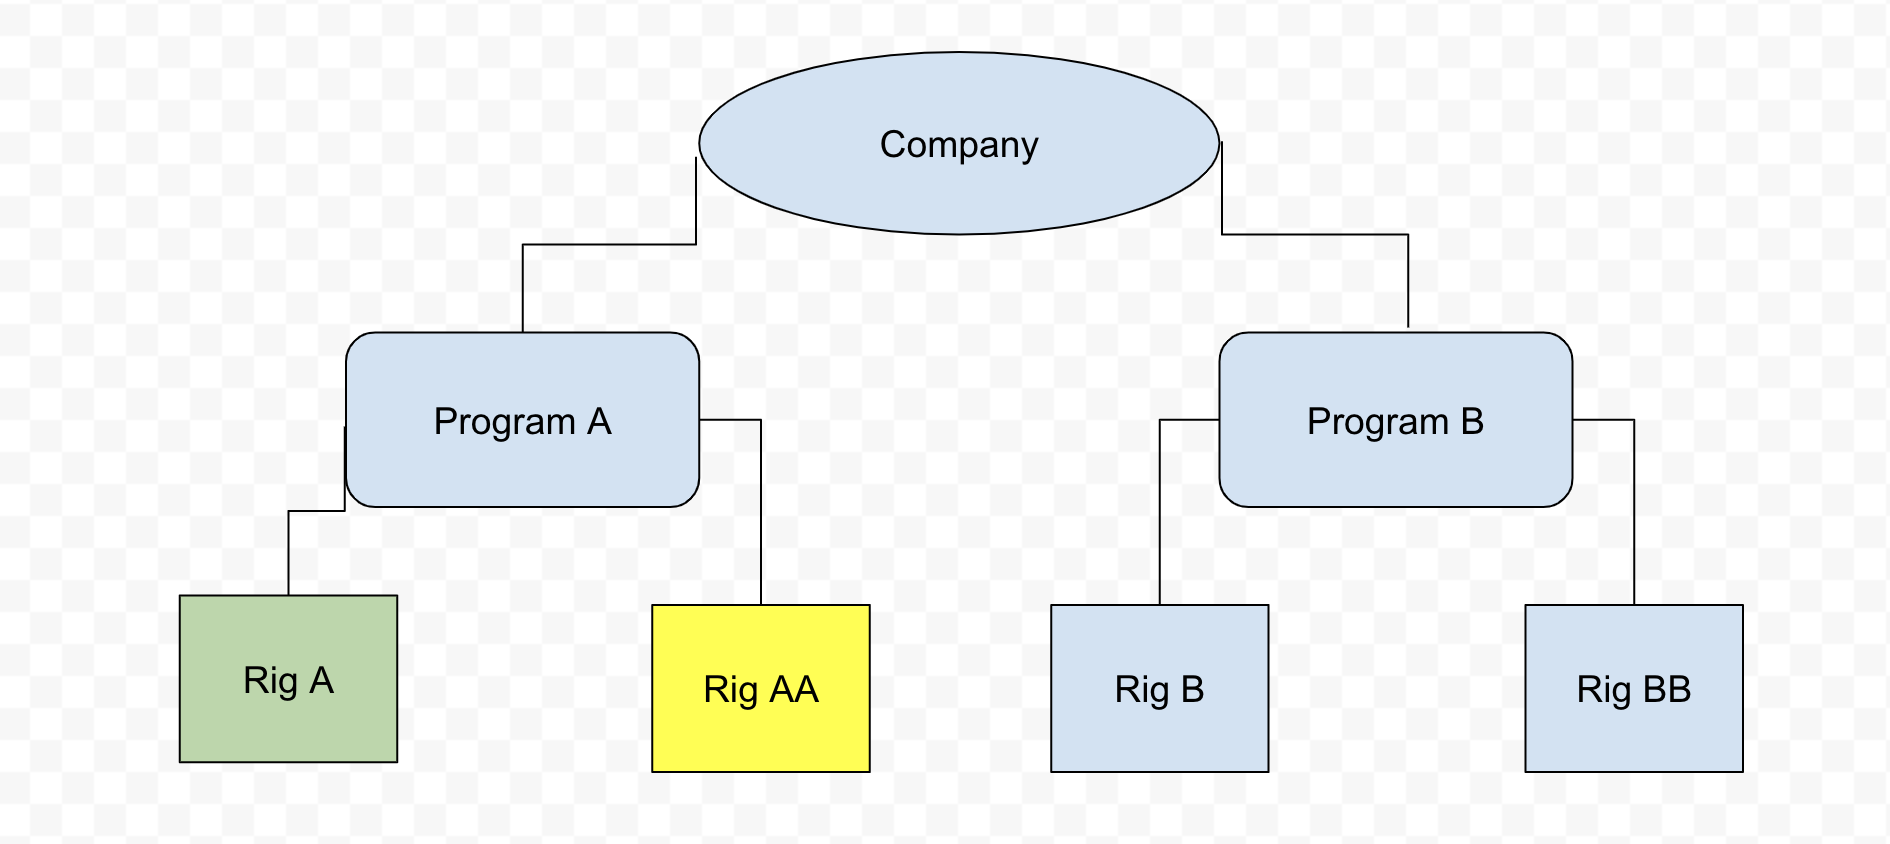
Problem: The company wants:
- FE App X has access to Rig A
- FE App Y has access to Rig AA
- FE App Z has access to all company rigs
Solution:
- Create one company-level subscription
- Create two rig-level subscriptions
Subscription details: Subscription #1
- Segment = Drilling
- Asset Type = Company
- Apps = [FE App Z]
Subscription #2
- Segment = Drilling
- Asset Type = Rig
- Assets = Rig A
- Apps = [FE App X]
Subscription #3
- Segment = Drilling
- Asset Type = Rig
- Assets = Rig AA
- Apps = [FE App Y]
Result:
- All company rigs will be available in the asset selector for FE App Z only.
- For FE App X, only Rig A will be available in the asset selector.
- For FE App Y, only Rig AA will be available in the asset selector.
- BE App ZZ will be added to all existing company drilling time streams with
well status ≠ completeand to every newly created drilling time stream. - BE App XX will be added to all existing drilling time streams with
well status ≠ completeand to every newly created drilling time stream related to Rig A. - BE App YY will be added to all existing drilling time streams with
well status ≠ completeand to every newly created drilling time stream related to Rig AA.
Use Case #10
Problem: The company wants:
- FE App Z has access to all rigs from Program A
- FE App X has access to Rig A
- FE App Y has access to Rig AA
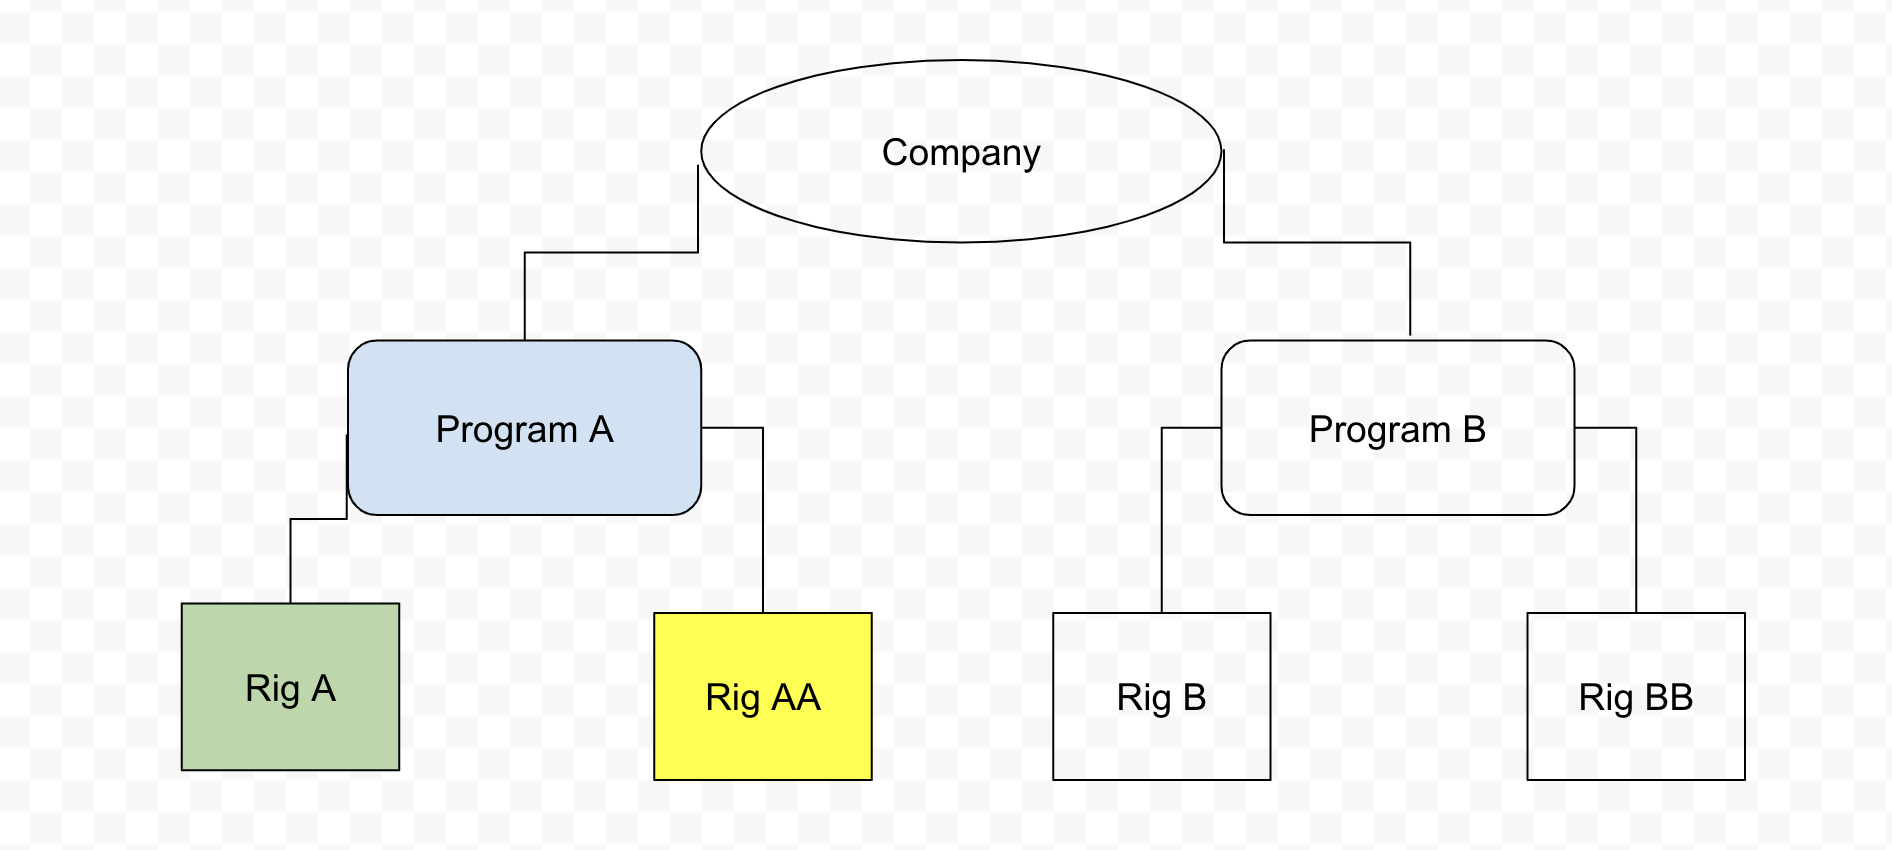
Solution:
- Create one program-level subscription
- Create two rig-level subscriptions
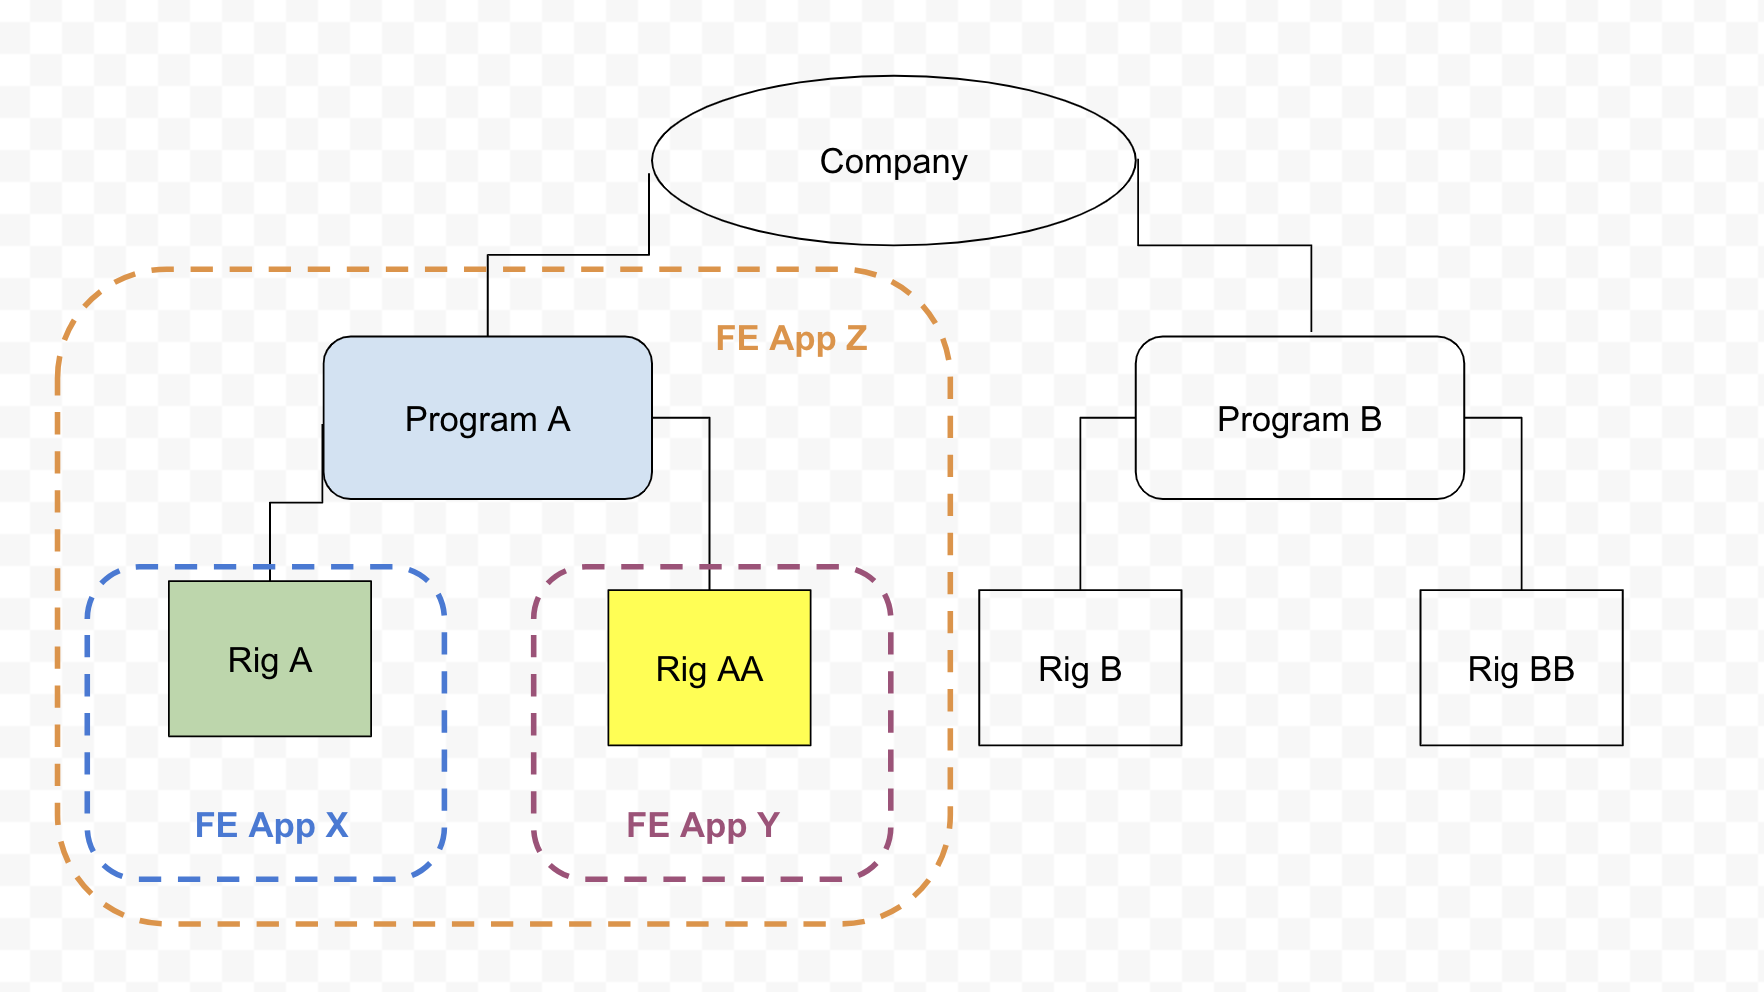
Subscription details: Subscription #1
- Segment = Drilling
- Asset Type = Program
- Assets = Program A
- Apps = [FE App Z]
Subscription #2
- Segment = Drilling
- Asset Type = Rig
- Assets = Rig A
- Apps = [FE App X]
Subscription #3
- Segment = Drilling
- Asset Type = Rig
- Assets = Rig AA
- Apps = [FE App Y]
Result:
- All rigs from Program A (Rig A and Rig AA) will be available in the asset selector for FE App Z only.
- For FE App X, only Rig A will be available in the asset selector.
- For FE App Y, only Rig AA will be available in the asset selector.
- BE App ZZ will be added to all existing Program A drilling time streams with
well status ≠ completeand to every newly created drilling time stream. - BE App XX will be added to all existing drilling time streams with
well status ≠ completeand to every newly created drilling time stream related to Rig A. - BE App YY will be added to all existing drilling time streams with
well status ≠ completeand to every newly created drilling time stream related to Rig AA.
What is the App Availability with or without Permissions?
| App Visibility | Role | Provisioning Exists | Able to Add App to Dashboard |
|---|---|---|---|
| Private | Developer Admin at the same company (not app owner) | No | No |
| Developer | Developer Admin at the same company (not app owner) | No | Yes |
| Company | Developer Admin at the same company (not app owner) | No | No |
| Public | Developer Admin at the same company (not app owner) | No | Yes |
| Private | Admin at the same company | No | No |
| Developer | Admin at the same company | No | No |
| Company | Admin at the same company | No | No |
| Public | Admin at the same company | No | Yes |
| Private | User at the same company | No | No |
| Developer | User at the same company | No | No |
| Company | User at the same company | No | No |
| Public | User at the same company | No | Yes |
| Private | Restricted user at the same company | No | No |
| Developer | Restricted user at the same company | No | No |
| Company | Restricted user at the same company | No | No |
| Public | Restricted user at the same company | No | Yes |
| Private | App owner | Yes | No |
| Developer | App owner | Yes | Yes |
| Company | App owner | Yes | Yes |
| Public | App owner | Yes | Yes |
| Private | Developer Admin at the same company (not app owner) | Yes | No |
| Developer | Developer Admin at the same company (not app owner) | Yes | Yes |
| Company | Developer Admin at the same company (not app owner) | Yes | Yes |
| Public | Developer Admin at the same company (not app owner) | Yes | Yes |
| Private | Admin at the same company | Yes | No |
| Developer | Admin at the same company | Yes | No |
| Company | Admin at the same company | Yes | Yes |
| Public | Admin at the same company | Yes | Yes |
| Private | User at the same company | Yes | No |
| Developer | User at the same company | Yes | No |
| Company | User at the same company | Yes | Yes |
| Public | User at the same company | Yes | Yes |
| Private | Restricted User at the same company | Yes | No |
| Developer | Restricted User at the same company | Yes | No |
| Company | Restricted User at the same company | Yes | Yes |
| Public | Restricted User at the same company | Yes | Yes |
App Purchases
This section describes how to place an app in the App Store and make it available for purchase by other third parties, as well as how to purchase a third company app and add it to a dashboard.
Request to Place an App in the App Store
Before the app becomes available in the App Store, at least one of its versions should be successfully validated and approved.
A Developer Admin needs to do the following:
- Open App page in Dev Center on “Version” tab
- Upload the app package and publish it.
- Send app package to Corva for Review
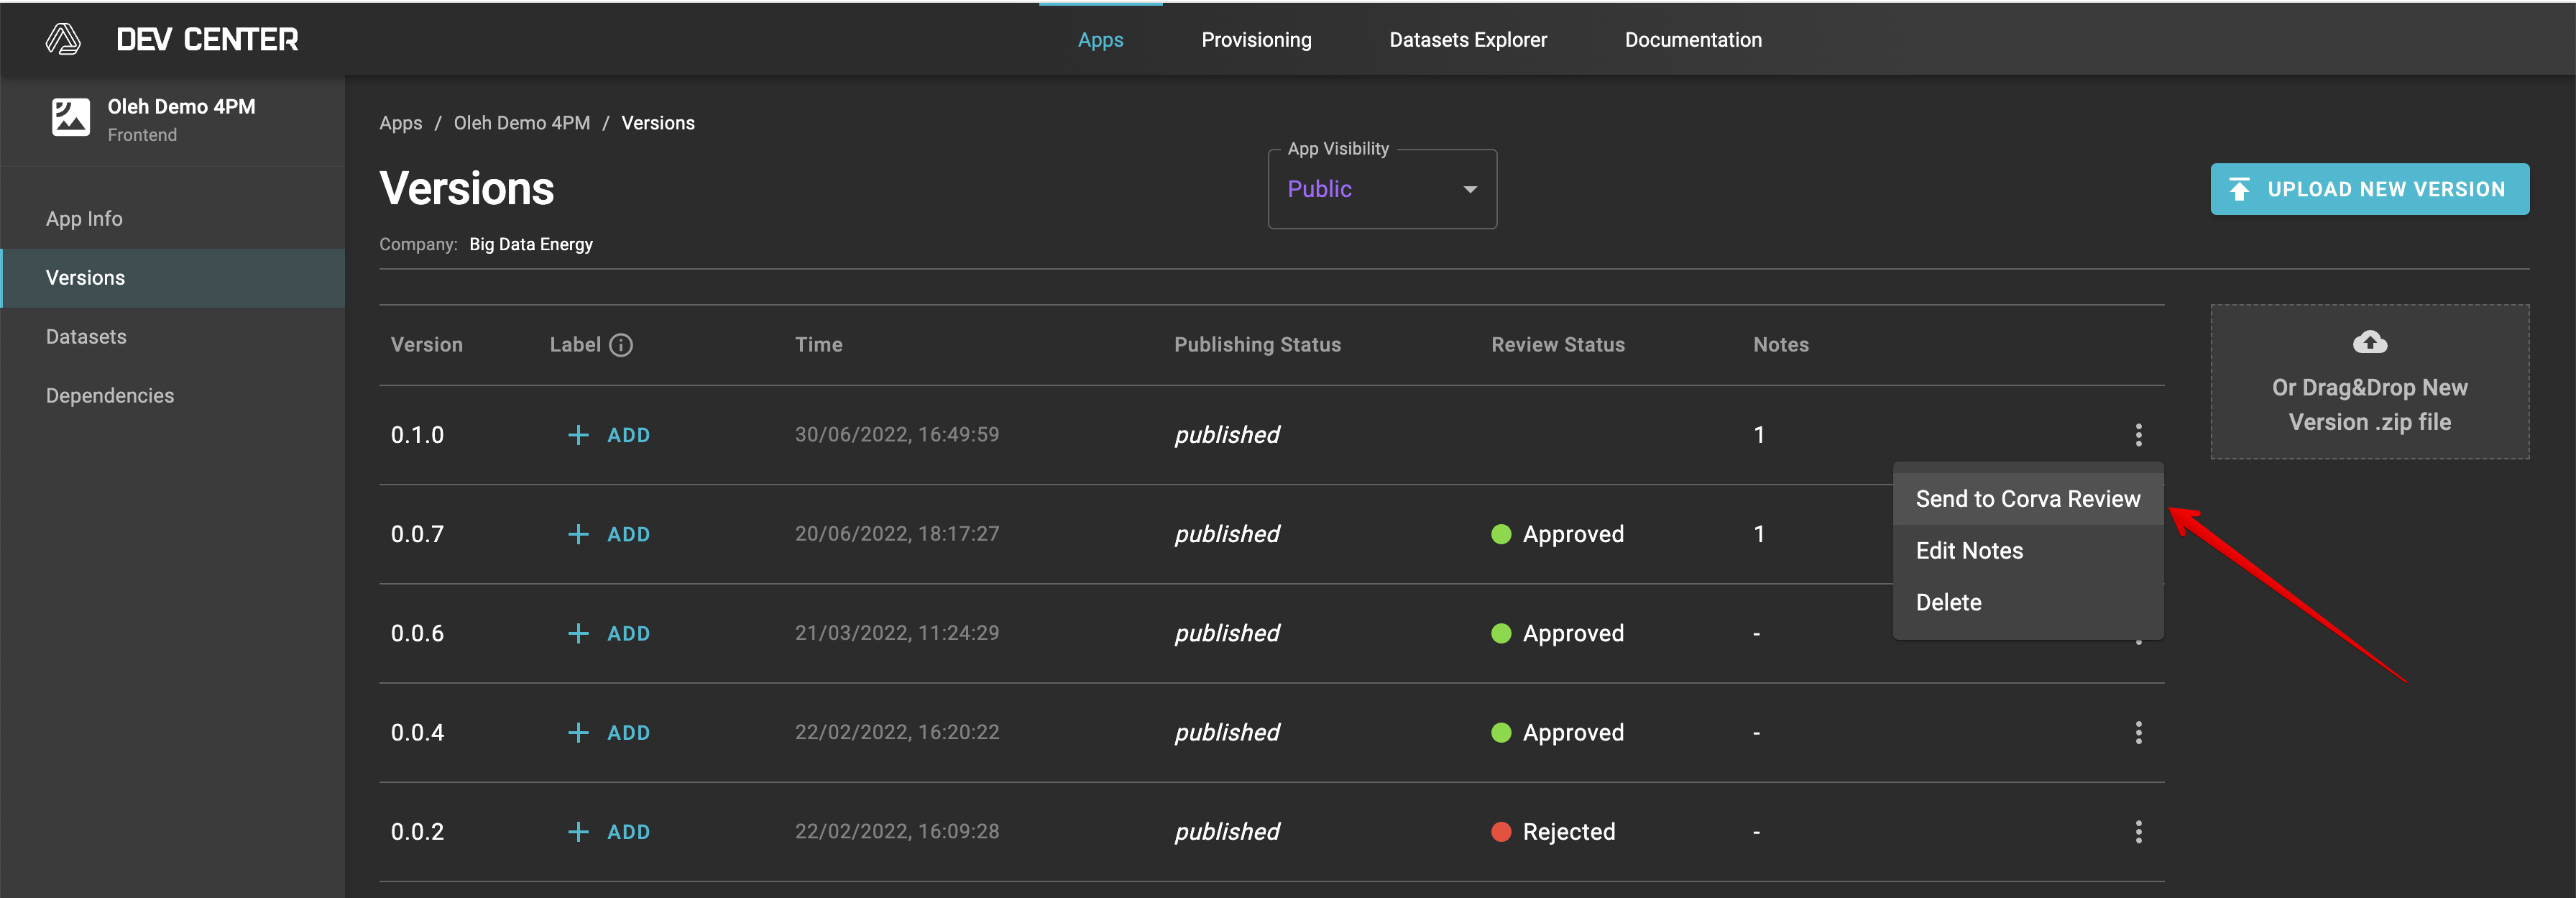
- Wait until the review request is processed. Once approved, you will see Review Status = Approved. Package approval automatically sets App visibility = Public. Once Visibility = Public, the app is available in the App Store. Admins from other companies are able to request it.
- Once app is reviewed you will receive a Status updated in the Provisioning -> Reviews page and a notification.
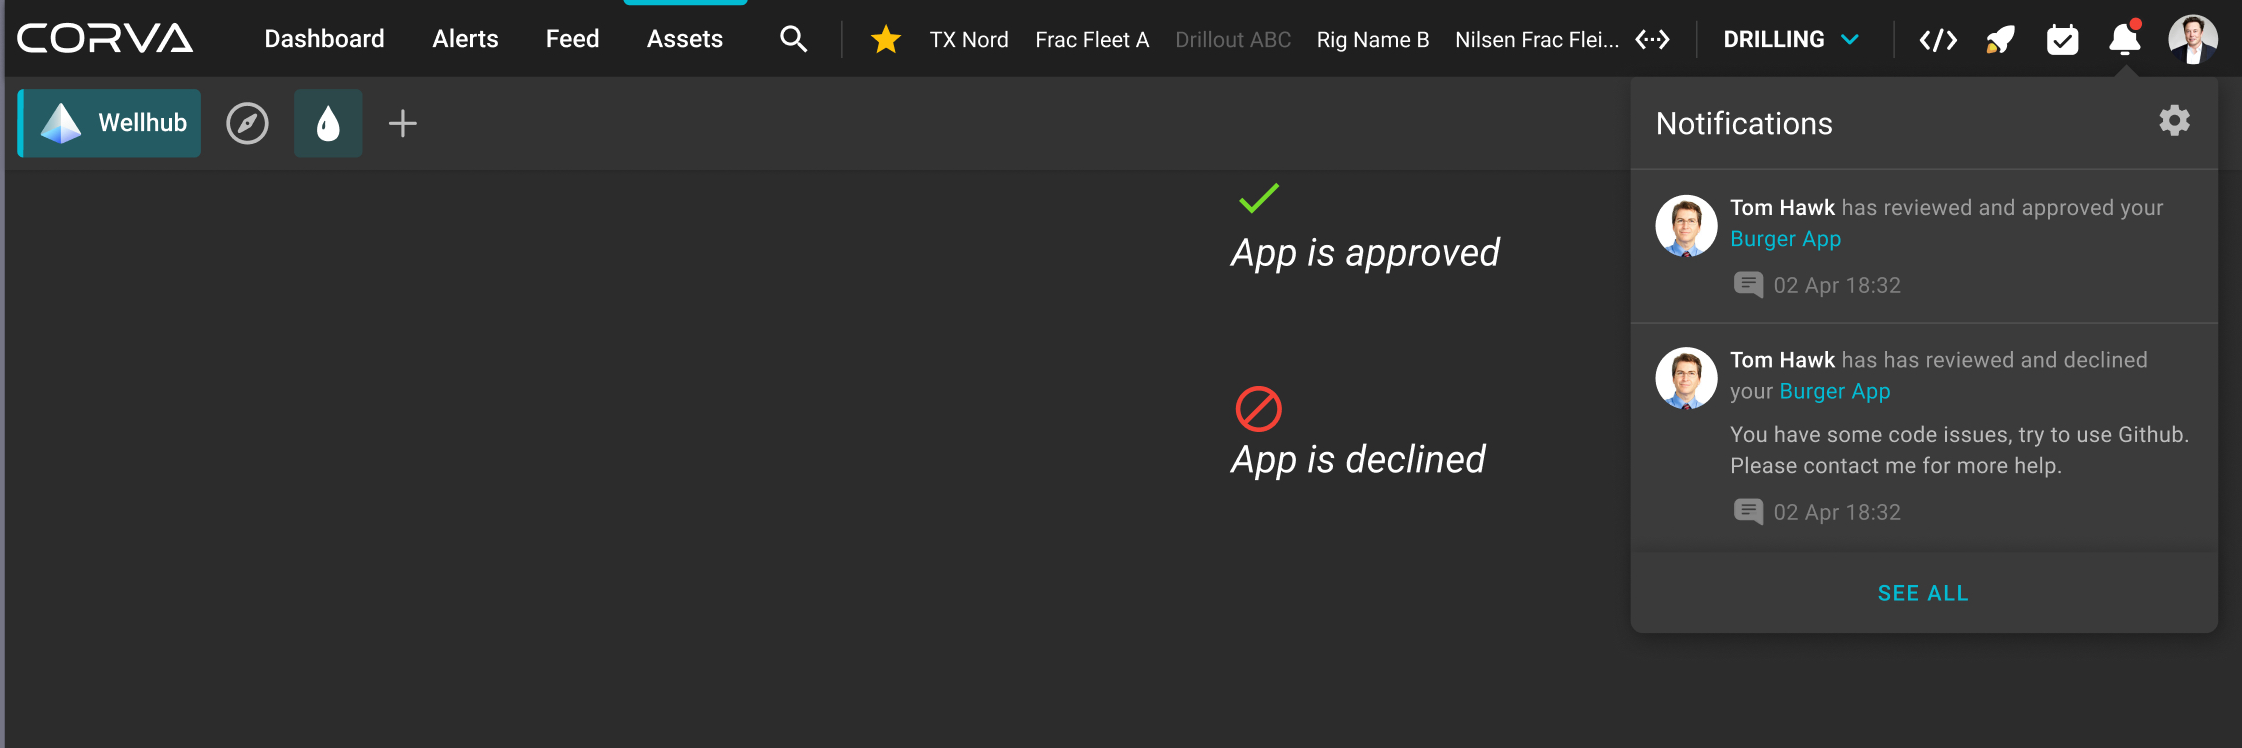
Recommendation : Before sending an app for review, please double check that it works smoothly and all needed info is added to the “App Info” page. User must consider the following two scenarios:
NOTE : If the app visibility is changed from public to any other visibility, the app will disappear from App Store. The app will stil be presented on dashboards where it had been added before.
NOTE : If you did not pass review and package review status becomes “Rejected”, that means that your app does not meet requirements to become available on the App Store. Make the suggested updates, then upload the new package and send it to review again.
Request to Purchase an App from the App Store?
Before any company user is able to add an app to a dashboard, it needs to be requested by Company admin
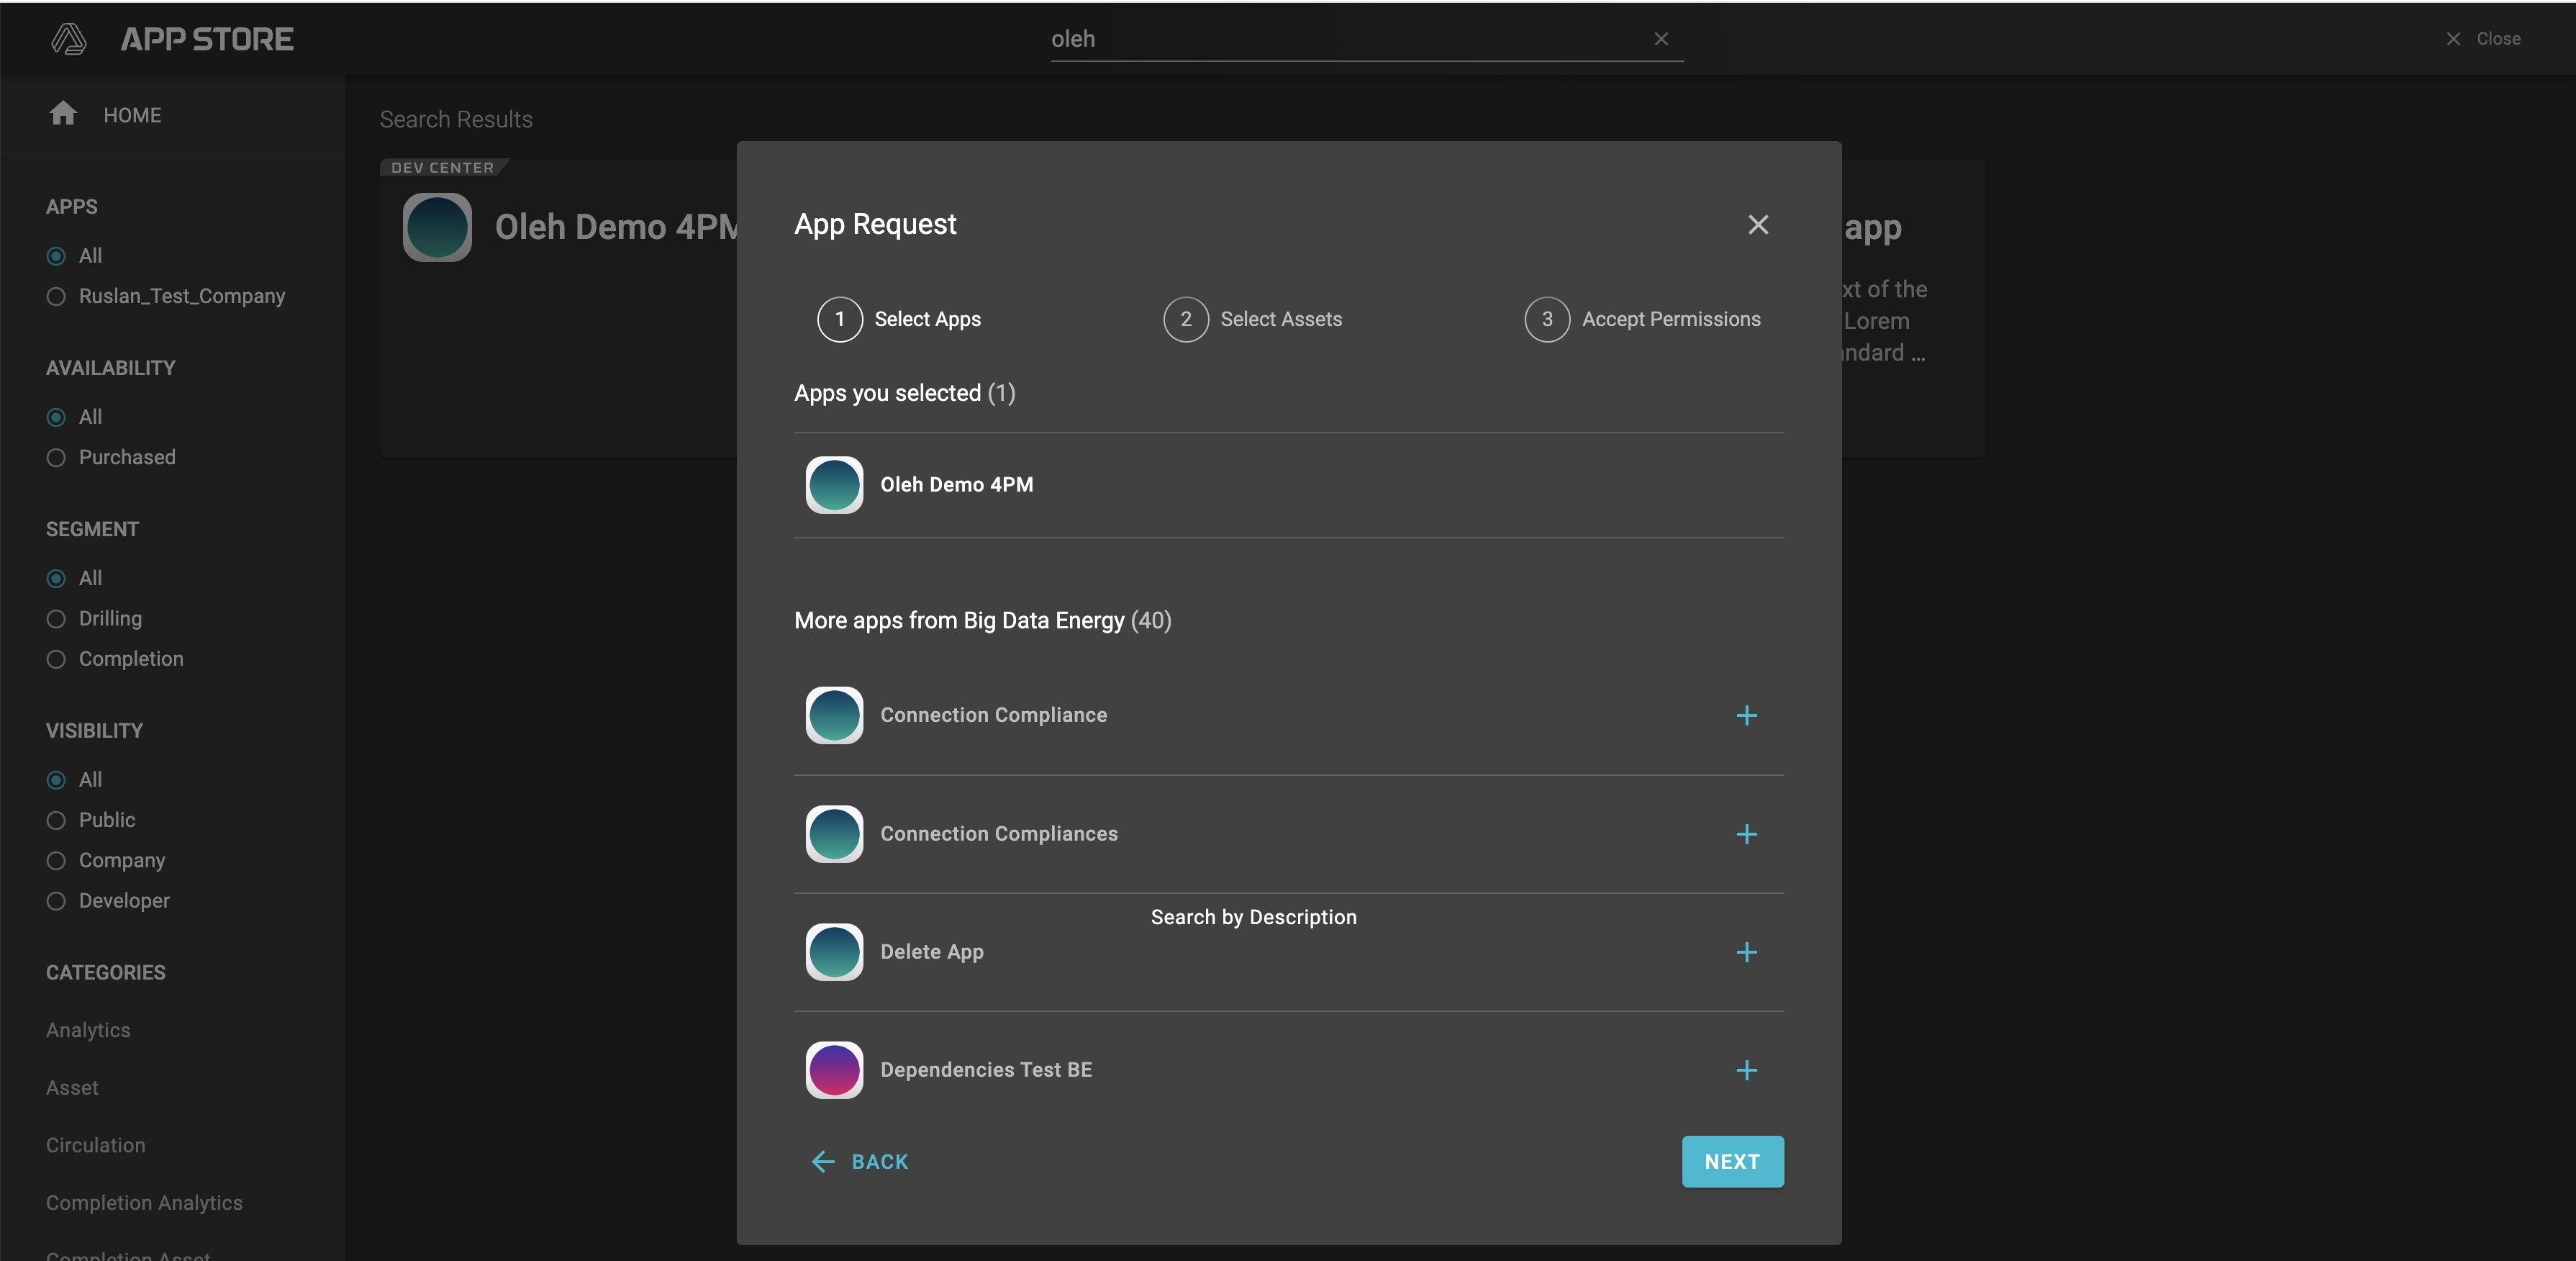
- Company Admin goes to App store to request an App of interest

- Company admin is able to request additional apps from the same developer and the same segment along with initial app
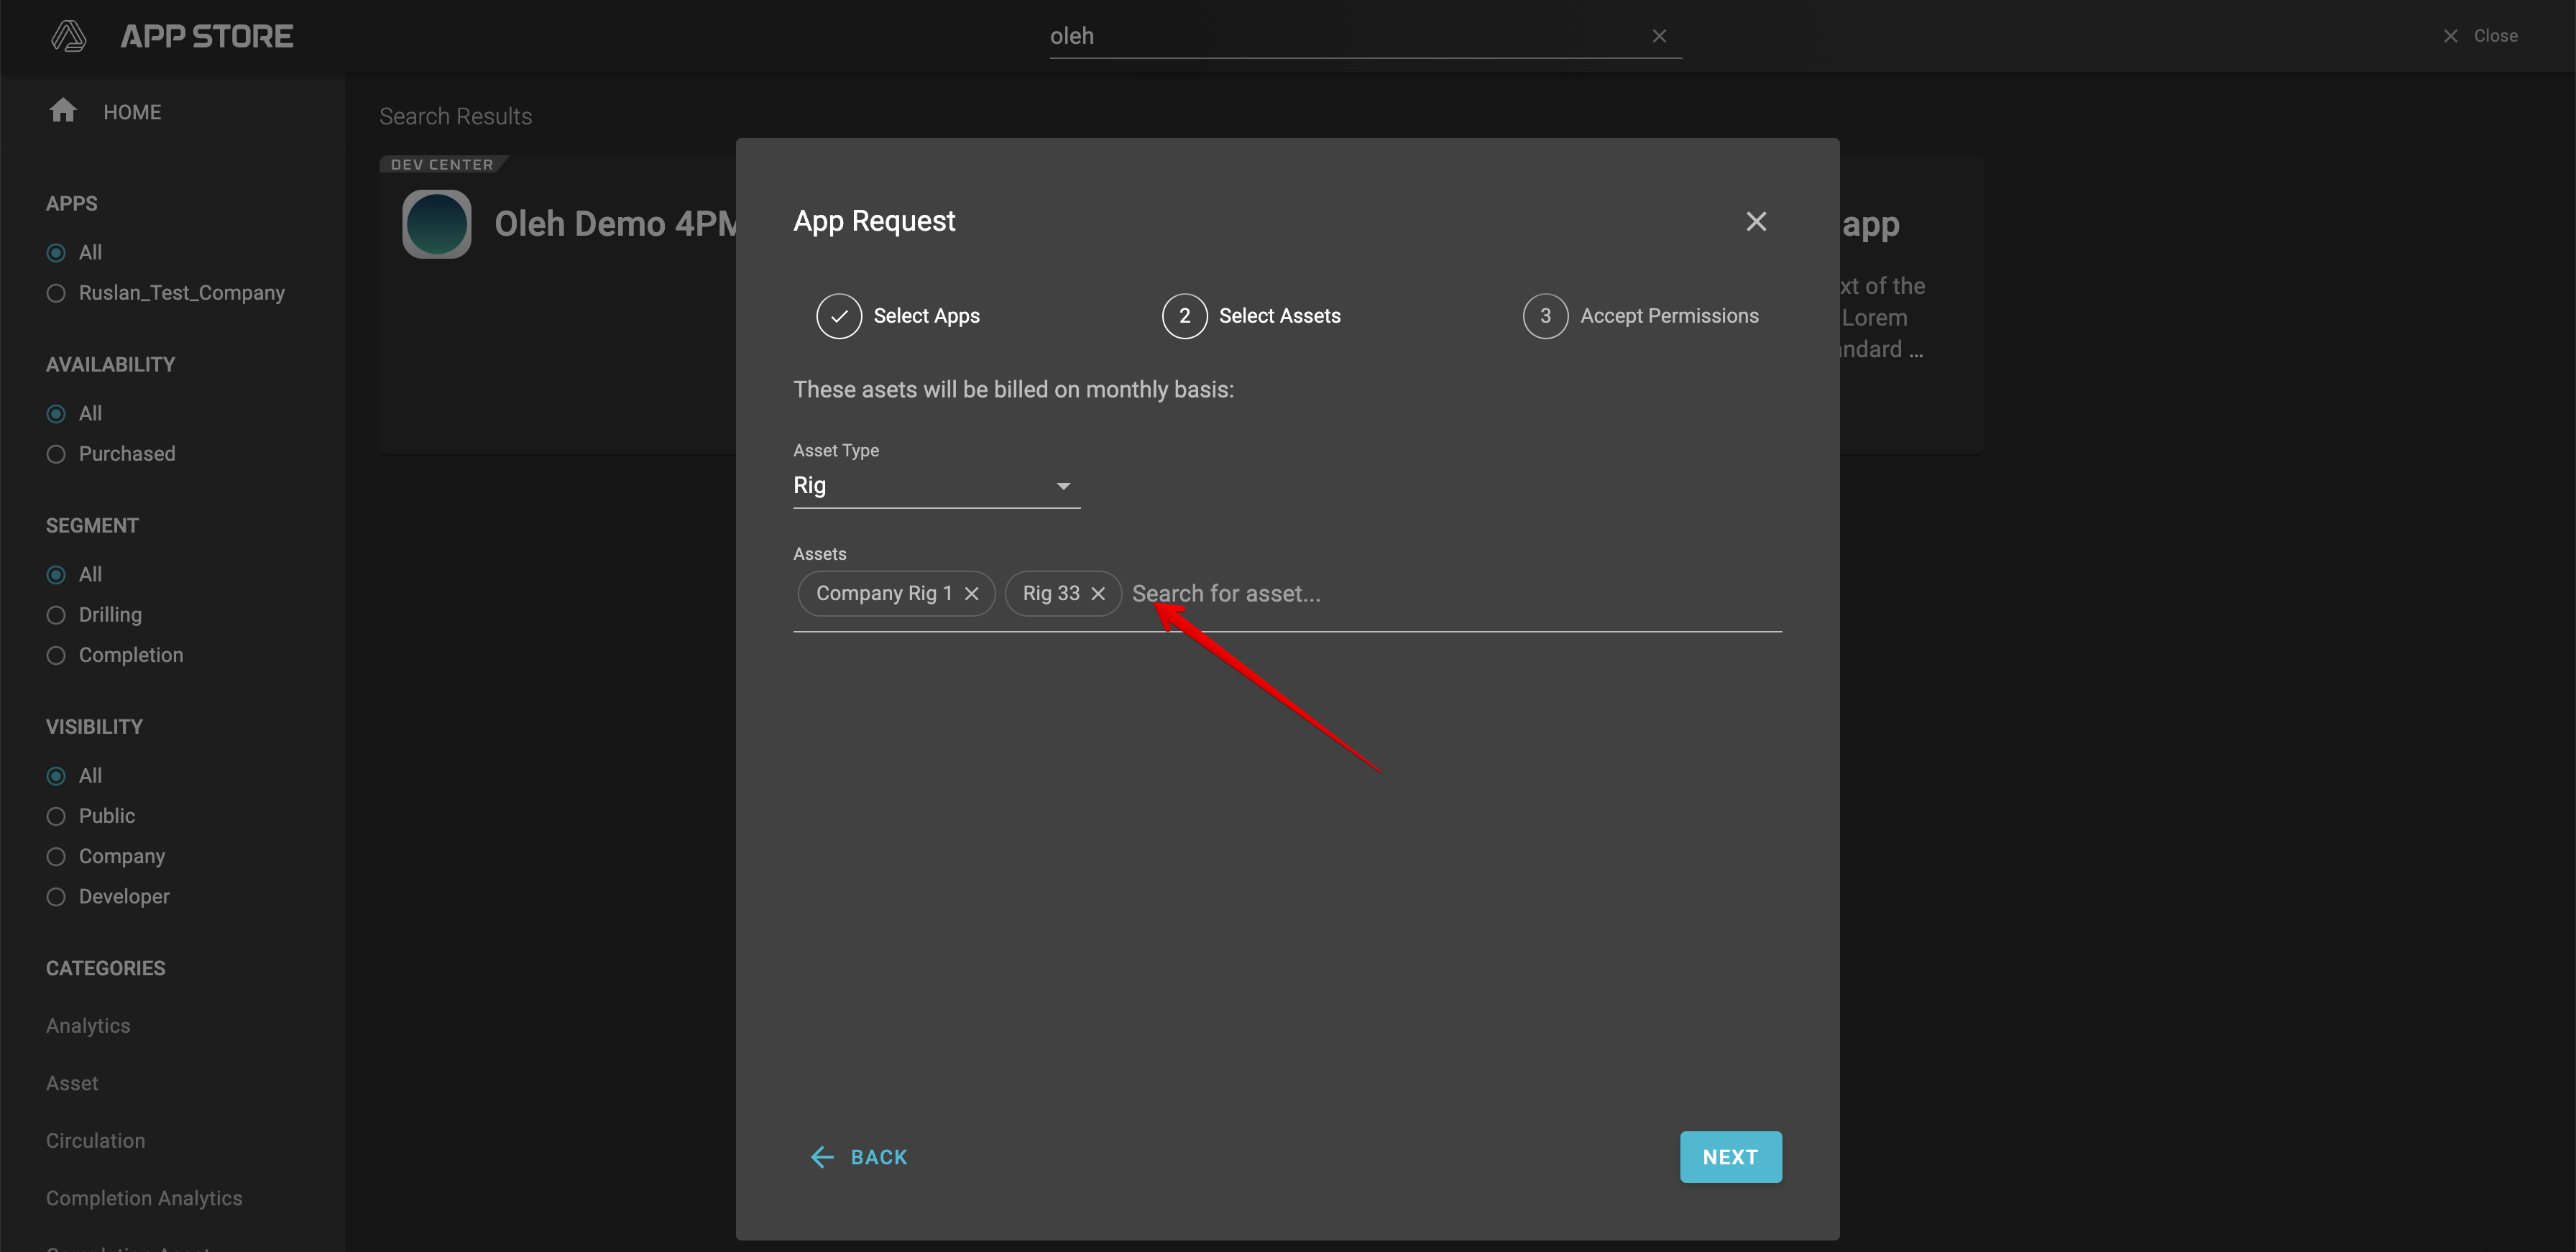
- Connect assets that will be available for requested apps
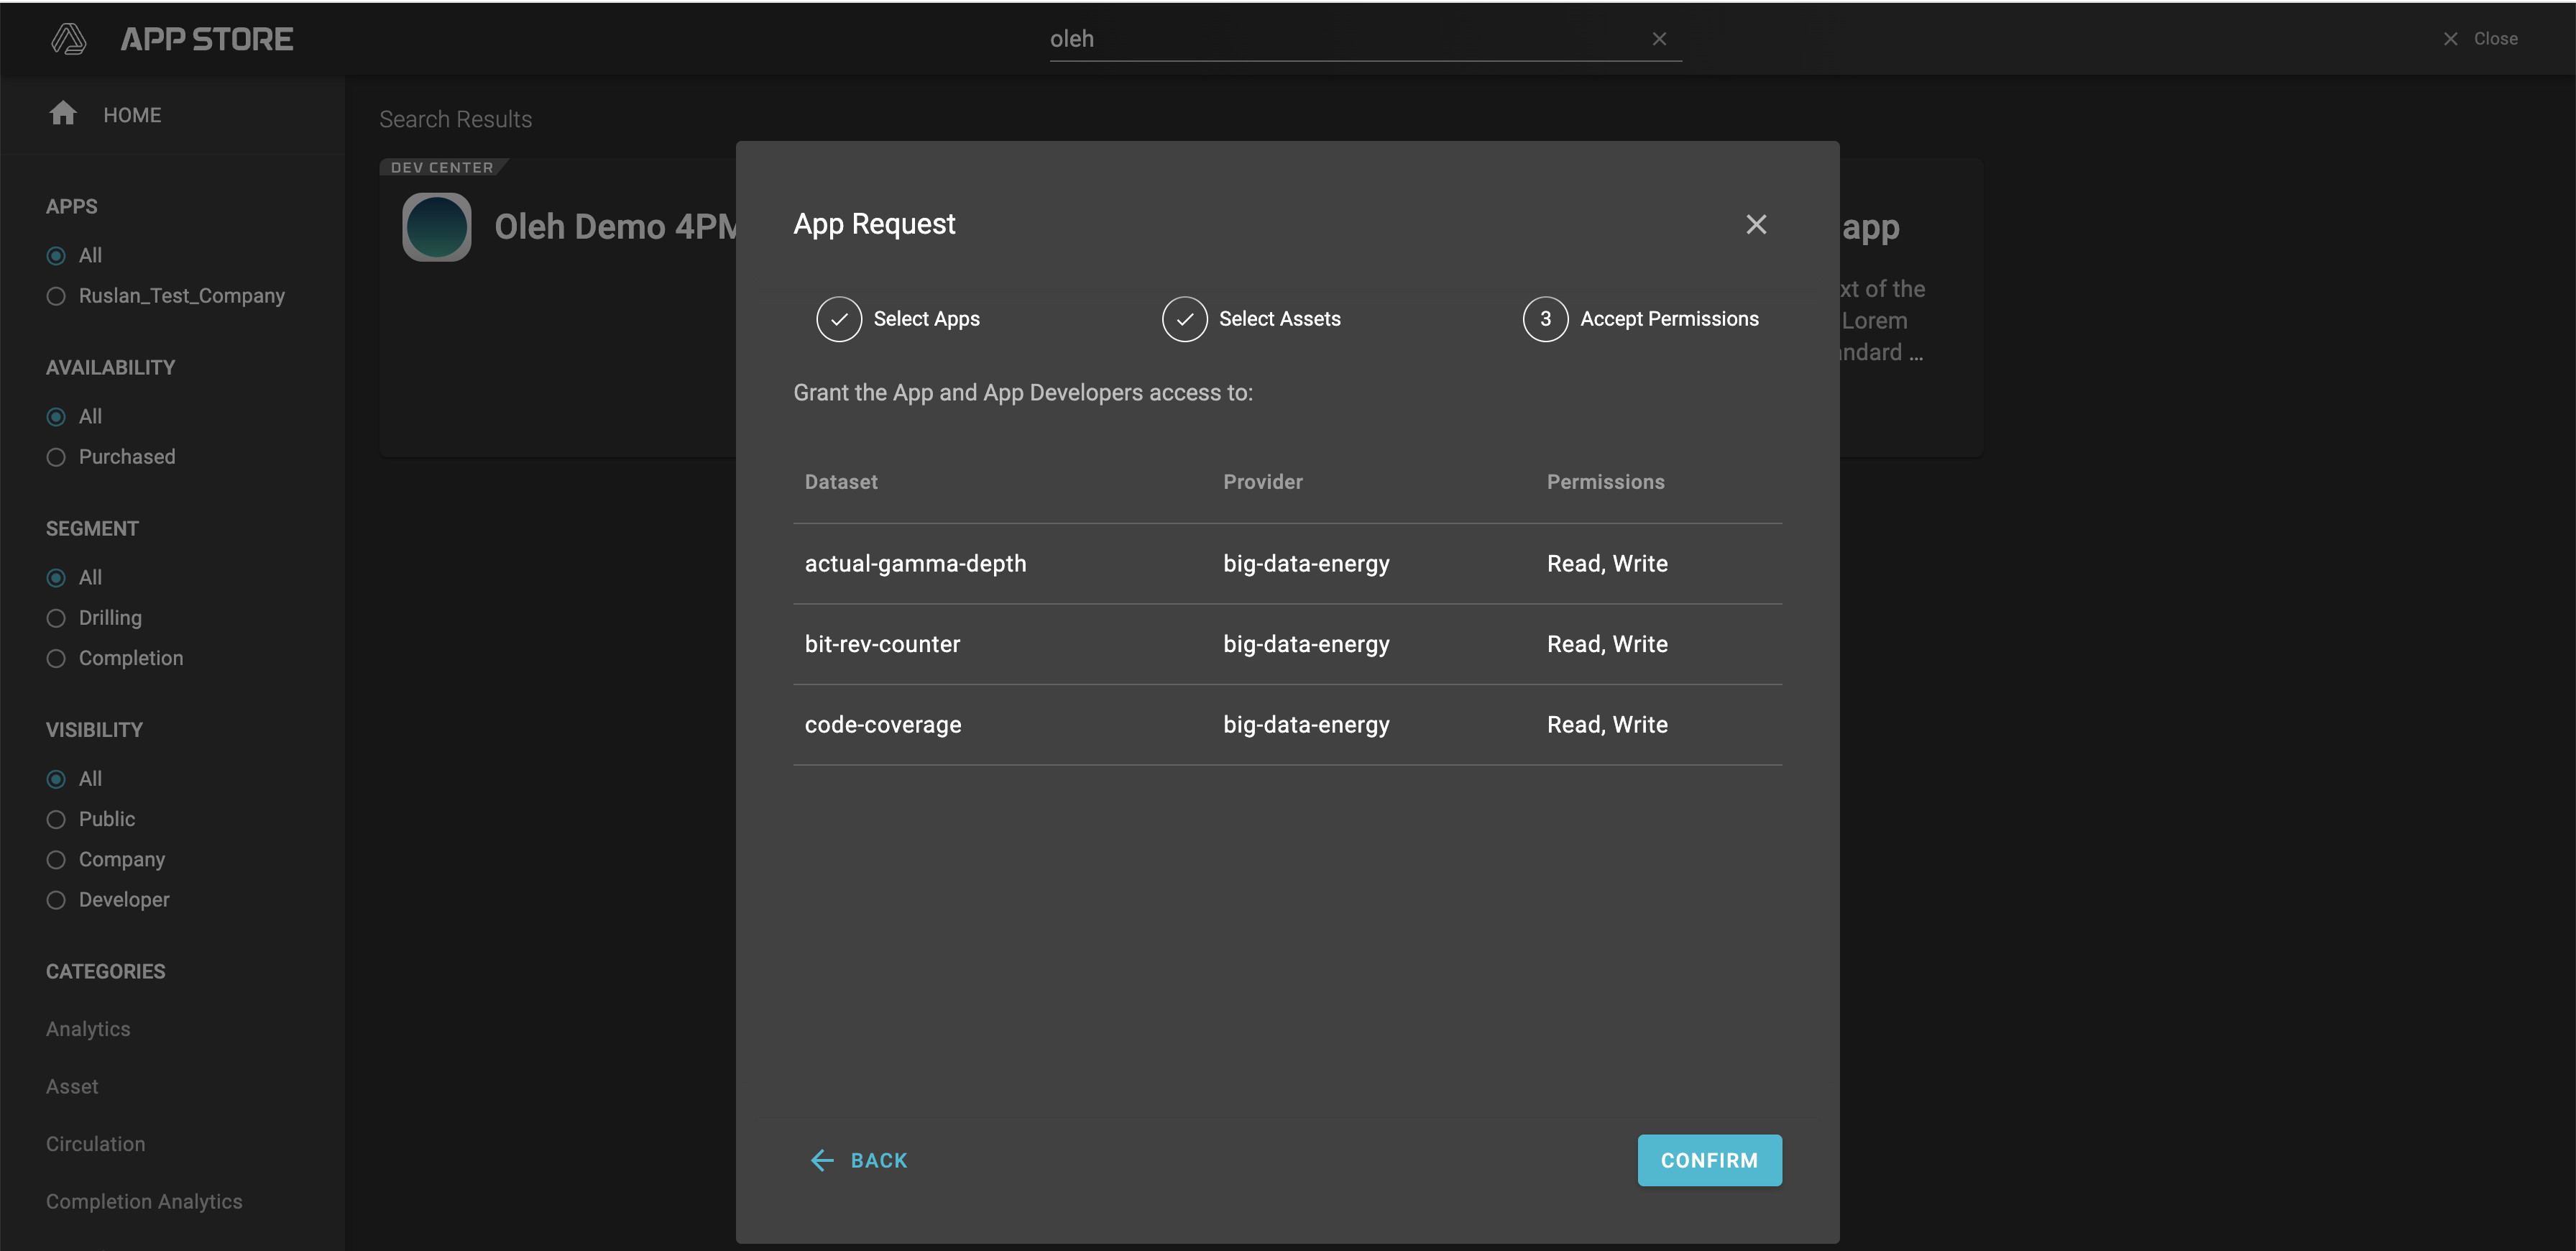
- Confirm that you grant the App and App Developers access to datasets (without this step you are not able to proceed with purchase)
- After this, you need to wait while the app owner approves the request. During this time you will see “Waiting for approval” on app’s card

- Once it approved, users are able to add the app to their dashboards

Request to Upgrade Purchased App
Find the App in the App Store that was previously purchased
Click “Upgrade” button

- Set updated list of assets, mark checkbox and press “Send” button
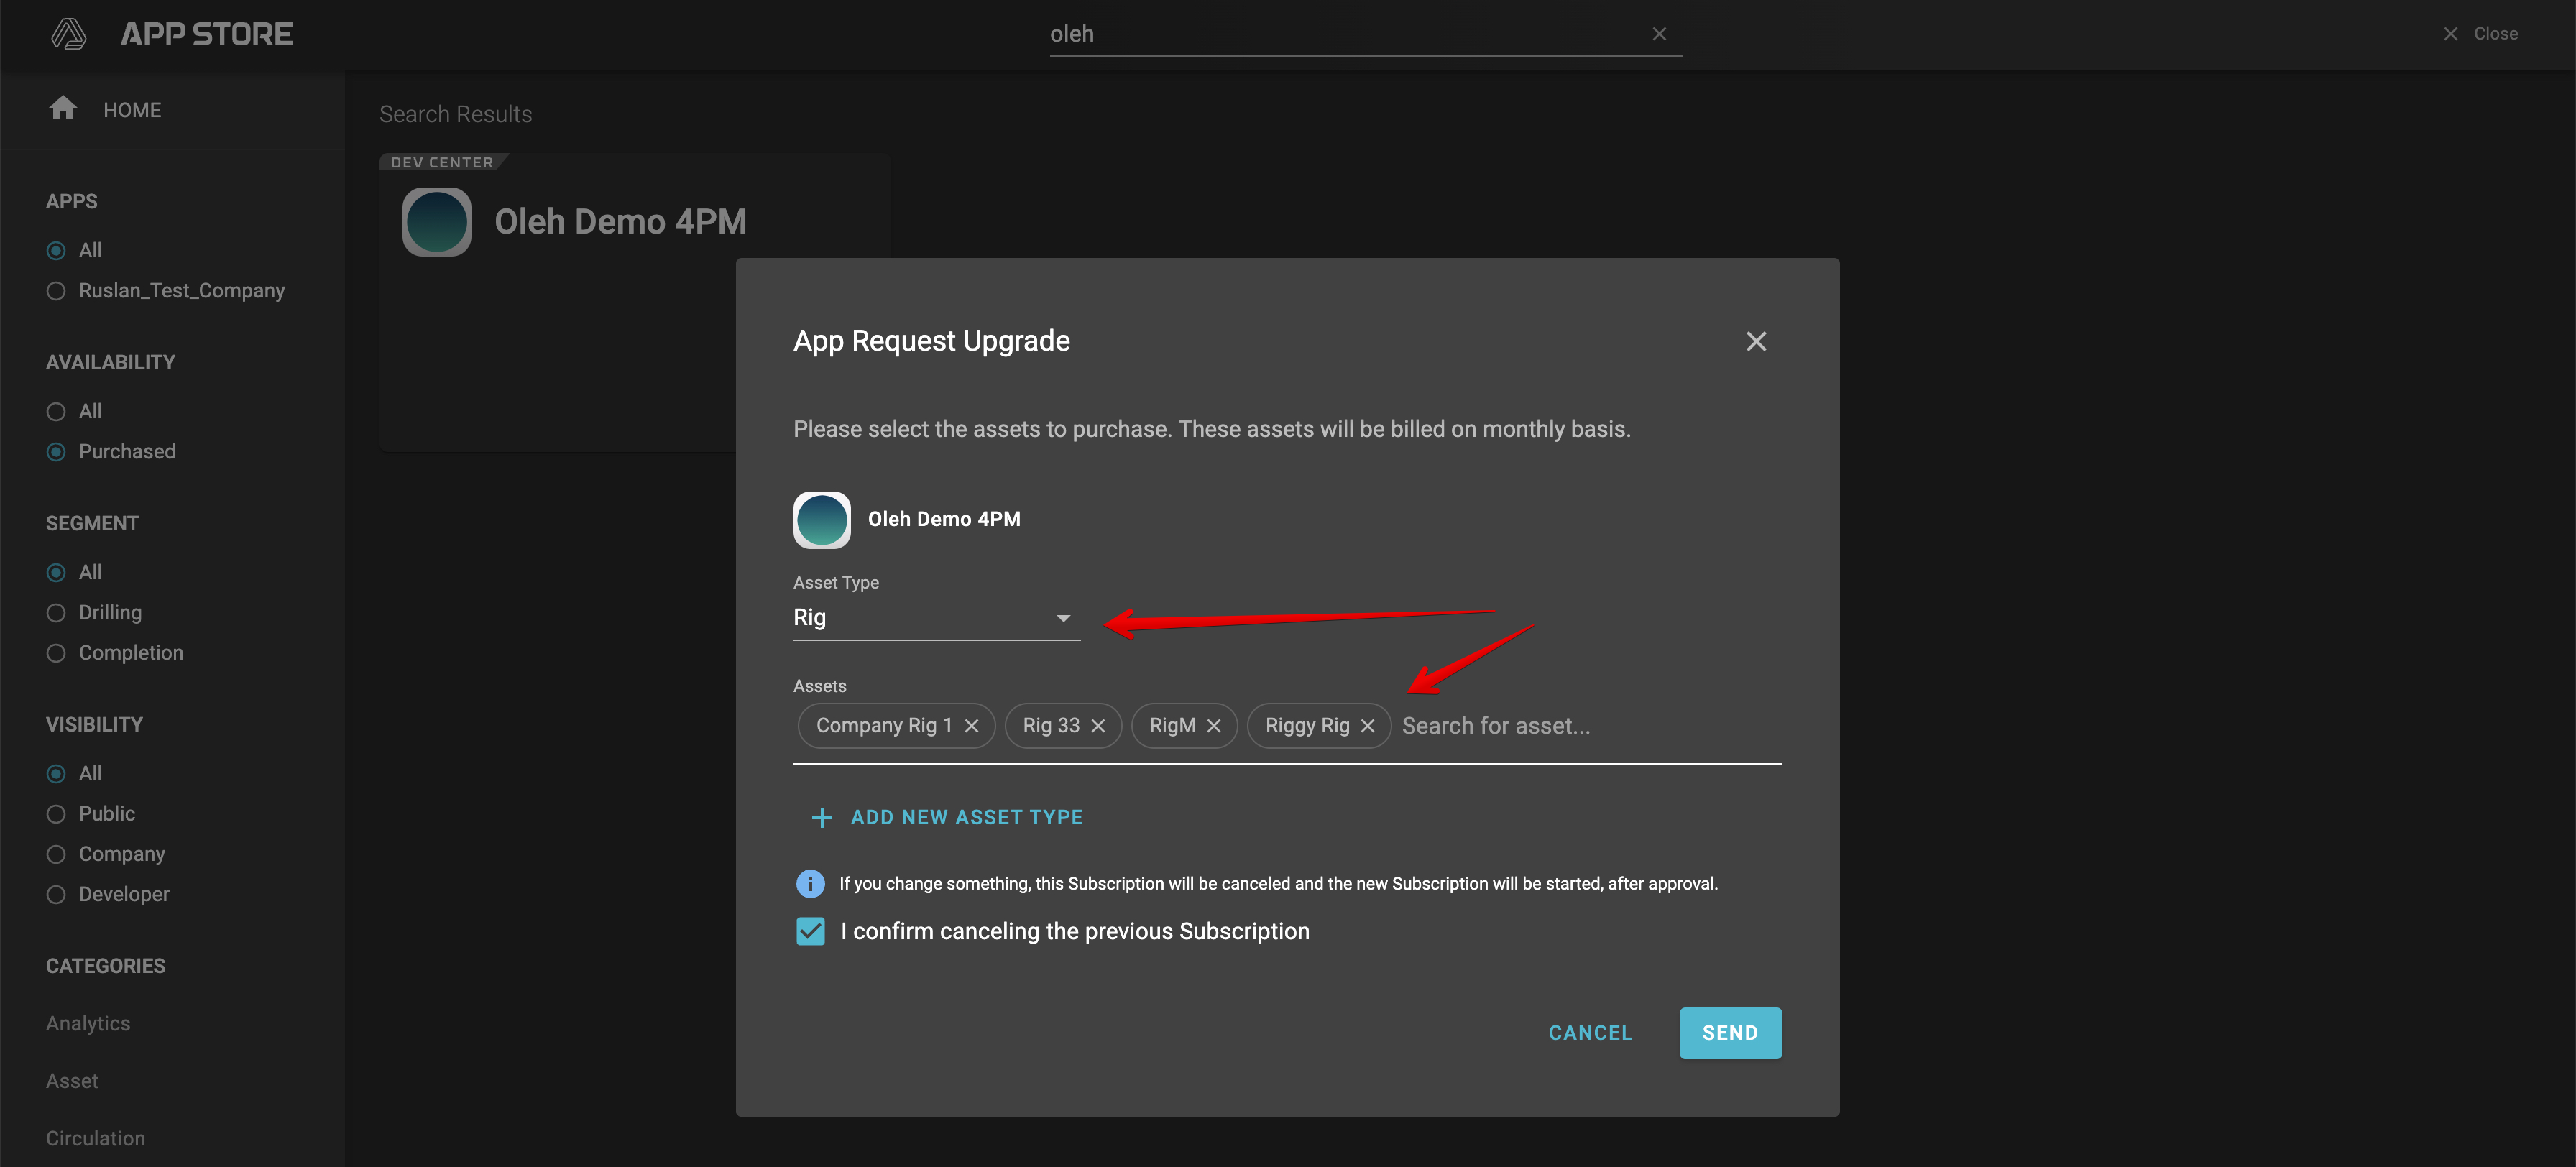
- While you are waiting for update request approve, you are able to add app with initial list of assets

- After the upgrade request is approved, there will be an upgraded list of assets available
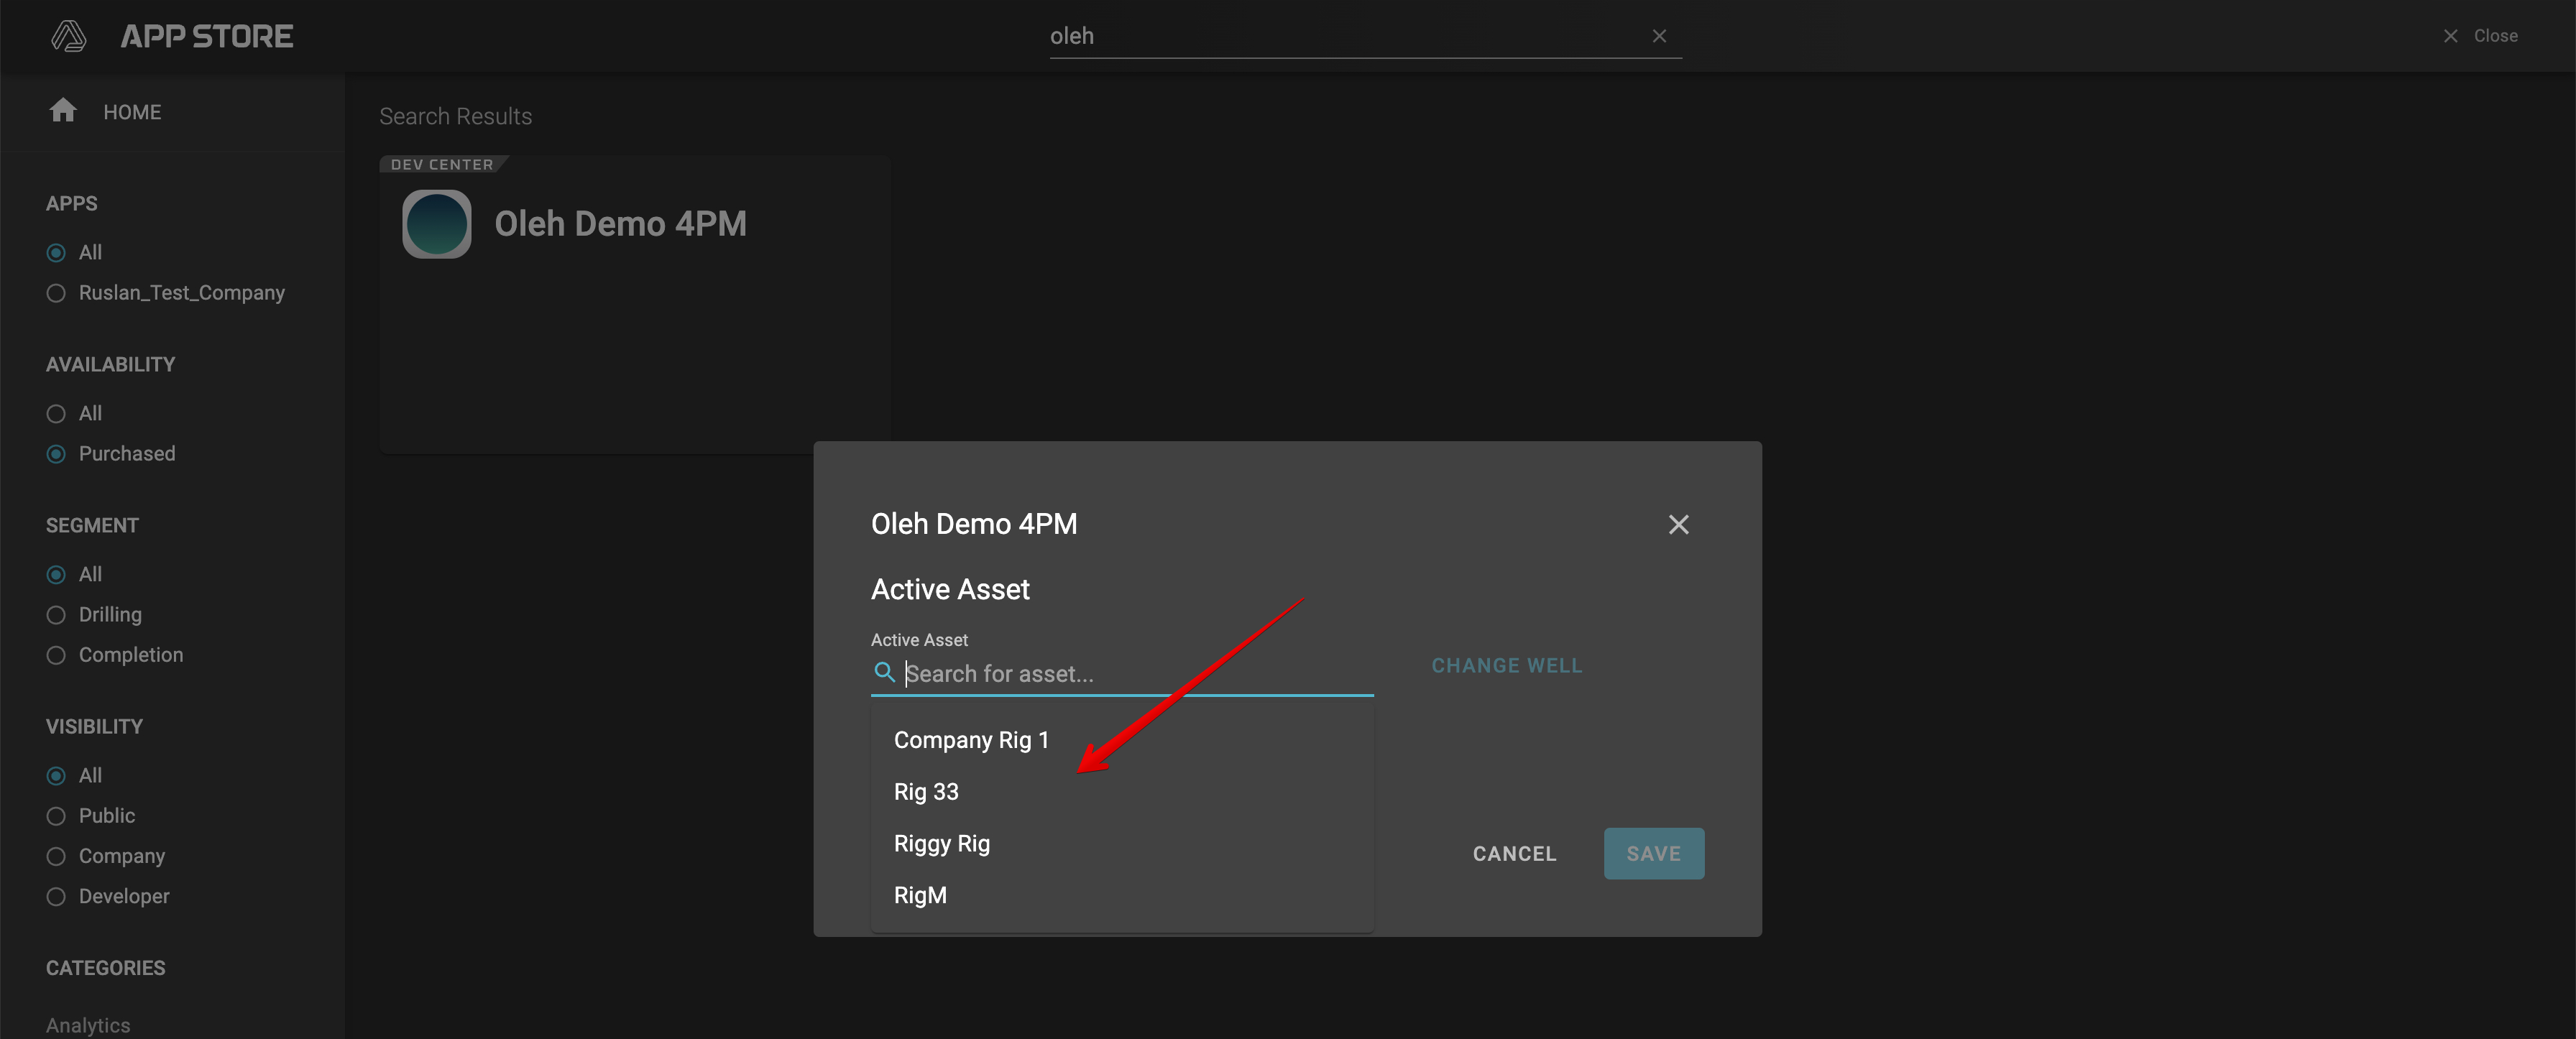
App Dependencies
Upon having an application provisioned for an asset, rig (or Completions asset type), program or company, any backend application will be automatically added to a new streams created. Since provisioning is created for front end applications, dependencies to backend applications create the appropriate link.
This section describes how to set backend application dependencies such that they are automatically added to streams if they are provisioned as described in the previous section, “Creating App Provisioning”.
Dependencies can only be created between backend and frontend apps. If a backend app does not have a frontend app, then a dummy frontend app must be created as a shell to attach the proper dependencies. The following two sections describe how to add dependencies, as well as how to create a dummy frontend app to host the dependent backen app.
Backend Dependencies to a Frontend App
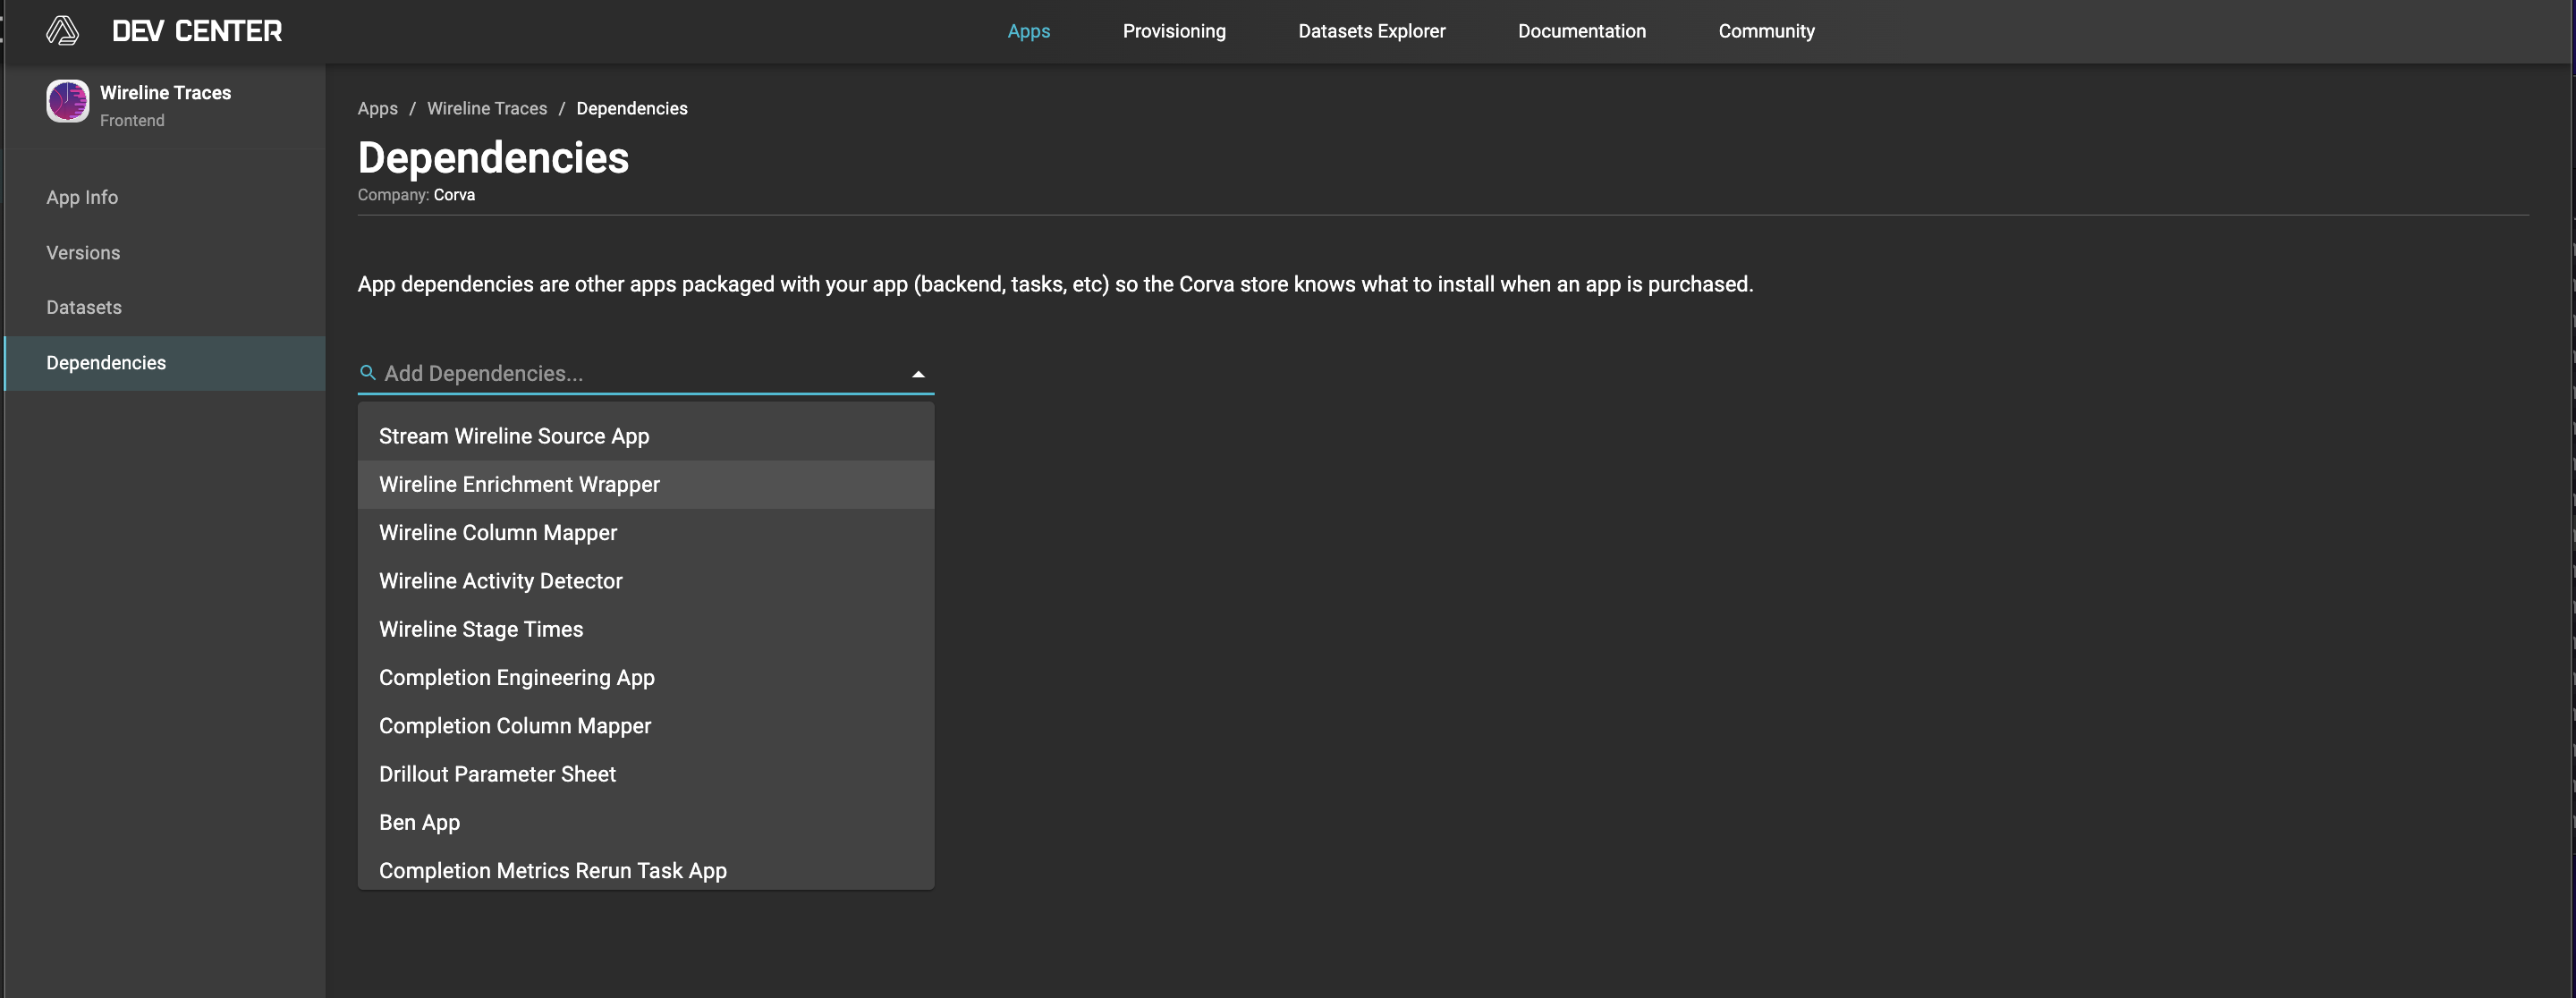
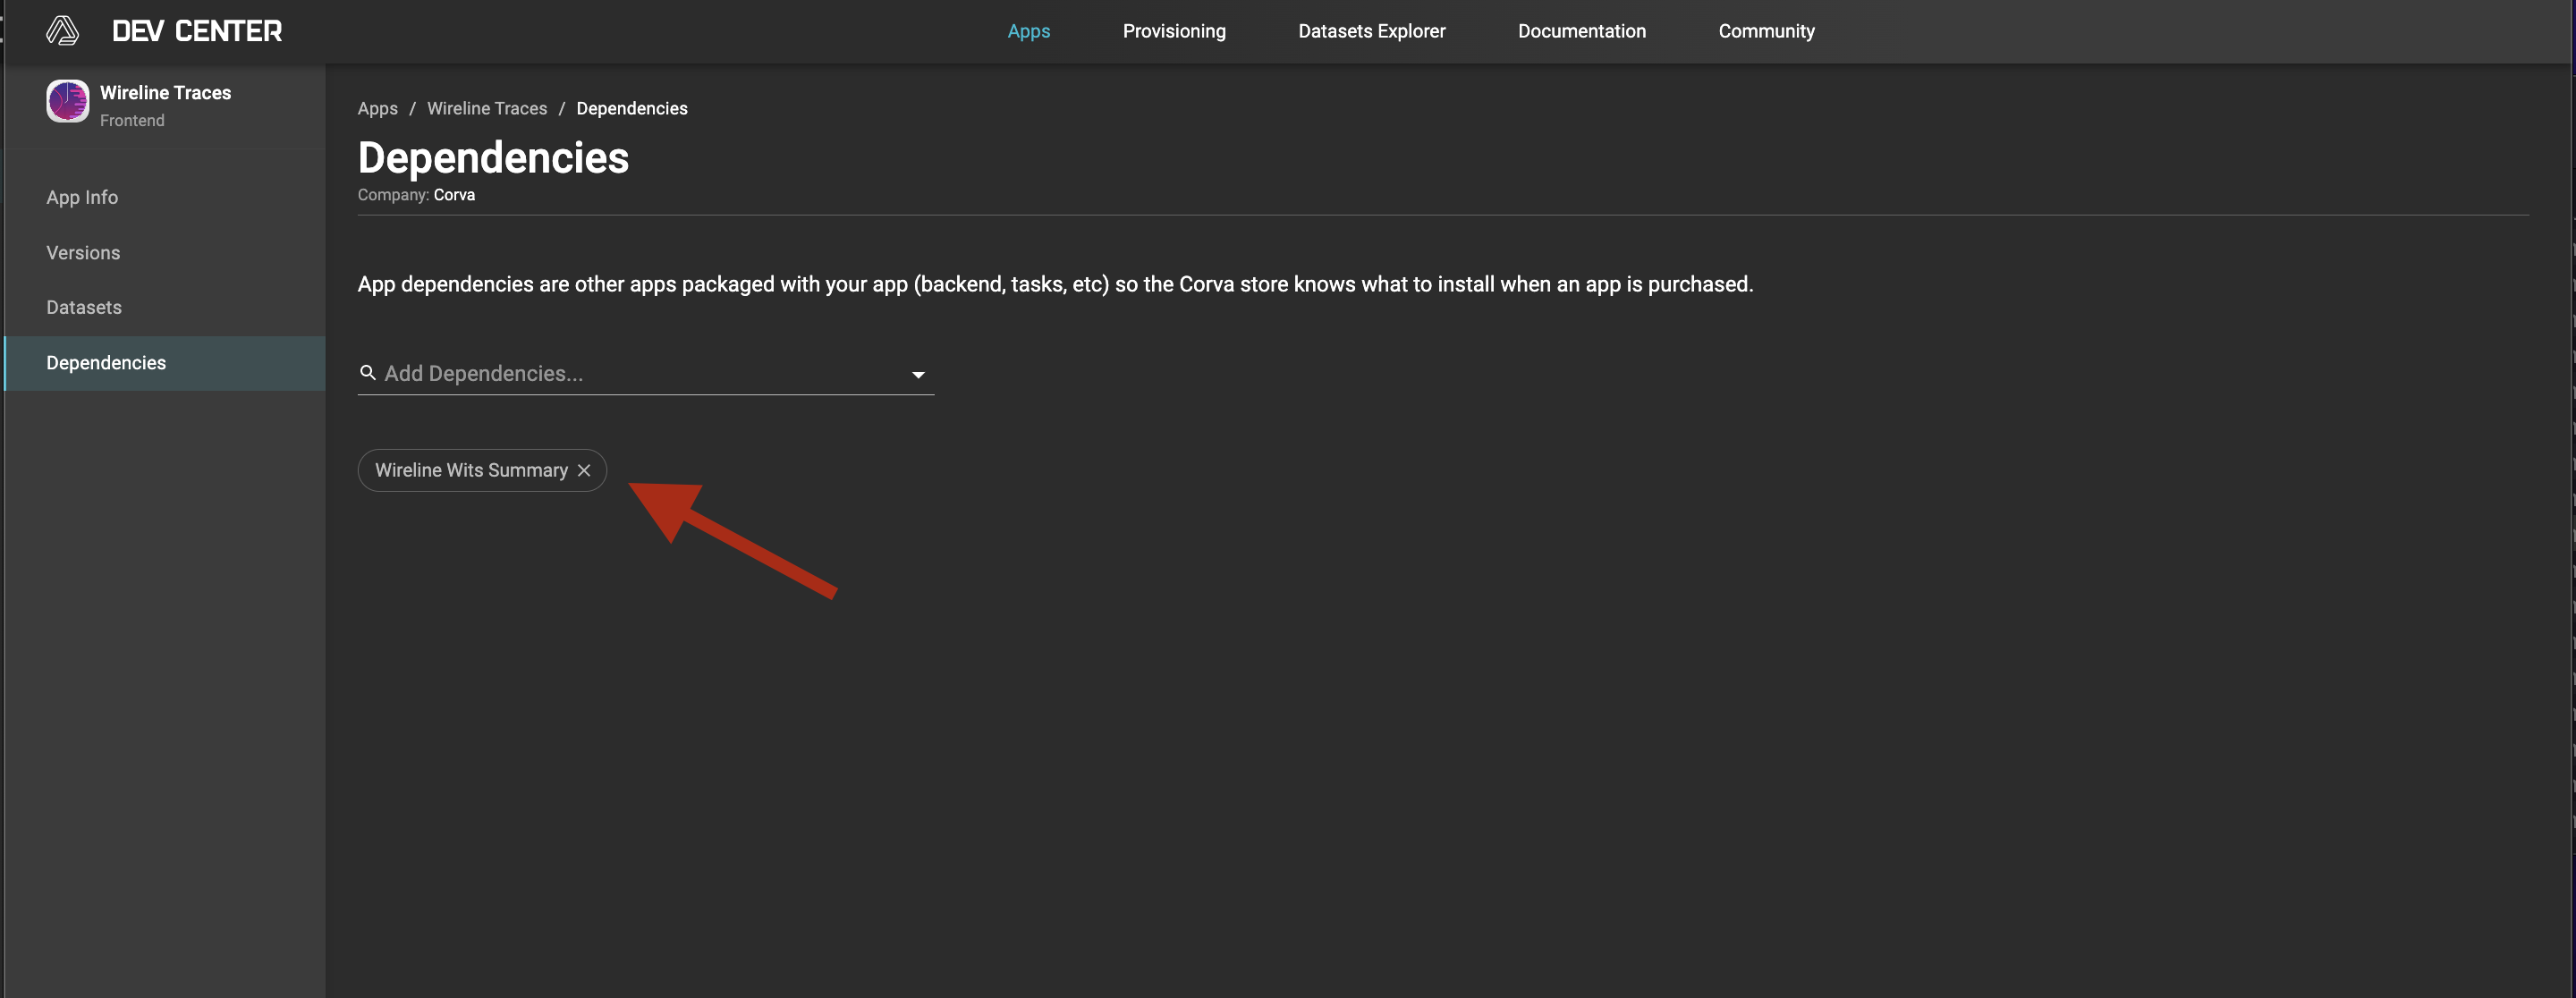
In the example below, we show how the backend app Wireline Wits Summary, is added as a dependency to the fronent app Wireline Traces.
- Go to frontend App in the App Store that you wish to add dependencies to
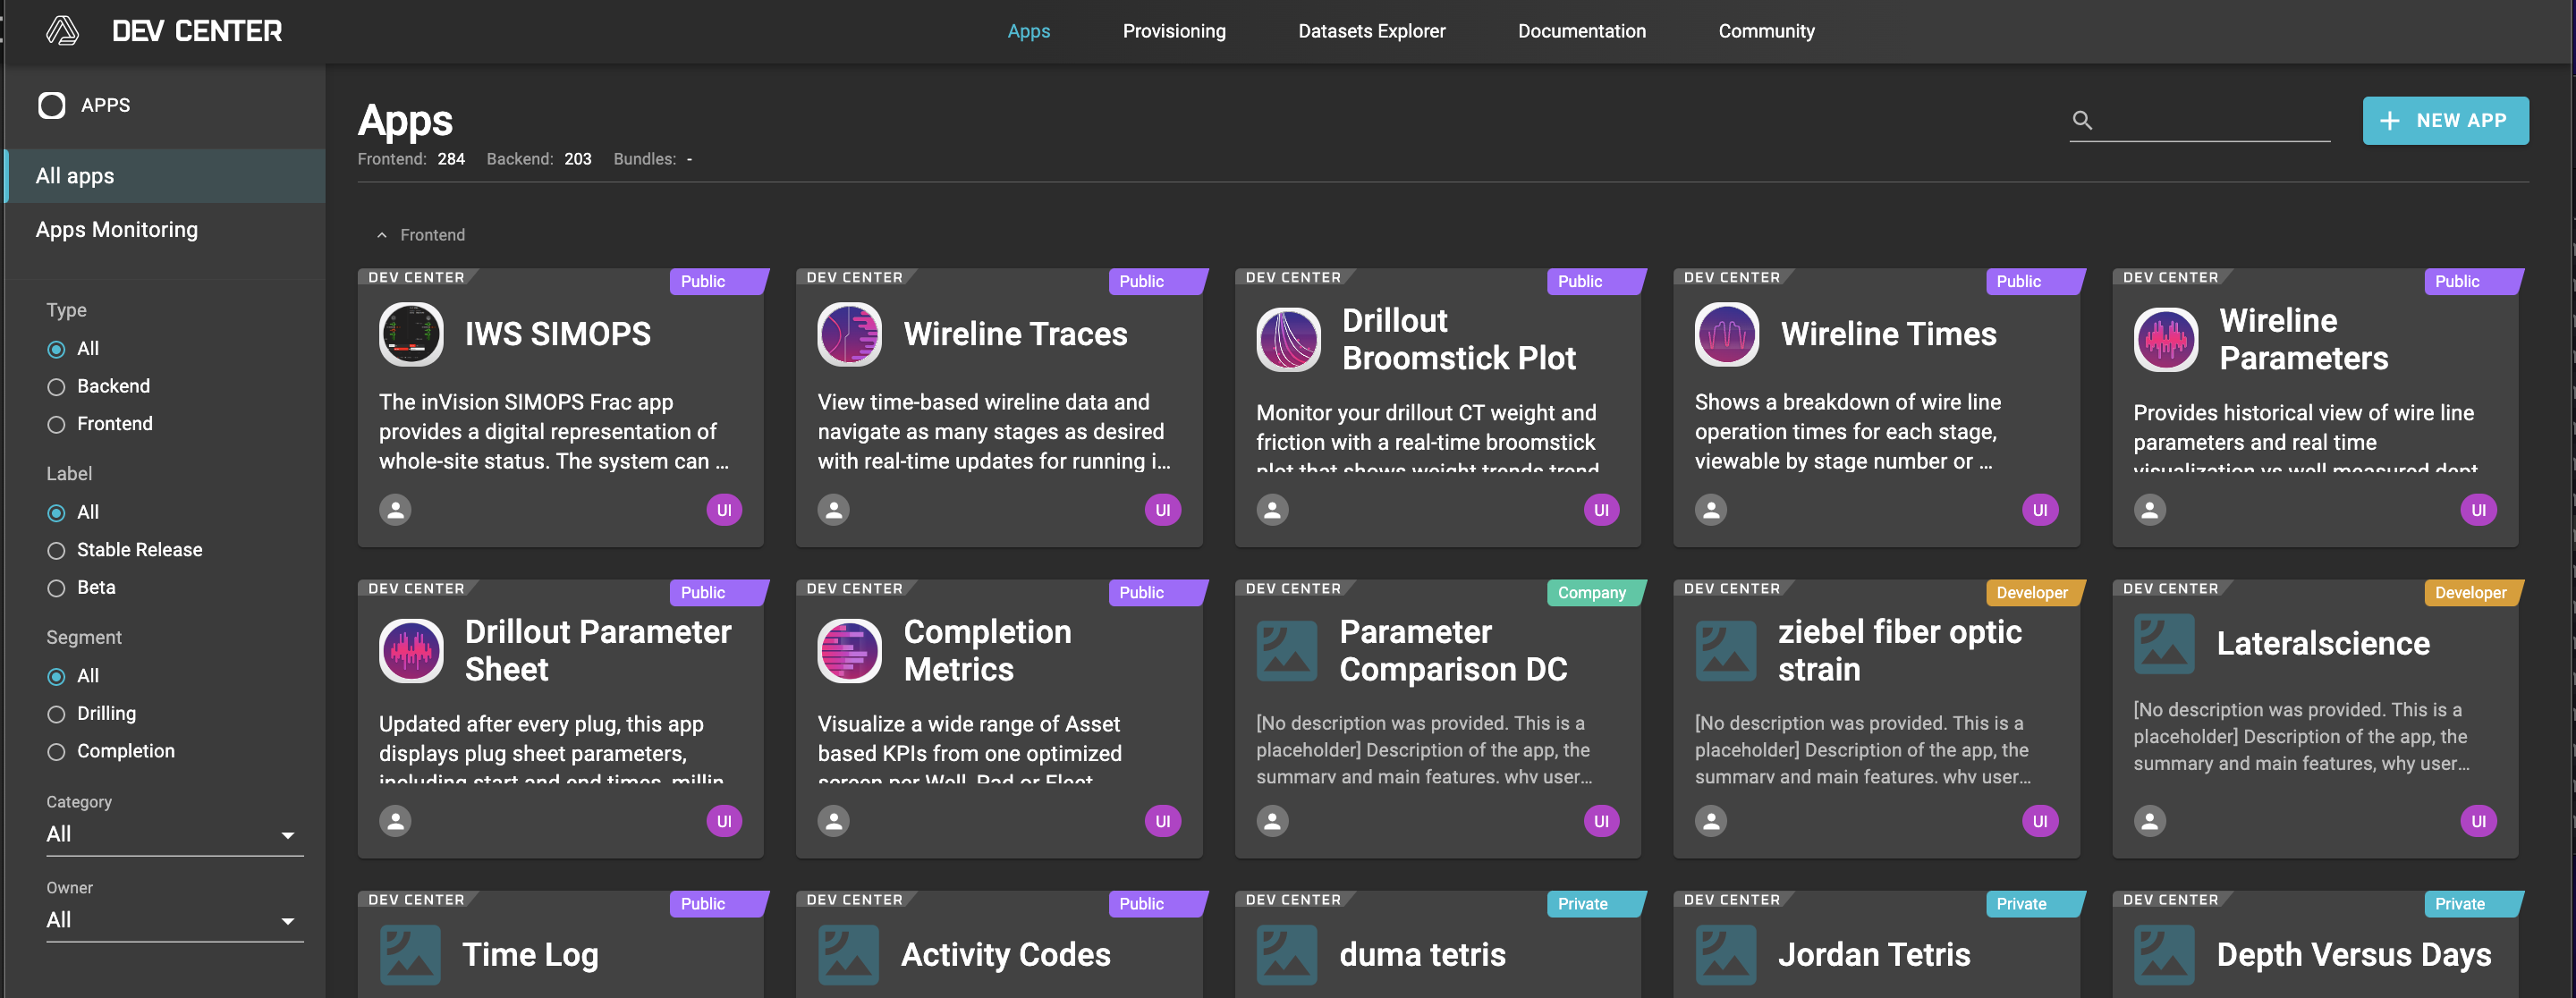
- Select Dependencies from navigation bar on the left
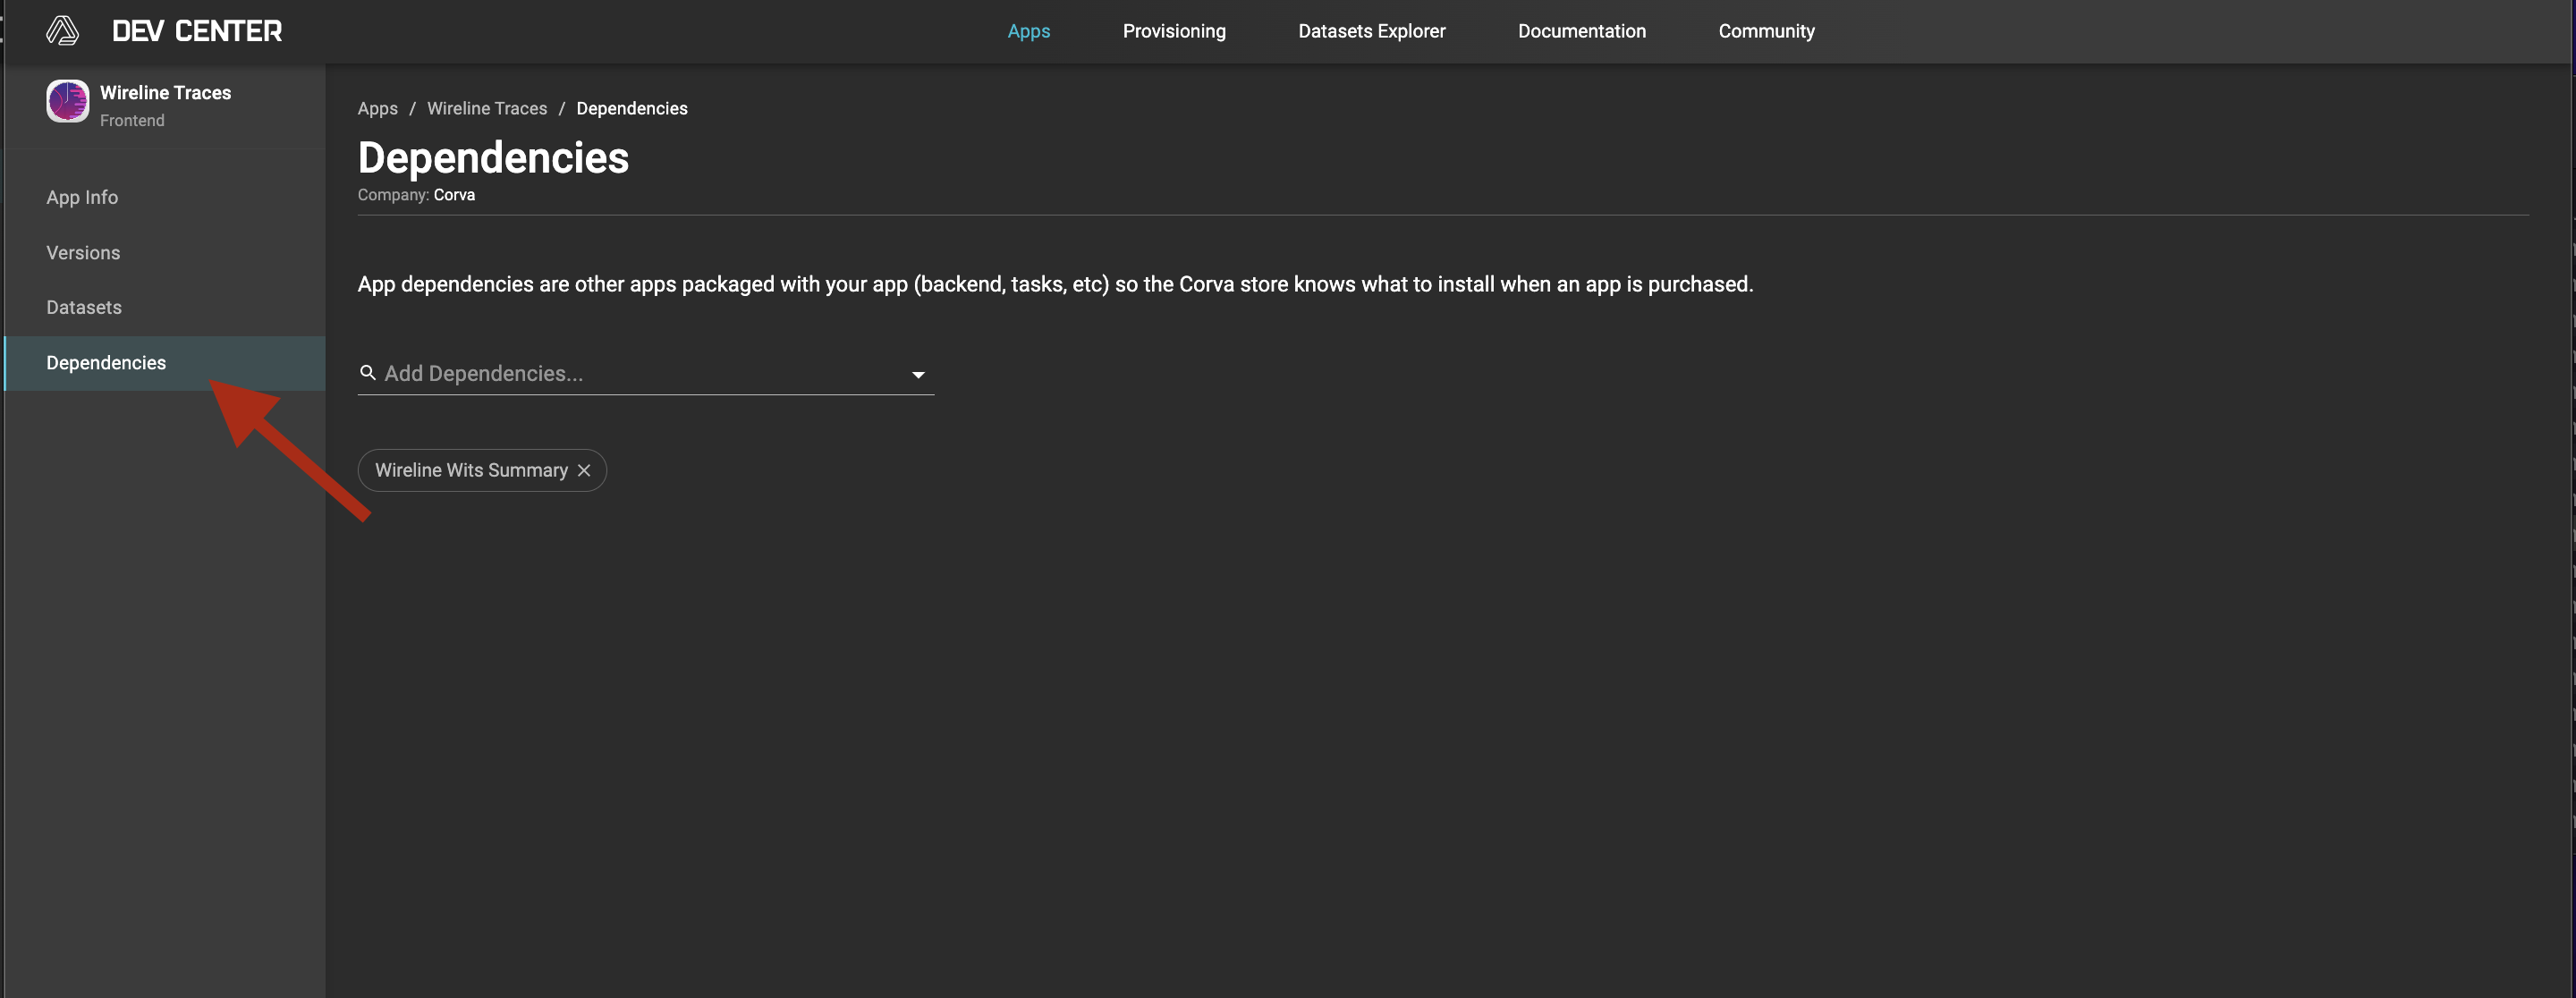
- Select the backend application from the dropdown menu
- The backend application will be displayed with a chip below
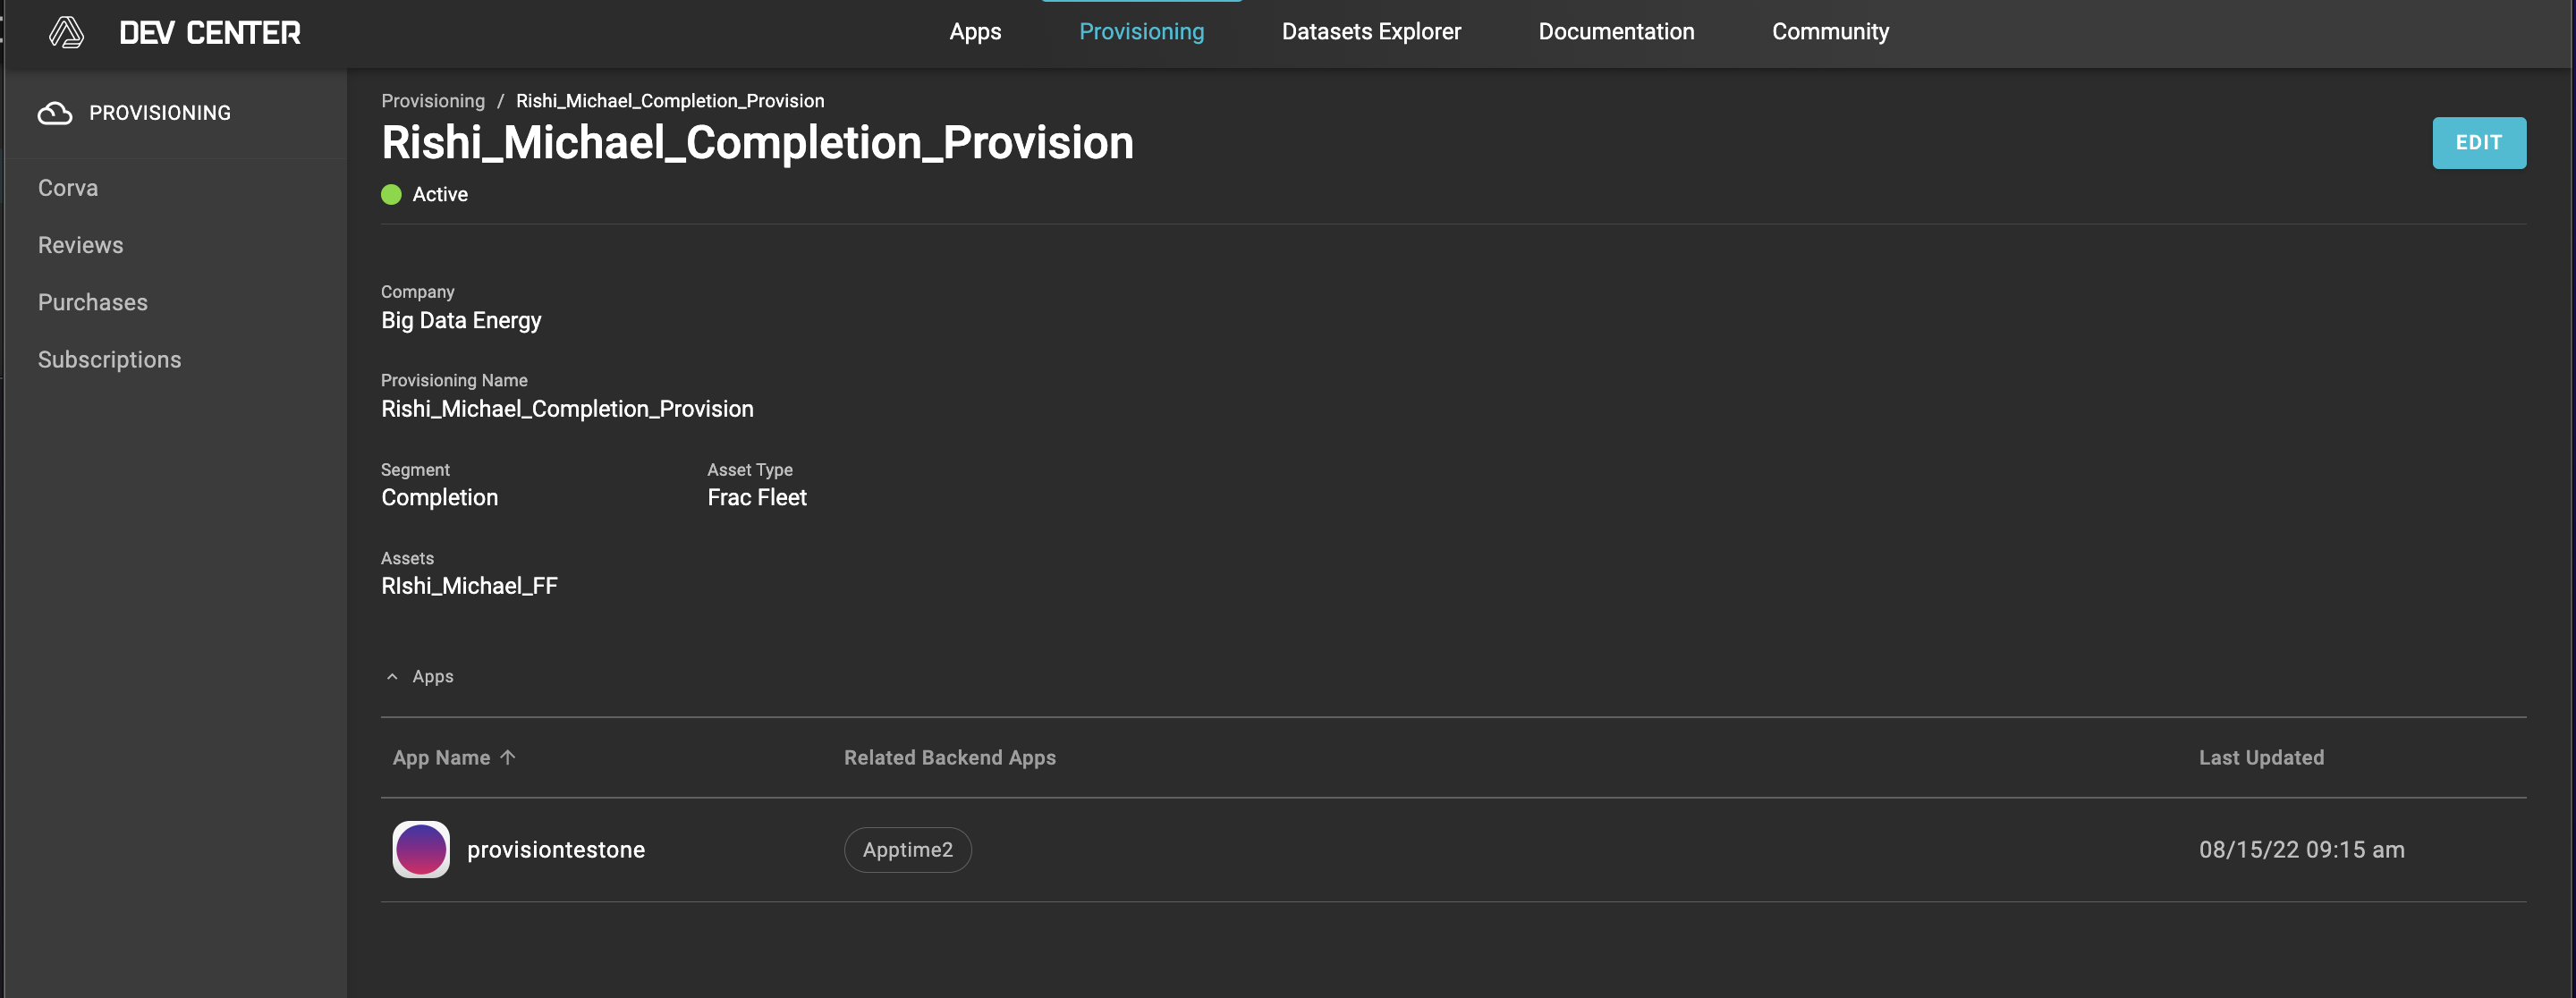
- Once the backend application is added as a dependency, it will be visible in the Provisioning screen as “Related Backend App”. The image below displays how the frontend application, provisiontestone, was provisioned for asset Rishi_Michael_FF, with the backend app Apptime2 as a dependent.
Backend Dependencies without a Frontend App
In the case where a backend app does not have a frontend app, but is still required to be deployed automatically to new streams, a dummy frontend app must be created as a shell with at least one package, even if it is empty. The following process must be used.
- As developeradmin of the same company of the backend application that needs provisioning, go to the App Store
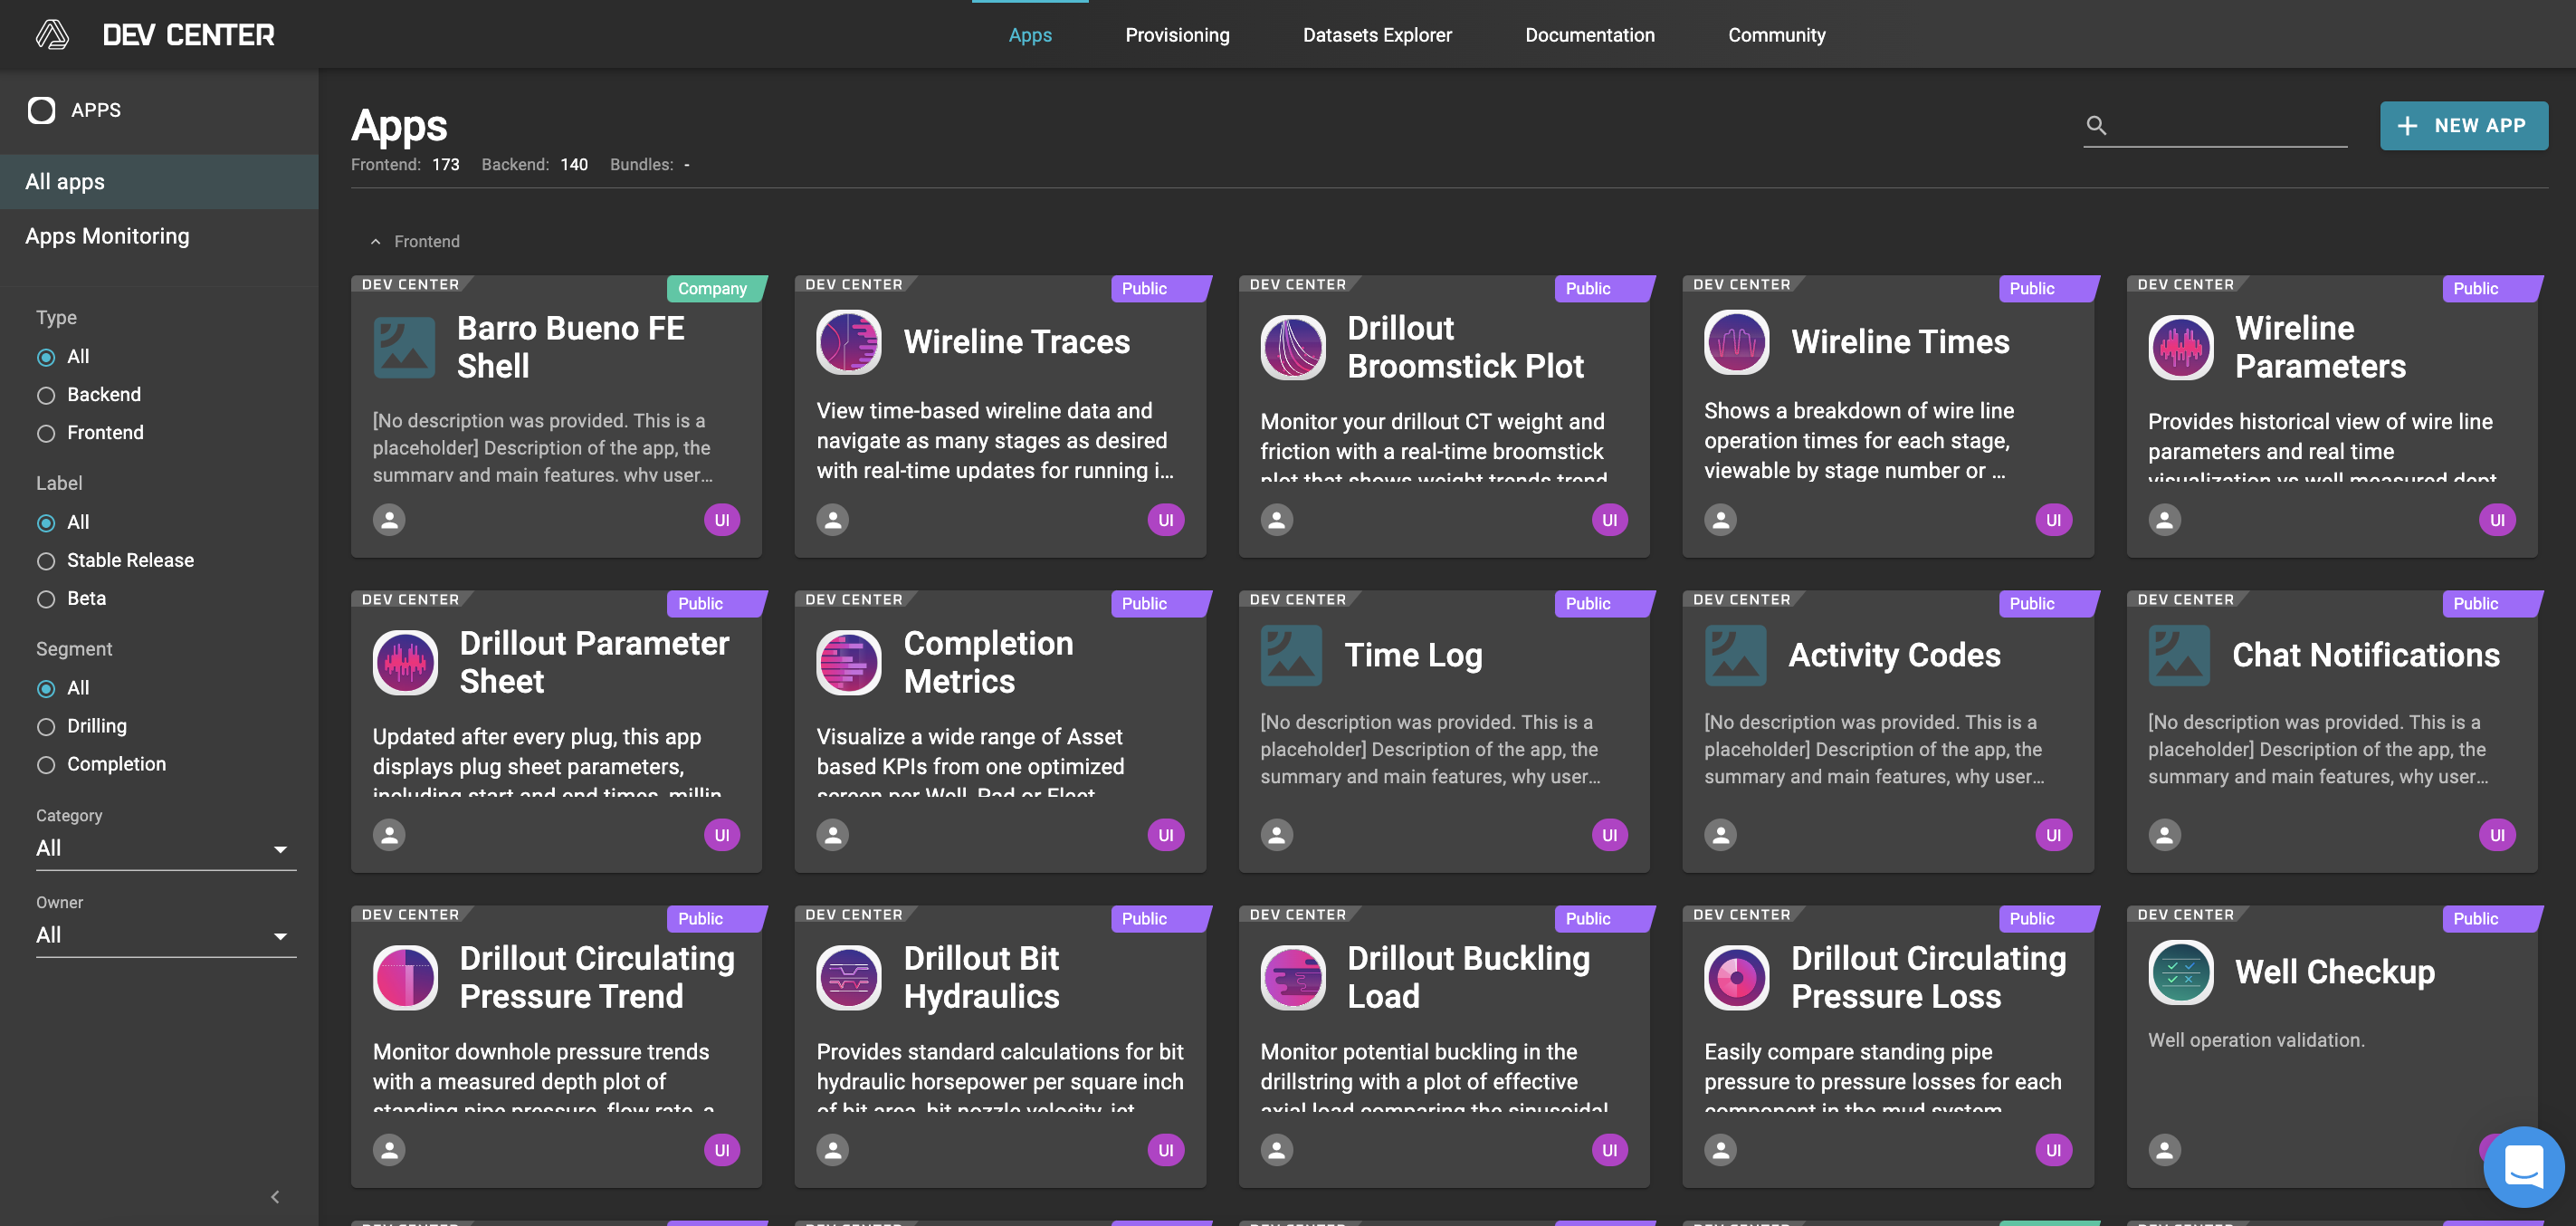
- Create New App on the top right
- Select Frontend App
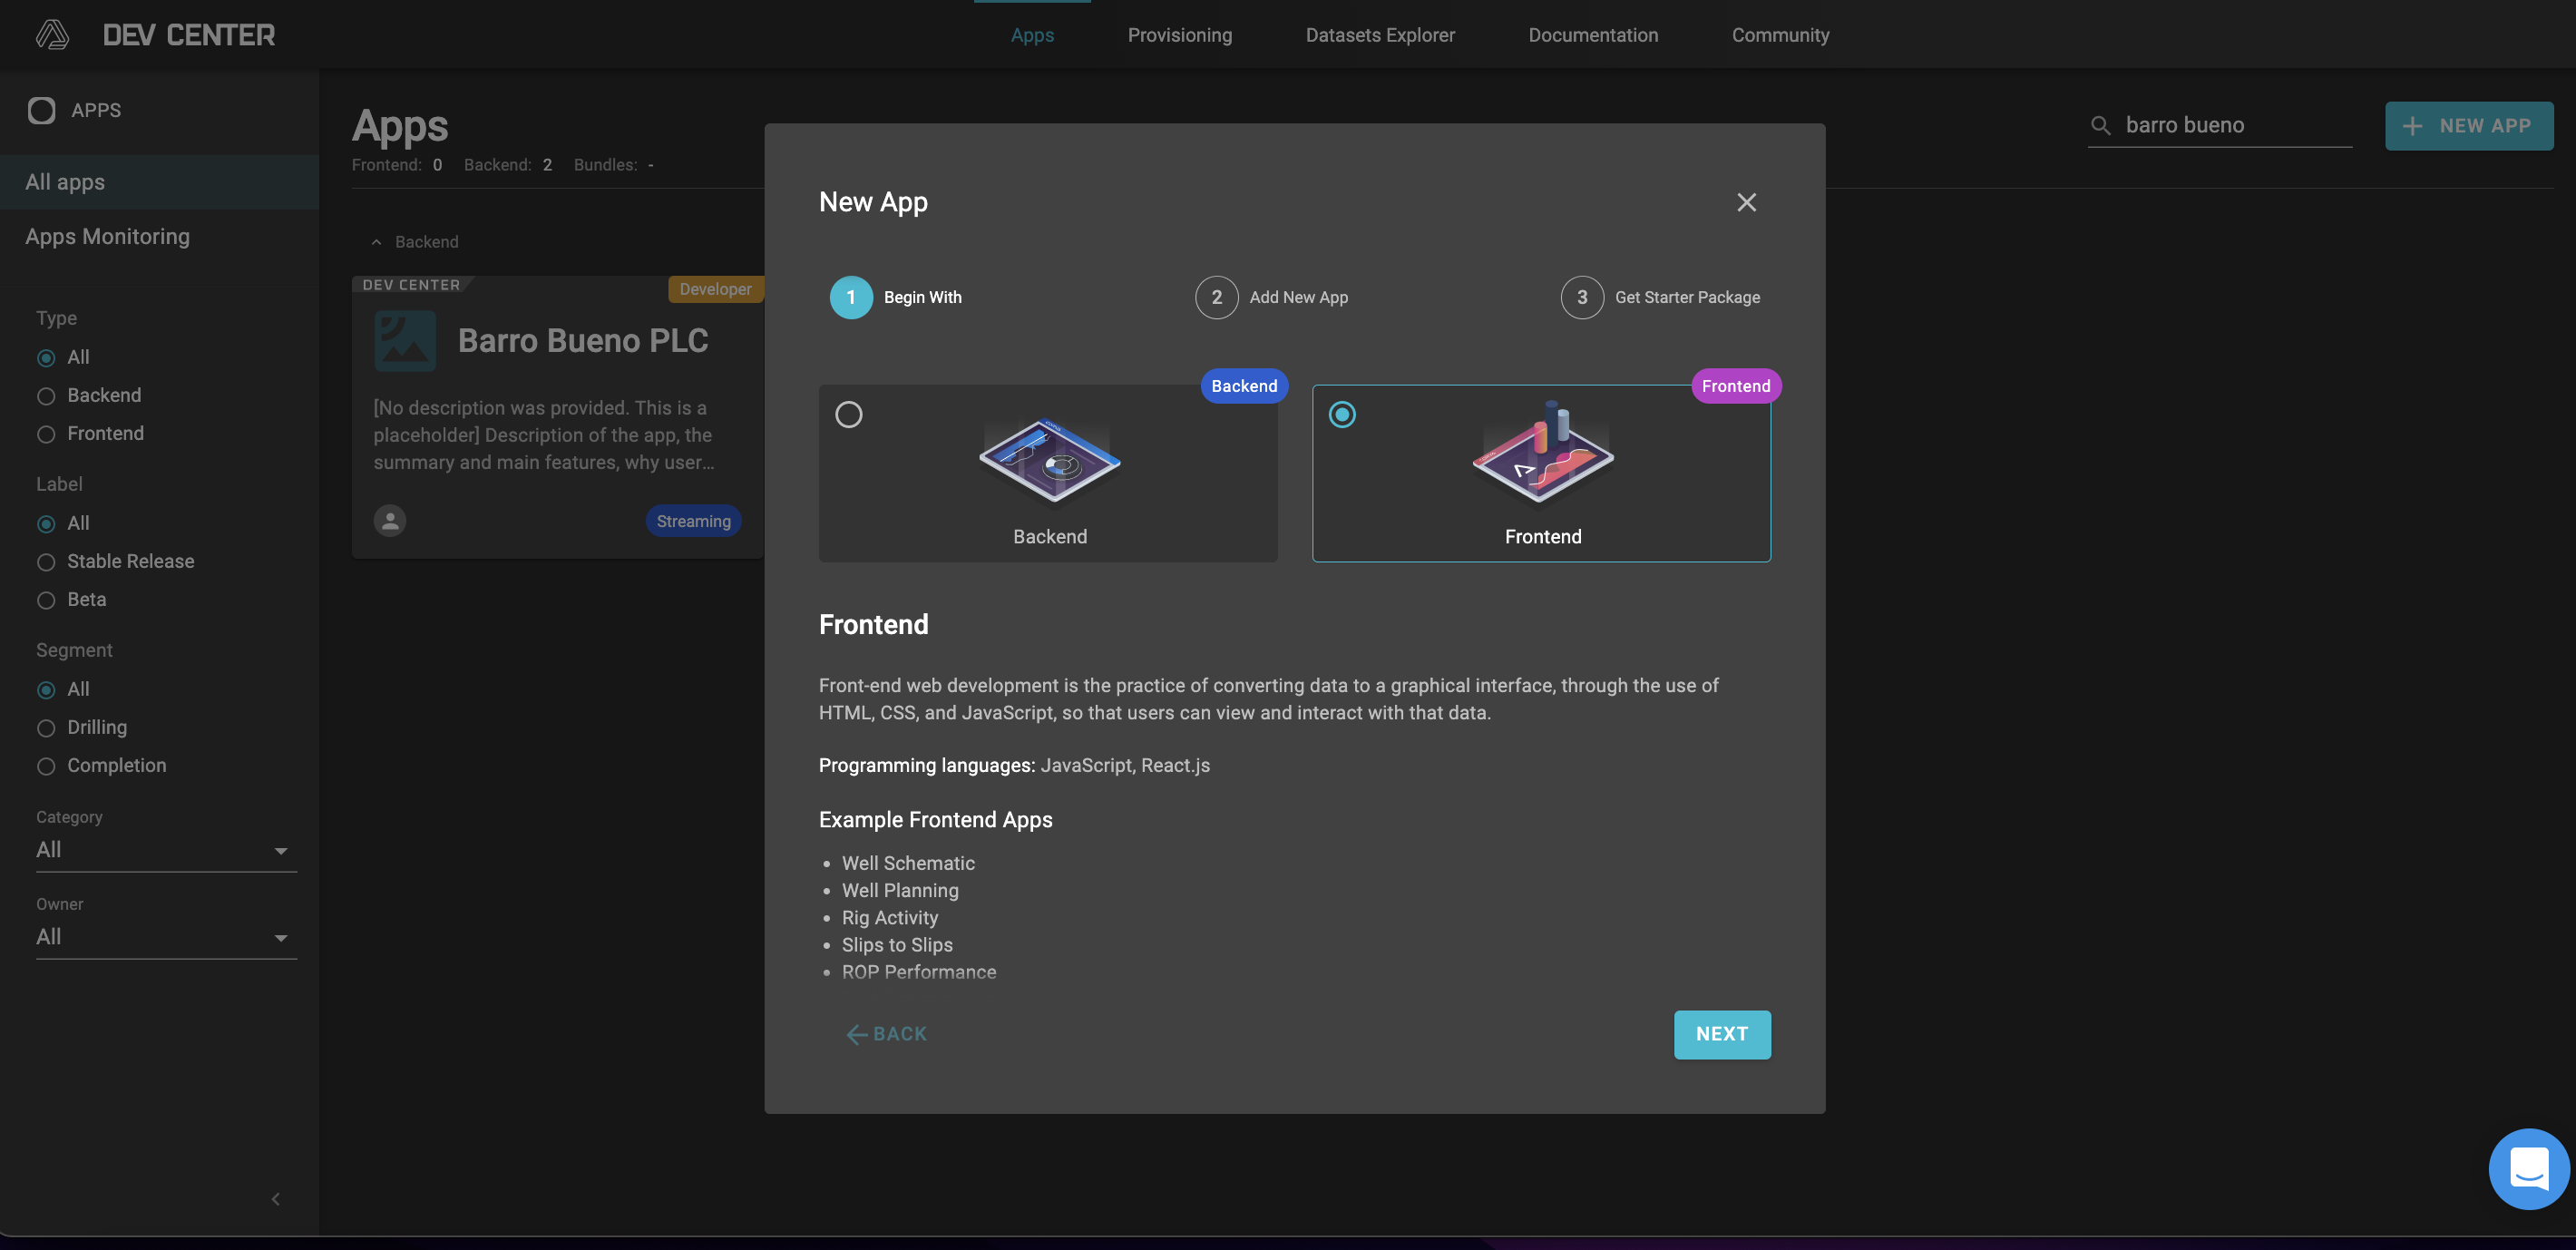
- Select appropriate segment and same category as the backend app to be provisioned
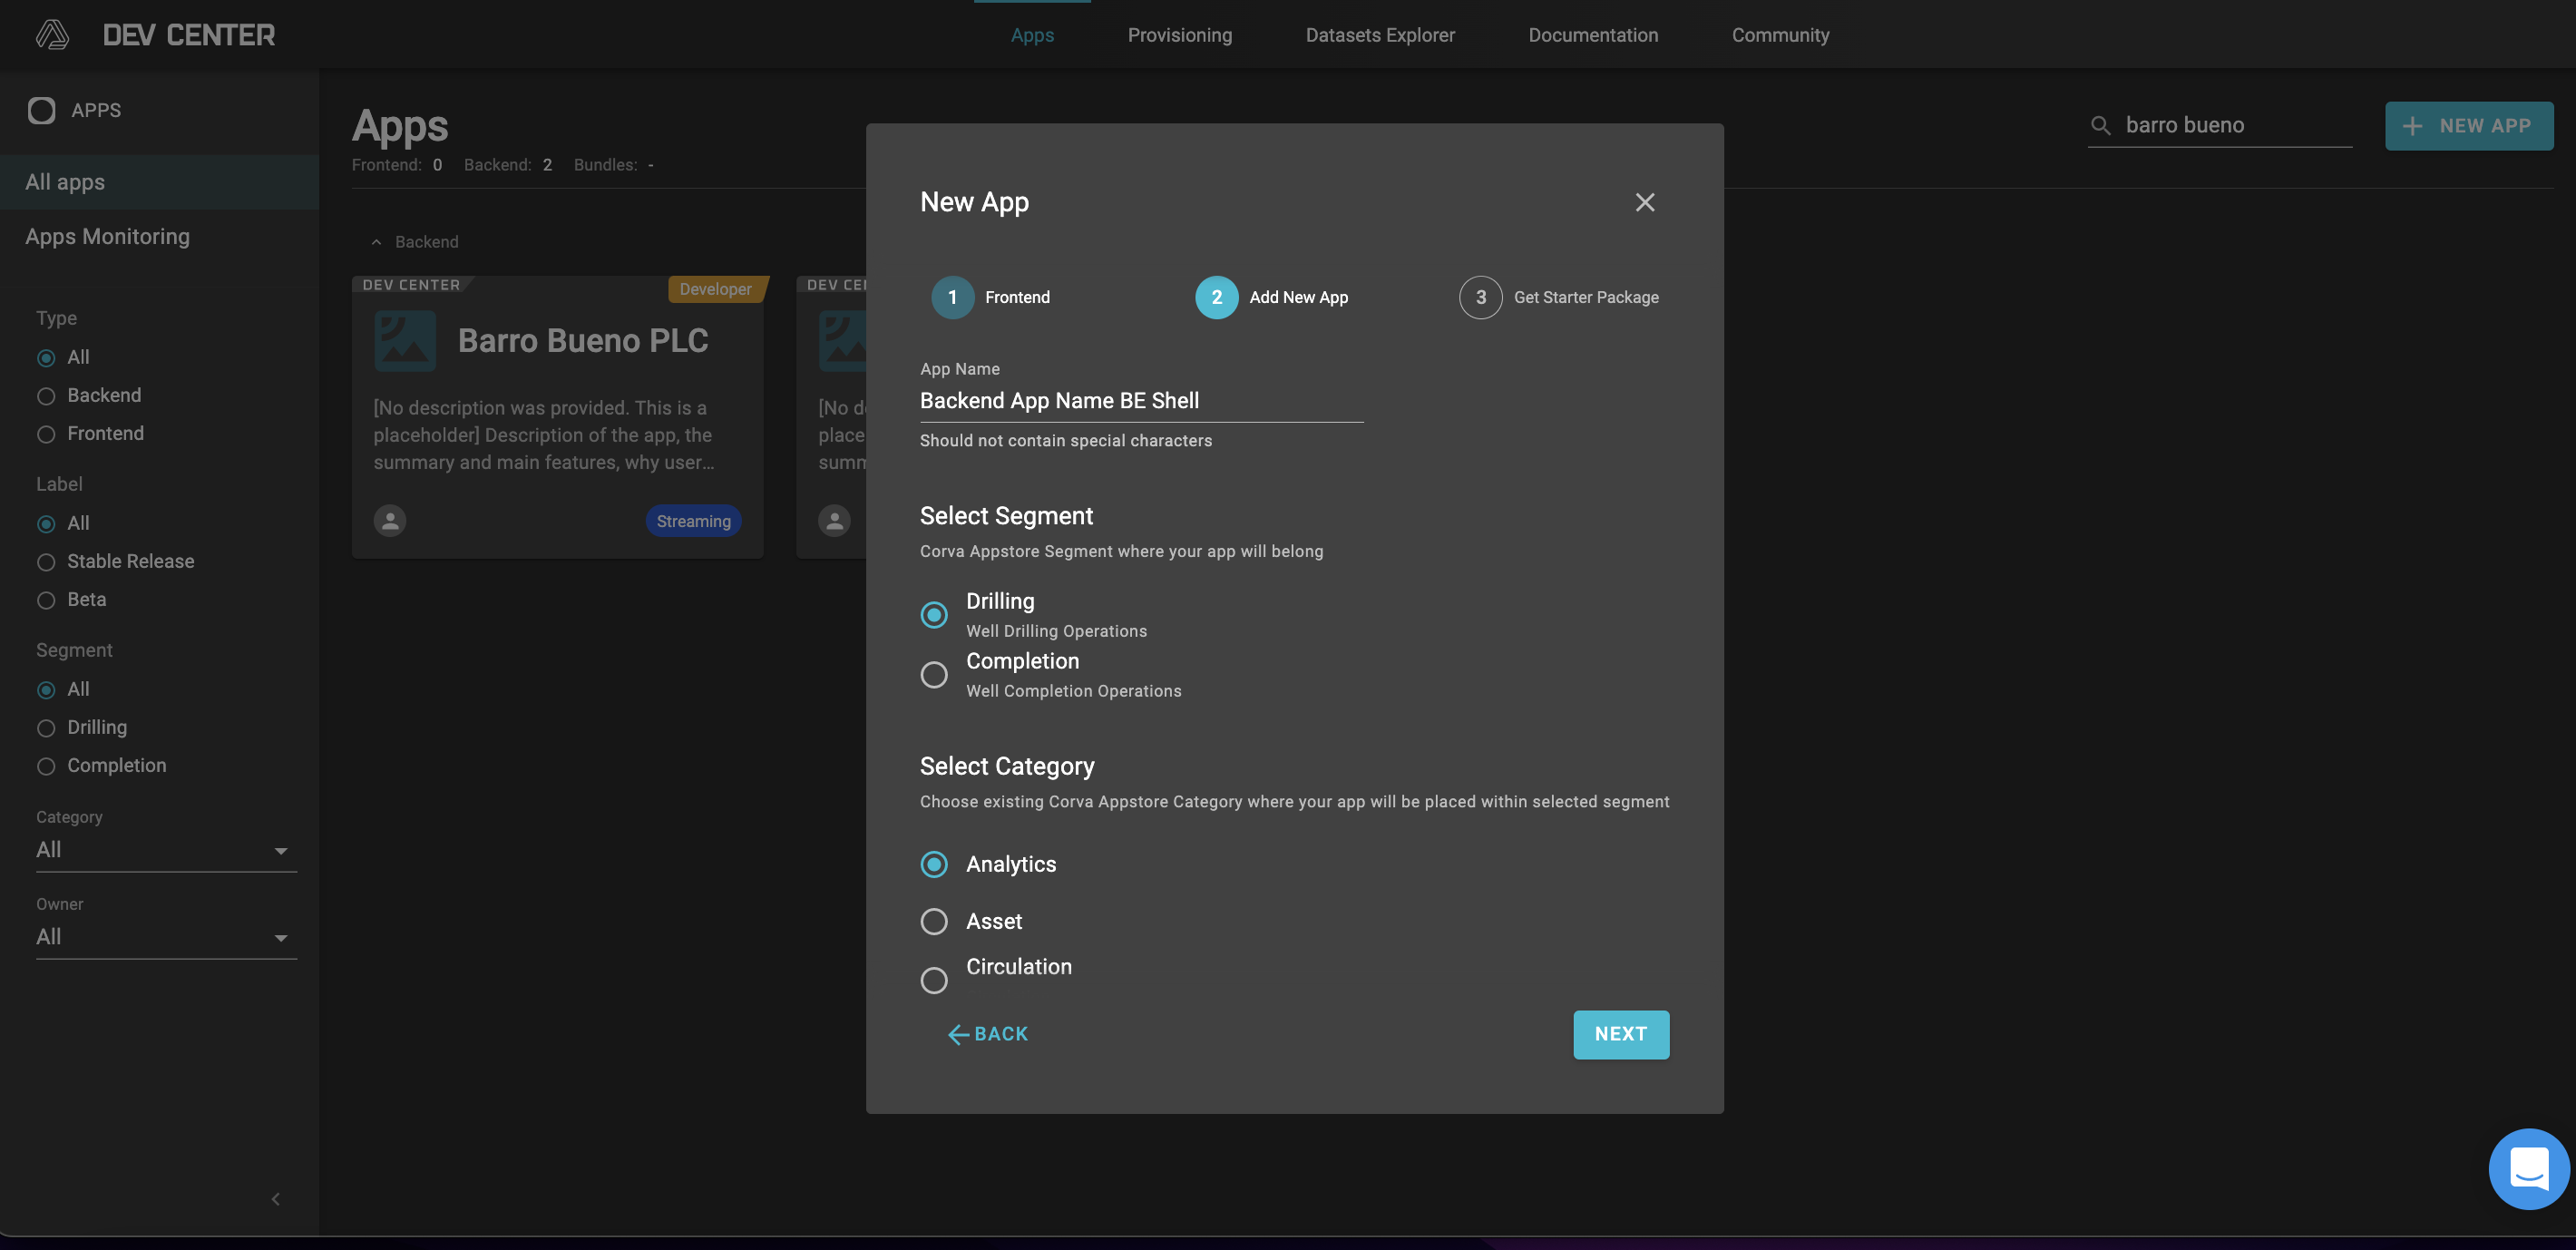
- Select desired CLI instructions
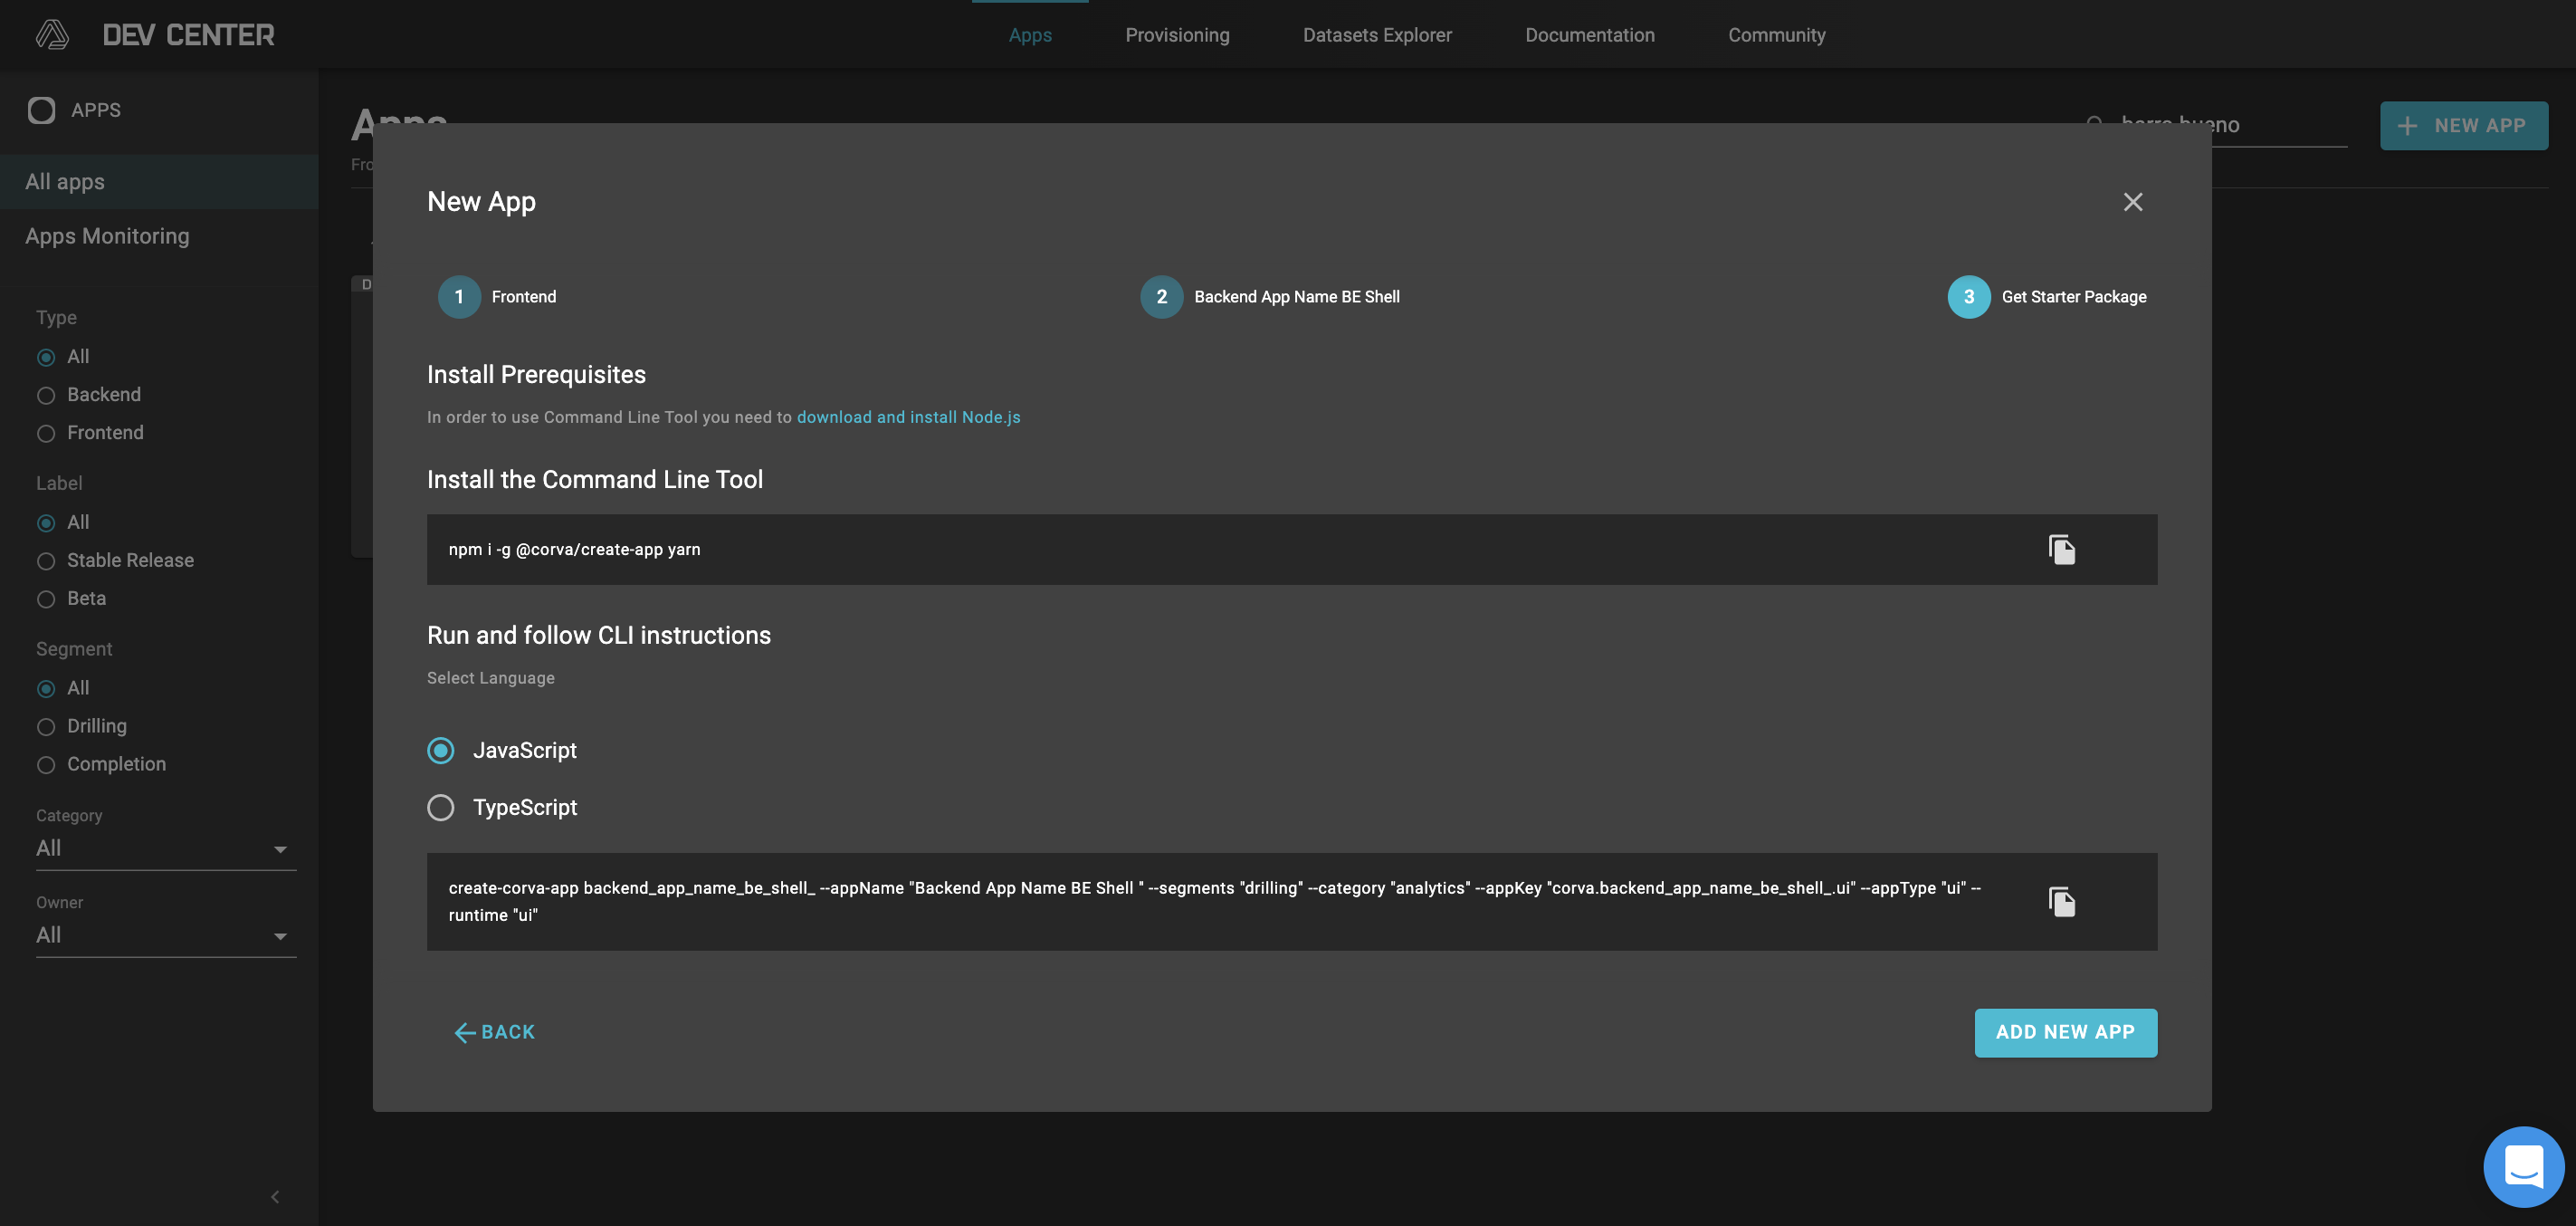
Go to your desired CLI editor and follow instruction on step 5. If npm is not up to date execute:
npm i -g @corva/create-app yarnPick javascript or typescript and copy command from step 5 to execute in CLI. Enter the directory for the app and execute:
yarn zip. This will create a zip package.

Go back to Corva App Creation wizard and select "ADD NEW APP" (complete step 5). You will be re-directed to App Info page in Dev Center.
Select Versions from left hand column.
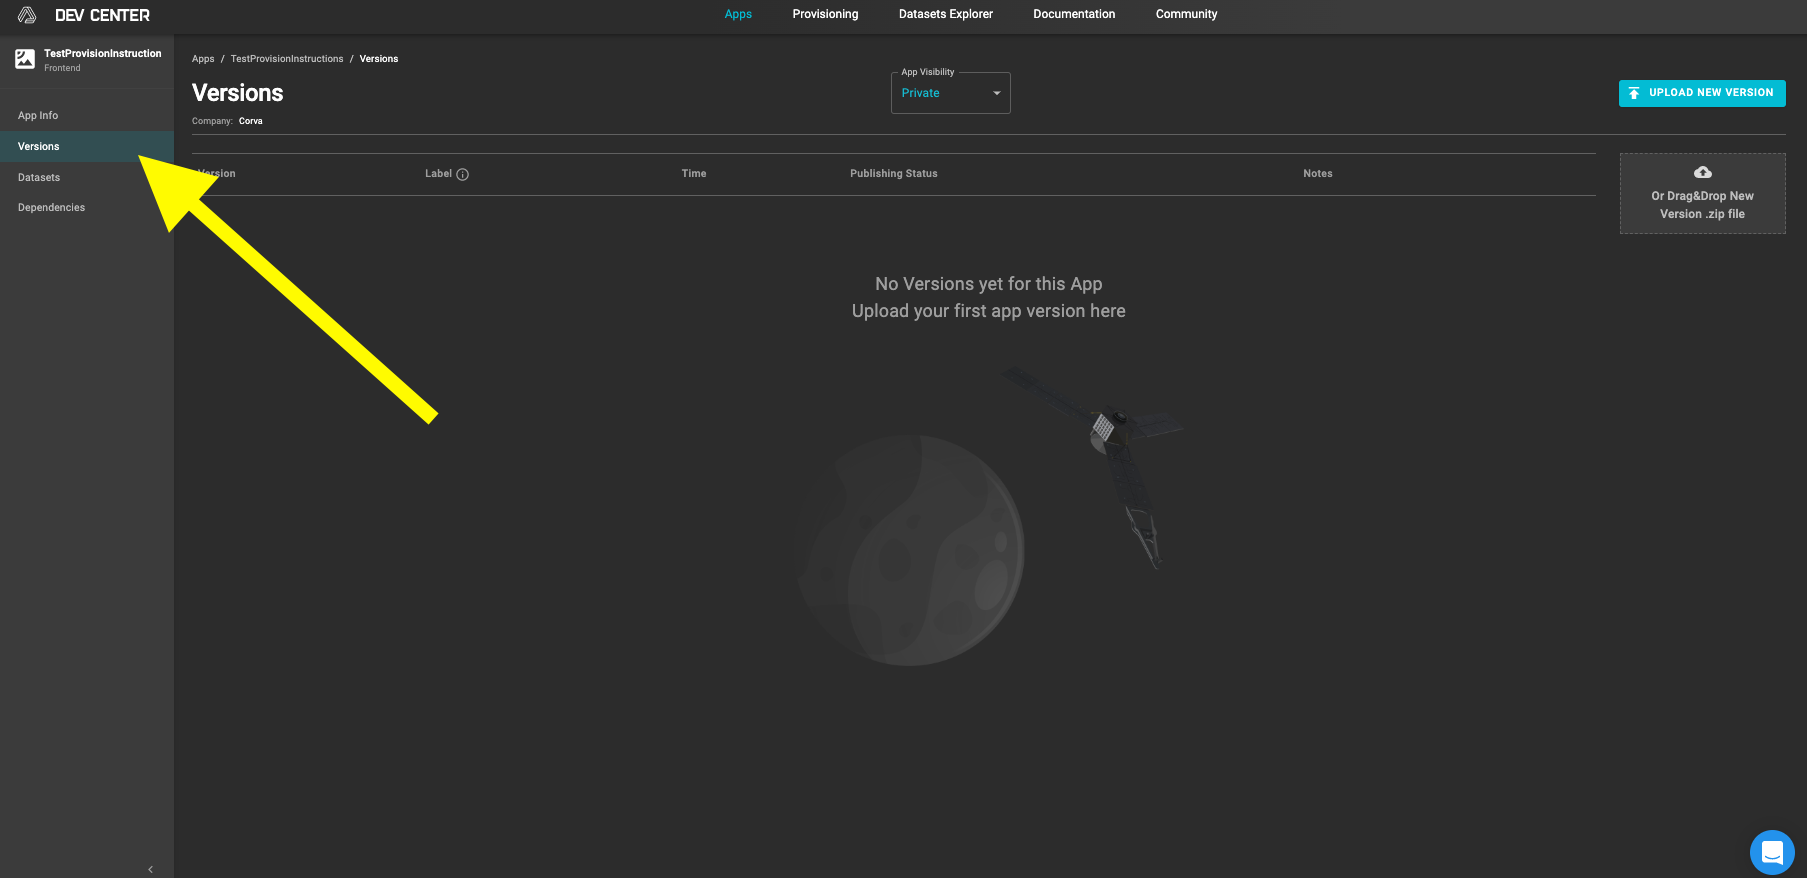
- Press UPLOAD NEW VERSION option on top right and select the zip created in step 6. Otherwise drag and driop the zip file into into the drag and drop window.
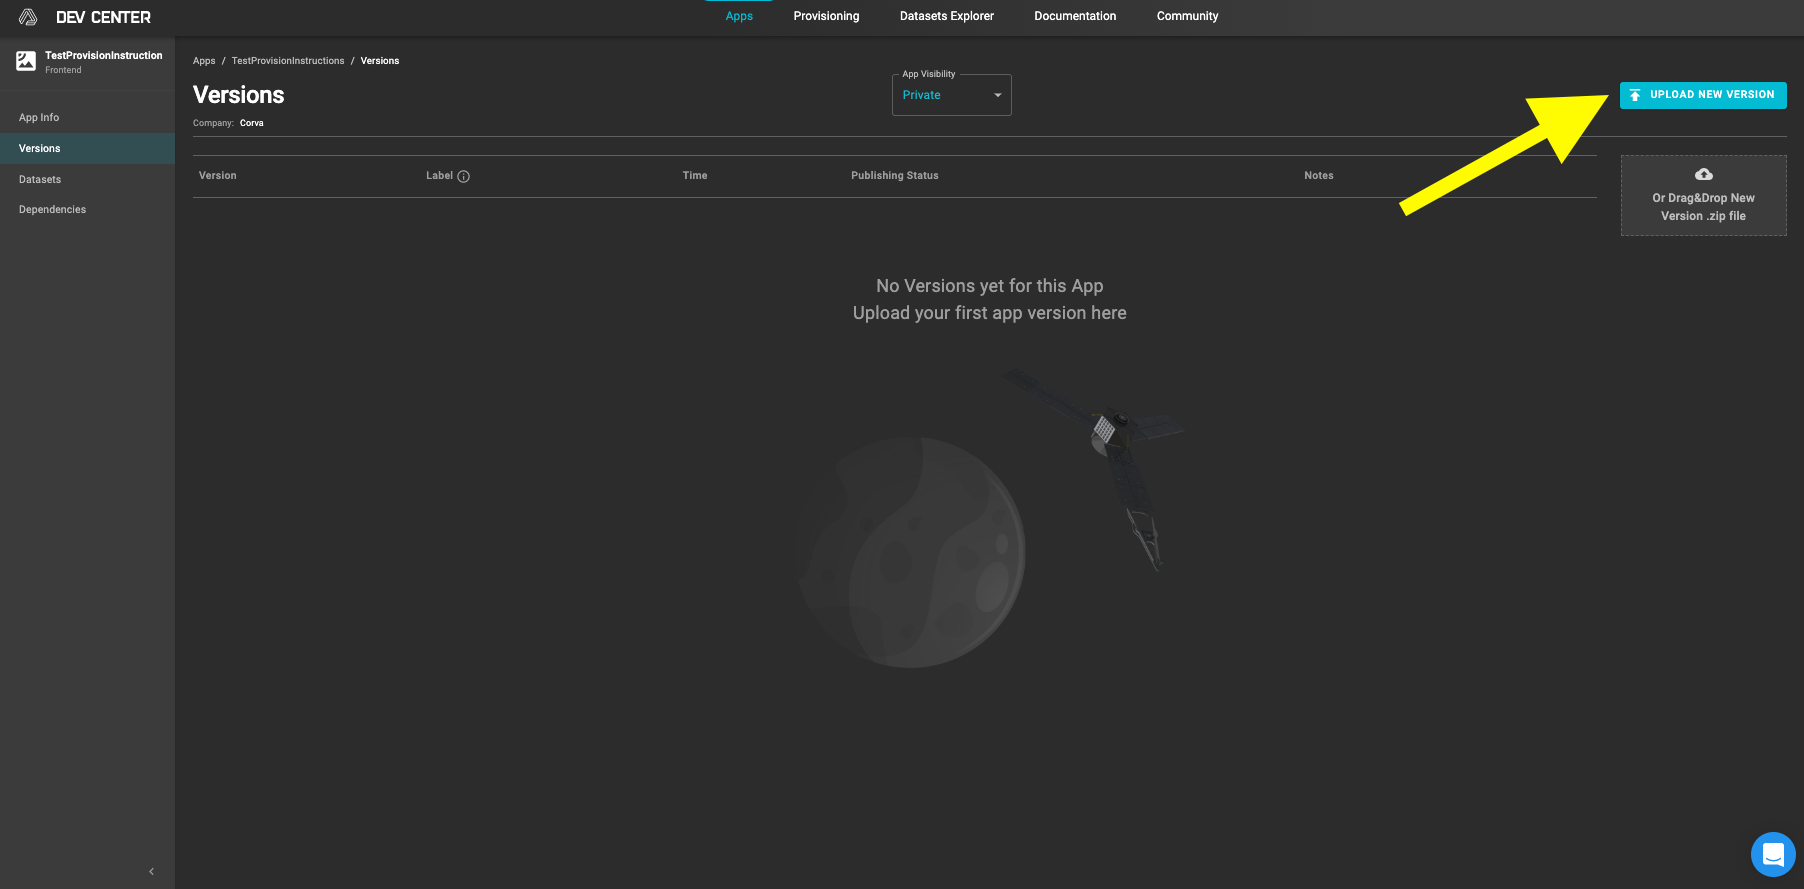
- Make sure visibility of the app is the same as backend app
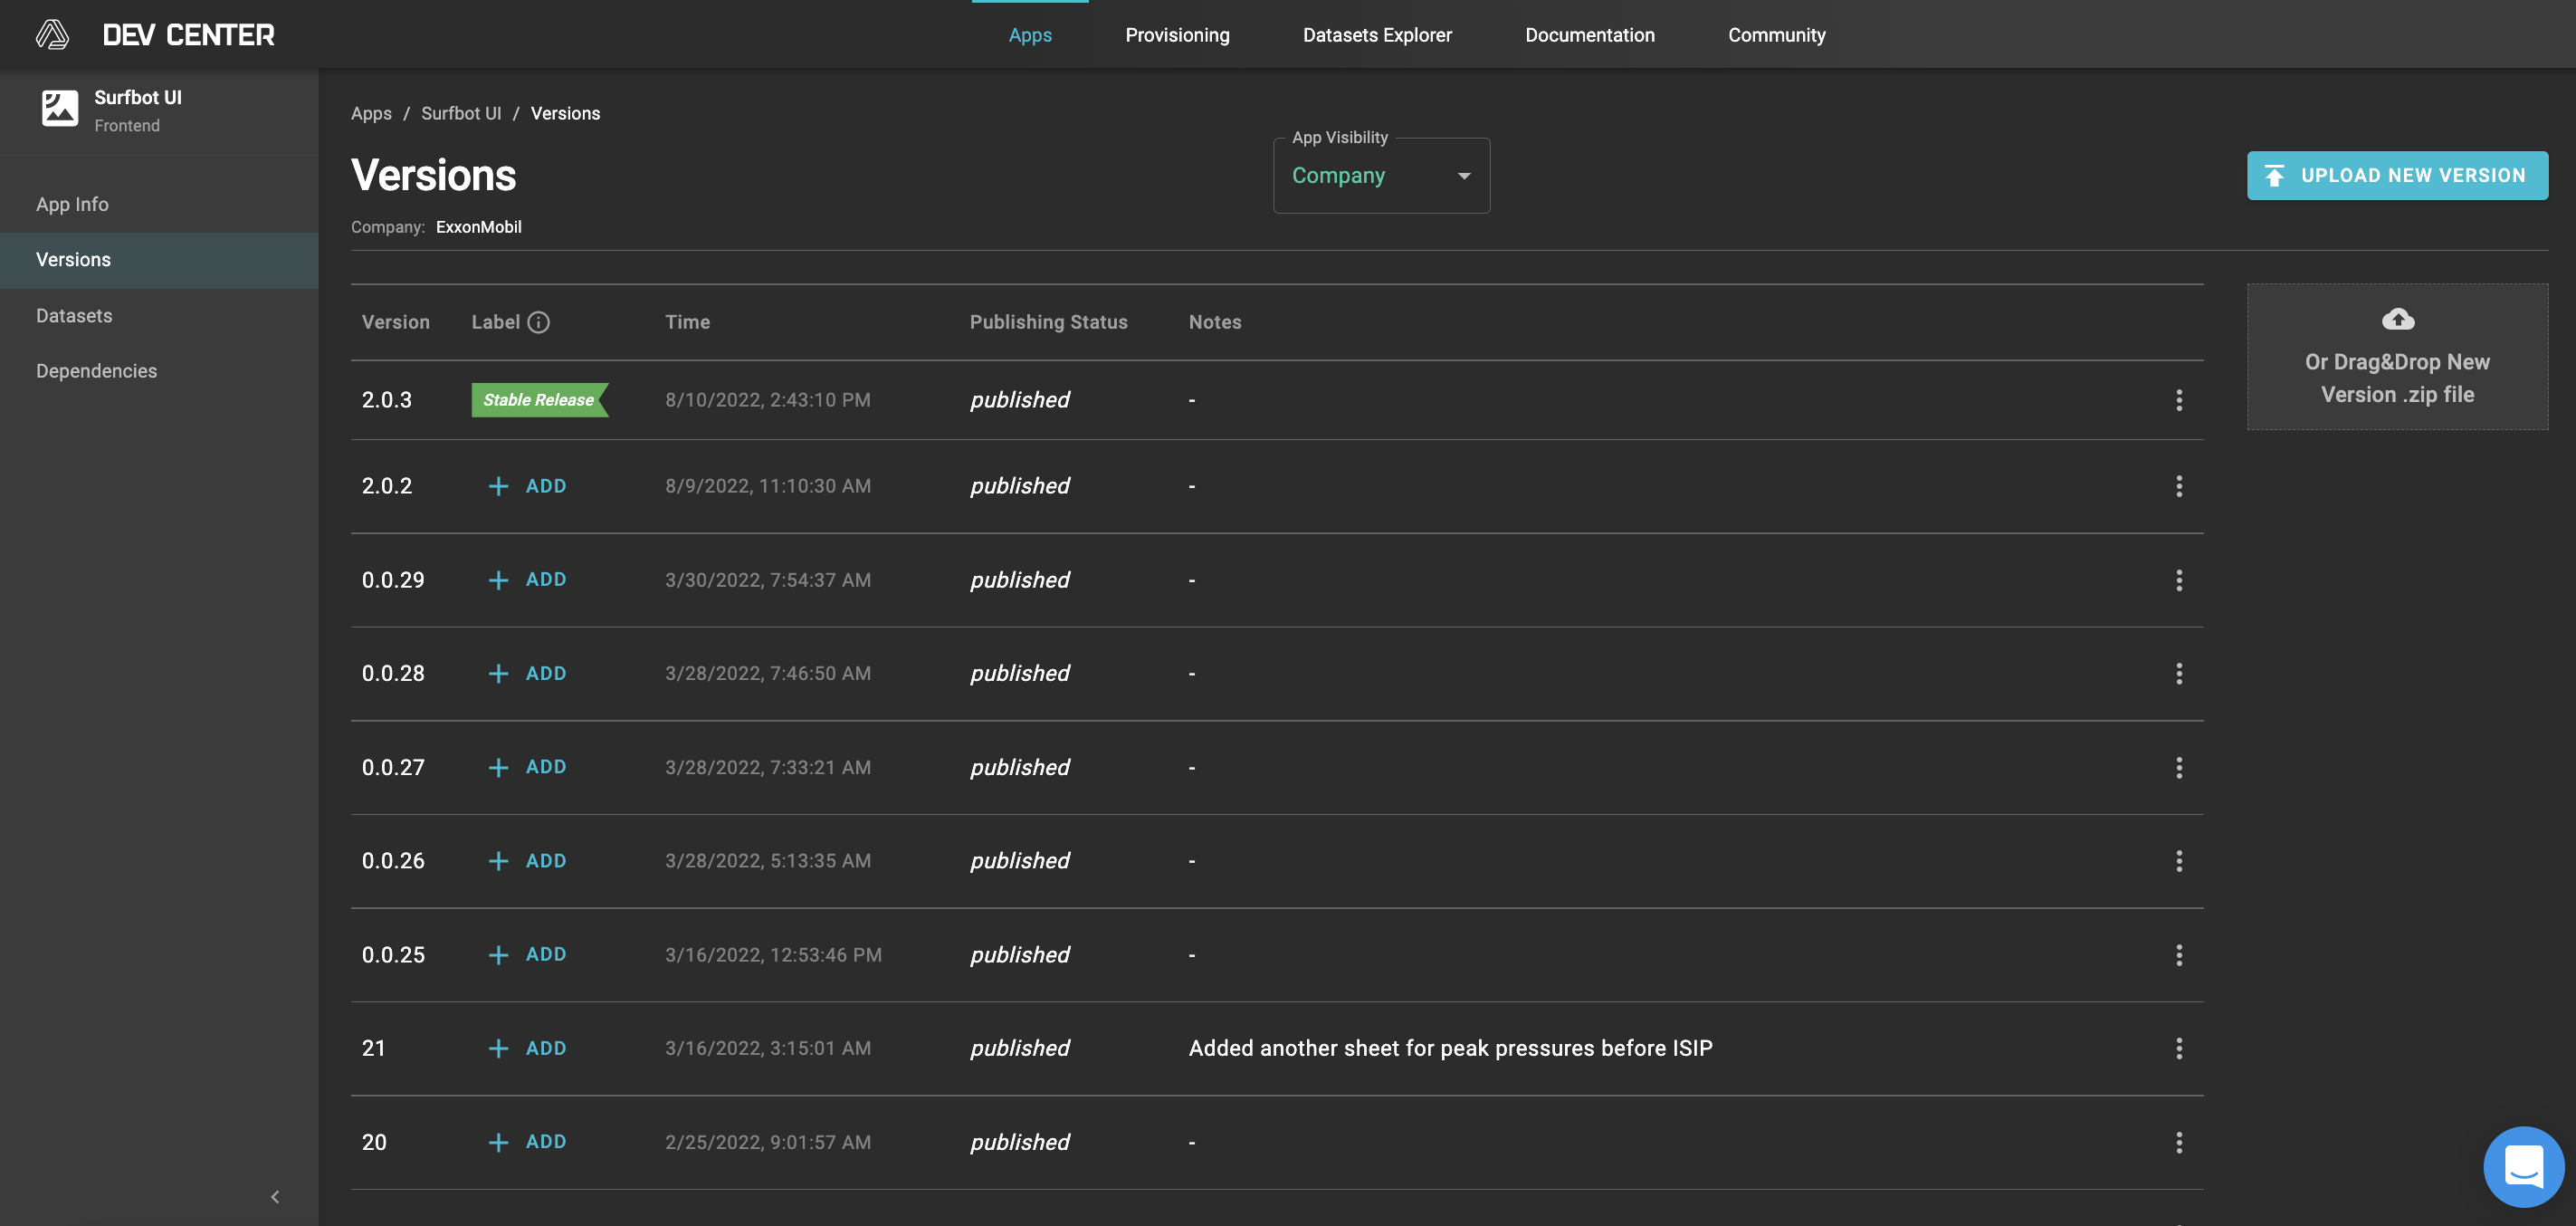
- Add Dependency following steps from “Backend Dependencies to a Frontend App” section above
- Add Provision for fronted app following steps in section “Creating App Provisioning” above